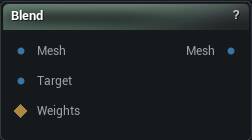
The Blend node
When to use it
The cheapest way to dial a shape halfway. It interpolates vertex positions between two meshes that share vertex count and order. Push Alpha past 1, or below 0, and you exaggerate or reverse the change instead.
Connect a WeightMap to make the blend local. Each vertex's effective alpha becomes Alpha * WeightMap[vertex], which is how you take a nose from one head and nothing else.
A vertex count mismatch blends unrelated vertices into a scrambled mesh rather than erroring somewhere you would see it.
If nothing seems to happen, check that the weight map is not all zero. A disconnected or wrongly sized map is the usual cause, not the alpha.
How to use it
- 1
Connect two meshes with matching topology
- 2
Adjust Alpha to control the blend amount
- 3
Optionally connect a WeightMap for per-vertex masking
- 4
The output is the interpolated mesh
Pins
| Pin | Type | Description |
|---|---|---|
Mesh |
Mesh | The shape you start from. Alpha 0 leaves it untouched. |
Target |
Mesh | The shape to move toward. Same vertex count and order as Mesh, or the node stops. |
WeightMap |
Weight Map | Optional mask. Nothing moves where the weight is 0, full blend where it is 1. |
| Pin | Type | Description |
|---|---|---|
Mesh |
Mesh | The blended shape. |
Settings
| Setting | Type | Description |
|---|---|---|
Alpha |
Number | How far to travel: 0 leaves the source shape alone, 1 lands exactly on the target. Negative values run the move backwards, pulling away from the target. |
Available in Mesh Morpher Graph and Mesh Morpher Studio.