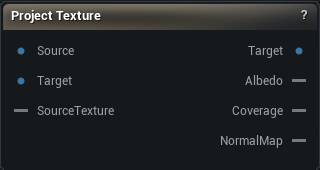
The Project Texture node
When to use it
Projects a scan's surface colour into a texture laid out on a clean mesh's UVs. This closes the scan loop, when a retopologised or wrapped mesh has good UVs and no albedo.
Detail from a sculpt is Bake Maps. Texture to texture with UDIM is Transfer Texture.
How it samples sets the quality ceiling. From a source texture or embedded materials it is real texture projection, limited by the source image's own resolution. From vertex colours it is interpolated between scan vertices, so a 500k photogrammetry scan into a 2k map is faithful while a 5k mesh into a 2k map is a smooth blur no matter how large you make the output. Result Summary says which path ran.
Coverage says which texels are real: white where colour was projected, mid-grey where the nearest-valid fill invented it, black where neither happened. Mark Unfilled Texels paints what could not be reached at all. Single UV tile only.
How to use it
- 1
Connect the scan to Mesh (labelled Source) and the retopologised mesh (with UVs) to Target - the house donor/recipient shape every transfer node in the app uses
- 2
Press Project Texture
- 3
Albedo carries the colour; Coverage says which texels are real
Pins
| Pin | Type | Description |
|---|---|---|
Mesh |
Mesh | The scan carrying the colour. It only needs UVs if that colour lives in a texture. |
Target |
Mesh | The clean mesh you want textured. It needs UVs. |
SourceTexture |
Asset | Optional colour map for the scan. Overrides whatever texture the scan arrived with. Its own sRGB setting is respected on the way in, but its alpha is not carried through to the Albedo. |
| Pin | Type | Description |
|---|---|---|
Target |
Mesh | The same mesh, untouched. Projecting never changes geometry. |
Albedo |
Asset | The projected colour, laid out in your target's UVs. It comes out as a colour texture (sRGB) and fully opaque - any see-through parts of the source are flattened out. |
Coverage |
Asset | Where the colour came from. White is real, taken straight off the scan. Mid-grey was filled in from neighbouring texels. Black got nothing. Use it as a mask when you paint over the invented parts. |
NormalMap |
Asset | The scan's fine detail as a normal map, when Also Project Normal Map is on. |
Settings
| Setting | Type | Description |
|---|---|---|
Color Source |
Choice | Where the colour is read from. Leave it on Auto unless the scan carries both a texture and vertex colours and you want the other one. |
Source UV Channel |
Whole number | Which UV channel the scan's texture is laid out in. Ignored when the colour comes from vertex colours. |
Resolution |
Choice | Size of every map this node produces. |
Samples Per Pixel |
Choice | How many samples land inside each texel. More samples means smoother edges and a longer run. |
Filter |
Choice | How the samples inside a texel get blended into the final pixel. |
Target UV Channel |
Whole number | Which UV channel on the target the colour is painted into. |
Also Project Normal Map |
True/False | Also produce a normal map of the scan's fine detail. It rides along on the same pass, so it costs far less than a separate Bake Maps run. |
| Setting | Type | Description |
|---|---|---|
Projection Distance (Cage Offset) |
Number | How far above the target surface each ray starts, in centimetres. It has to clear the widest gap between your retopo mesh and the scan. Too small and you get holes. Too large and rays pass clean through to the far side of the model and bring back the wrong colour, which is worse than a hole because nothing downstream can tell it is wrong. |
Fall Back To Nearest Point |
True/False | When a ray hits nothing, take the closest point on the scan instead, as long as it falls within Max Nearest Point Distance. Leave it on for production. It closes the small gaps a slightly tight projection distance leaves in creases and around the silhouette. Switch it off to see exactly where that distance is too tight, because those texels then show as holes on Coverage instead of being quietly rescued. |
Max Nearest Point Distance (cm) |
Number | How far the rescue may reach off the ray before the result stops counting as real data, in centimetres. Without a limit the rescue answers everything: a texel over a part of your mesh the scan never covered just takes the colour of the nearest scan geometry, however far away, and Coverage calls it real. The default of 1 cm is a third of the default projection distance, which is about right for closing the millimetre gaps between a retopo mesh and the scan it came from. Set it to 0 and only an exact ray hit counts. |
| Setting | Type | Description |
|---|---|---|
Fill Radius (texels) |
Whole number | How far, in texels, colour is smeared out of the regions that found the scan. Every empty texel takes the colour of the nearest projected one. That is right for the small holes you actually get in practice, UV seams and a few dropped samples, and it is a visible smear across anything large the scan never saw: under the chin, inside the nostrils, behind the ears. It also does the job of a bake gutter, so 0 leaves every UV island edge showing a seam once the texture is filtered. |
Mark Unfilled Texels |
True/False | Stamp the marker colour on any texel inside a UV island that got neither a projection nor a fill. Without it those texels come out black, which you cannot tell apart from a genuinely black surface. Turn it off only when something automated downstream is reading Coverage instead. |
Unfilled Marker Color |
Colour | Colour stamped on the texels that got nothing. Magenta by default, because the whole point is that it cannot be mistaken for skin. |
Learn more
| Texture transfer with Mesh Morpher Graph | Read the walkthrough on meshmorpher.com | https://meshmorpher.com/blog/texture-transfer-with-mesh-morpher-graph |
Available in Mesh Morpher Graph and Mesh Morpher Studio.