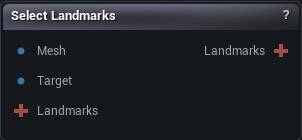
The Select Landmarks node
When to use it
Place and pair landmark correspondences by hand across a source and a target mesh, splines included for edges like a lip line or a jaw. Landmarks are the constraints Non-Rigid Fit and Elastic Conformer solve against, so this is where a wrap either becomes accurate or stays approximate.
On a head scan, run Auto Face Landmarks first and refine here rather than placing every point yourself. When both meshes have albedo and you want hundreds of pairs instead of dozens, Texture Flow Landmarks is the faster route in.
A spline is sampled into individual pairs, and Spline Segment Samples says how many. A dense spline is a strong constraint, so too many samples on a badly placed spline will fight the rest of the fit instead of helping it.
Pins
| Pin | Type | Description |
|---|---|---|
Mesh |
Mesh | The mesh shown in the left pane. Points you click get snapped onto its surface. |
Target |
Mesh | Optional. The mesh shown in the right pane, where you click the matching points. |
Landmarks |
Landmarks | Optional. A landmark set to start from - its points and splines come in as your editable selection so you can nudge, add or delete them instead of placing every one by hand. Wire Auto Face Landmarks here. Leave it unwired to start blank. |
| Pin | Type | Description |
|---|---|---|
Landmarks |
Landmarks | The paired points and splines, updated every time you place or move one. A point with no partner yet is held back until you pair it. |
Settings
| Setting | Type | Description |
|---|---|---|
Spline Segment Samples |
Whole number | How many points get generated between each pair of spline control points. Higher gives a smoother curve and more landmarks downstream. Splines you already finished keep the density they were drawn with. Each Select Landmarks node has its own setting. |
Available in Mesh Morpher Graph and Mesh Morpher Studio.