Meta Humans
How to Merge MetaHuman Body and Head DNA with Mesh Morpher Graph and Studio
By Admin ·
A MetaHuman arrives in two halves: a body DNA with its own skeleton, meshes and RBF correctives, and a head DNA carrying the face rig, the blendshapes and the expression logic. That split is fine until you want one rig you can pose, validate, edit and export as a single character. Merge DNA folds the two into one DNA. The video does it inside Mesh Morpher Graph; the same nodes run in Mesh Morpher Studio, and only the way DNA gets in and out of Unreal assets differs.
What we need
- Mesh Morpher Graph inside the Unreal Editor, or Mesh Morpher Studio on its own
- A body DNA and a head DNA from the same MetaHuman family - in Graph, read straight out of the two skeletal meshes; in Studio, as .dna files
- A few seconds of patience when the merge runs - it rebuilds the rig, it is not a preview
Load both DNAs
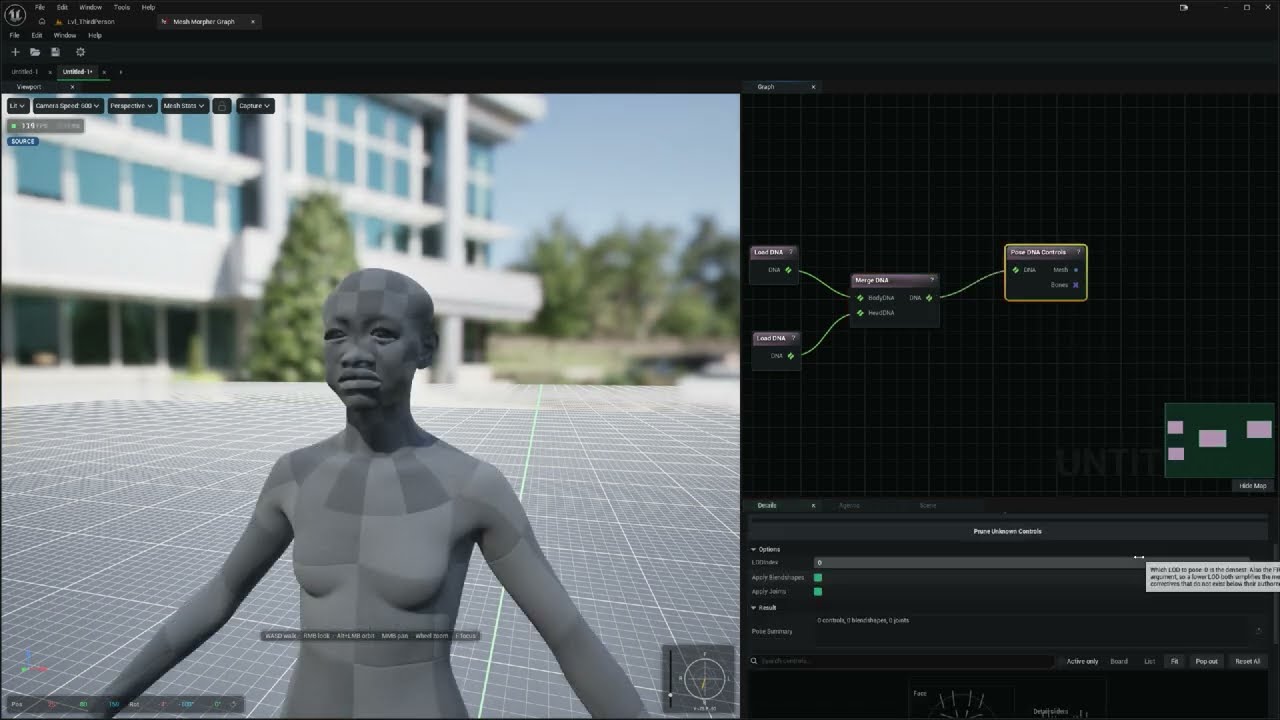
In Graph, drop two Load DNA nodes and pick the body skeletal mesh on one and the face skeletal mesh on the other. The node reads the DNA out of the asset the moment you pick it, and it handles both the newer MetaHuman Character storage and the older one, so you do not need to know which your character was built with.
In Studio there are no Unreal assets to read from, so Load DNA File takes their place: browse to the body .dna and the head .dna. Expect a short pause on a full MetaHuman; these files run to tens of megabytes.
Merge DNA
Wire the body into Body DNA and the head into Head DNA on a Merge DNA node. The order matters. The body is side A: its skeleton root, its placement in the world and its joint numbering are kept as they are. The head is side B: its face rig is appended, its joints are renumbered to follow the body's, and the joints both files declare by name - head, neck_01, neck_02 and the chain they hang off - are collapsed to a single entry each.
It helps to know what the merge is not. It is index-space concatenation, not a geometric re-fit: nothing is re-wrapped or re-projected, because a MetaHuman-family pair is already authored pre-aligned in one world space. If the two halves do not line up, the node says so rather than guessing.
Before you press anything, look at the details panel. Report and Shared Joints refresh on every pin change: the report lists each remap decision or refusal reason in the order the merge would make them, and Shared Joints lists the joints found in both inputs, in body order. Read them, then press Merge Now. The merge is a button rather than something that re-runs as you tweak settings, because it rebuilds the rig from scratch every time. If a precondition fails, the DNA output stays empty - never a half-merged file - and Report says exactly why.
Settings worth knowing
- Descriptor Source picks which input's descriptor the merged file inherits. Head by default, since the head DNA carries a MetaHuman's identity.
- LOD Mapping is one row per output LOD, pairing a body LOD with a head LOD. It fills itself in proportionally once both DNAs are wired; edit a row to override it, and Reset LOD Mapping puts the proportional table back.
- Shared Joint Tolerance (centimetres) and Shared Joint Rotation Tolerance (degrees) say how far a shared joint may differ between the two files before the Anchor Mismatch Policy steps in. The default, Reseat Head, rigidly moves the whole head - mesh, normals and blendshape deltas - onto the body's placement and recomputes the boundary joints' neutrals. Refuse stops the merge; Ignore merges the mismatch through untouched. Either way, Report names the joint and the deviation.
- Allow Unknown Layer Loss is off by default: a DNA section this build does not model would be left pointing at the old index space, so the node refuses rather than carry it through. Turn it on to proceed and drop that section.
Check the result before exporting
The merged DNA behaves like any other DNA on the wire, which is the easiest way to prove the merge worked. In the video the output goes into Pose DNA Controls: move a few face controls on the board in the details panel, and the complete character - body and head together - reposes through the DNA's own RigLogic rig, blendshapes and joints included.
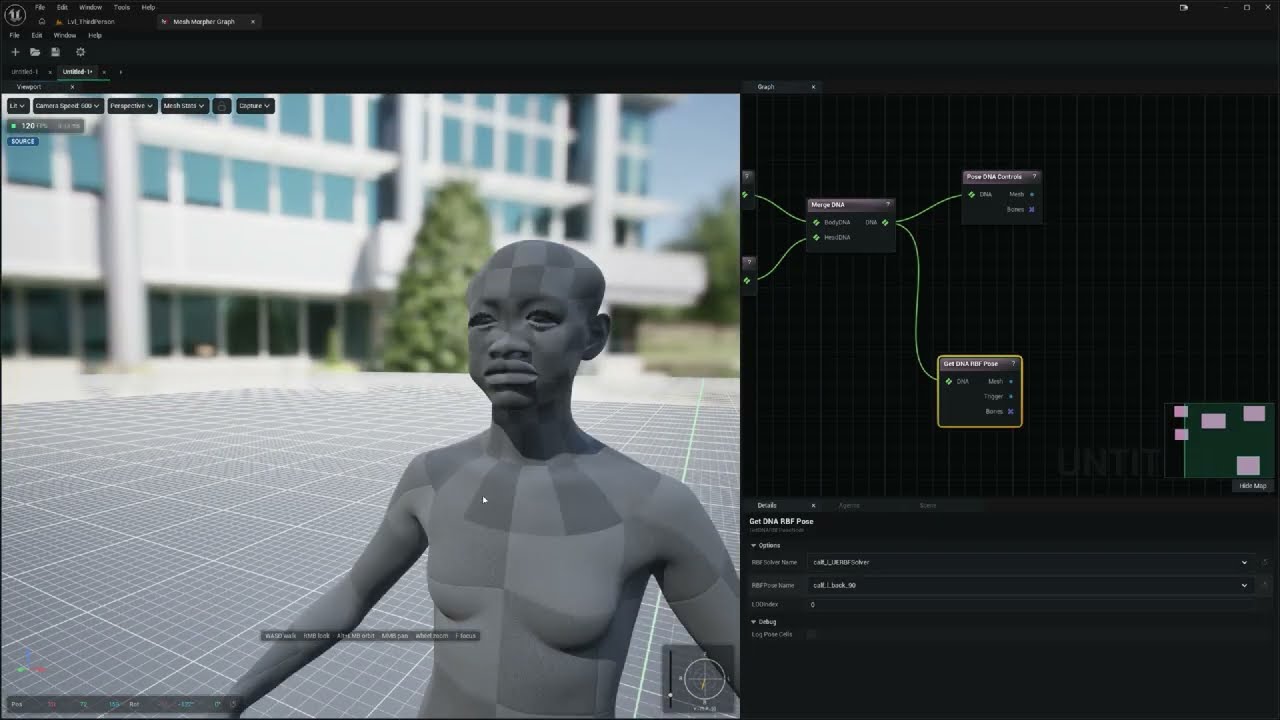
Then the same DNA goes into Get DNA RBF Pose with a body solver selected - calf_l_UERBFSolver and its calf_l_back_90 pose in the video - and the leg corrective fires on the merged rig. A face control and a body corrective evaluated from the same DNA is exactly the outcome you were after.
For a structural check, put a Validate DNA node in the chain. It passes the DNA through untouched, lists any findings worst first, and publishes Is Sound with joint, mesh and LOD counts on its pins; those counts should match what Merge DNA shows in its own details panel.
Get it out
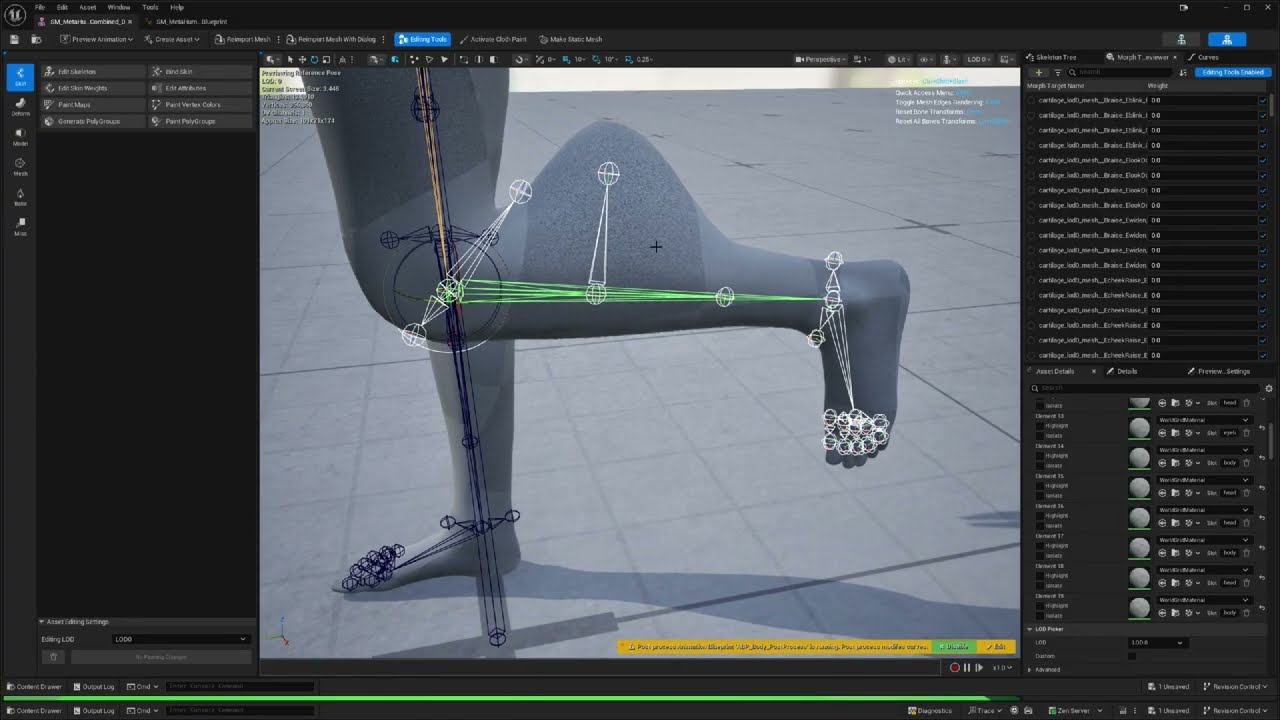
In Graph, Export DNA To Skeletal Mesh turns the merged DNA into a fully set-up skeletal mesh asset: joints, base mesh, skin weights, morph targets, plus the archetype's physics, LOD settings and post-process animation blueprint. Set its Type to Combined; the option exists precisely for a Merge DNA output, and the wrong type reaches for the wrong archetype skeleton. That is the asset open in the Skeletal Mesh editor at the end of the video, with the head's morph targets listed on the combined mesh and the body's bones drawn on the posed leg.
To write the DNA into a skeletal mesh you already have, Set DNA On Skeletal Mesh replaces whatever DNA the asset carried. Both nodes edit project assets, so they are editor-only. In Studio - and in Graph, whenever you want a file - Write DNA saves the merged DNA as a .dna that Unreal Engine, Maya or Houdini will load like any other. Put Validate DNA in front of it when the file is going to someone else.
Practical tips
- Body into Body DNA, head into Head DNA. The body is the side whose skeleton root and placement win, so a swapped pair gives you a rig hung off the face.
- Read Report before Merge Now. The preflight already knows about descriptor differences, unknown layers and drifting shared joints.
- A shared joint outside tolerance is information, not a failure. Reseat Head absorbs a pair exported from slightly different placements; switch to Refuse only when a pipeline should stop loudly.
- Export as Combined, and validate before you write. The wrong Type on export and a skipped Validate DNA are the two ways a good merge turns into an unusable asset.
Conclusion
Two Load DNA nodes (or two Load DNA File nodes), one Merge DNA, a press of Merge Now, and a MetaHuman body and head live in a single DNA with one skeleton. Pose it, fire its correctives, validate it, then export it as a combined skeletal mesh or write it to a .dna file. Everything in the video runs in Mesh Morpher Graph inside Unreal Engine and, apart from reading and writing Unreal assets, in the standalone Mesh Morpher Studio app.
Related reading: modifying MetaHuman RBF poses, creating a DNA asset for any skeletal mesh, and how Mesh Morpher compares to other DNA editors.
#metahuman#dna#merge#graph#studio#tutorial#unreal-engine
Related posts
- How to Edit MetaHuman DNA PSDs to Fix a Mix of Expressions
- How to Create MetaHuman DNA Expressions from Scratch with Mesh Morpher Graph and Studio
- How to Modify MetaHuman DNA RBF Poses with Mesh Morpher Classic
- How to Modify MetaHuman RBF Poses with Mesh Morpher Graph and Mesh Morpher Studio
Looking for reference material? Read the Mesh Morpher documentation or see pricing & licenses.