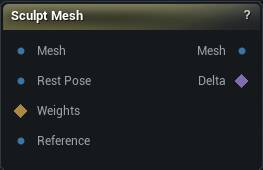
Sculpt Mesh: Sculpt the mesh by hand. Pick a brush from the side panel, work in the viewport, then press Accept to get the sculpted mesh and a record of everything you moved.
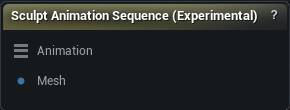
Sculpt Animation Sequence (Experimental): Scrub to a frame where the animation goes wrong, sculpt the fix on the posed mesh, and bake it back into the sequence as a morph target that fires on exactly those frames.
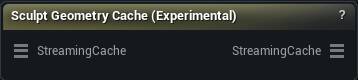
Sculpt Geometry Cache (Experimental): Scrub to a frame of a cached animation, sculpt the fix straight onto the deformed mesh, and bake it back into the cache. Experimental.
Studio and Graph › Sculpt
Sculpt Mesh
Sculpt a mesh by hand in the viewport. Select the node and the brushes appear; deselect it and they go away.
The Sculpt Mesh node
When to use it
Sculpt a mesh by hand in the viewport. Select the node and the brushes appear; deselect it and they go away.
Wire the unsculpted mesh into Original as well. That is what the Restore brush paints back toward, and what Delta is measured against.
How to use it
1
Wire a mesh into Mesh and select the node
2
Pick a brush from the side panel and work in the viewport
3
Press Accept
Mesh carries the result; Delta carries what you moved.
Pins
Pin
Type
Description
Mesh
Mesh
The mesh you want to sculpt on.
Original
Mesh
The same mesh before you sculpted it. Delta is measured against this, and the Restore brush paints back toward it.
Weights
Weight Map
Where the brushes are allowed to bite: 1 is full strength, 0 is frozen, in between feathers. Leave it unconnected to sculpt the whole mesh.
Reference
Mesh
The surface the Project brush pushes vertices onto. The other brushes ignore it.
Pin
Type
Description
Mesh
Mesh
The sculpted mesh, once you press Accept.
Delta
Deltas
How far each vertex moved from the original. Feed it to Apply Deltas to put the same change on a different mesh.
Editor-only node. Runs only in Mesh Morpher Graph inside the Unreal Editor, because it reads or writes Unreal Engine assets. Not available in the standalone Mesh Morpher Studio app.
Editor-only node. Runs only in Mesh Morpher Graph inside the Unreal Editor, because it reads or writes Unreal Engine assets. Not available in the standalone Mesh Morpher Studio app.
The Sculpt Animation Sequence (Experimental) node
When to use it
Sculpt corrective shapes directly on a playing animation, frame by frame, then bake them into the sequence as animation-driven morph targets. Editor only.
How to use it
1
Connect an Animation input (from a Load Animation node) and a rest-pose mesh that comes from skeletal mesh import data
2
Select the node, pick a frame range, sculpt, Accept
3
Click Save to bake morph targets into the sequence
Pins
Pin
Type
Description
Animation
Animation
The animation to sculpt on, from a Load Animation node. This is also the sequence Save writes the morph curves into.
Mesh
Mesh
The rest-pose mesh. It has to come from a skeletal mesh import, because that is the asset the baked morph targets land on.
Settings
Setting
Type
Description
Capture Baseline From GPU
True/False
Take the posed shape from what the renderer actually draws, so anything a post-process Anim Blueprint, a deformer graph or a morph curve adds is already in the mesh you sculpt on. Needs a live sequence on the Animation input. Turn it off to pose from the raw keyframes instead: exact and instant, but blind to everything those three add.
Name
Text
What the morph targets get called. They come out numbered from this, one per processed frame, so keep it short and recognisable in the asset.
Apply To LODs
True/False
Push the shapes down onto the lower LODs too, so they do not pop away as the character gets further from camera.
LOD Vertex Threshold
Number
Same distance rule as the main projection, but for landing the shape on the lower LODs.
LOD Smooth Type
Choice
How the shape gets smoothed on the lower LODs.
LOD Smooth Strength
Number
How hard each LOD smoothing pass pulls. Does nothing while LOD Smooth Iterations is 0.
LOD Smooth Iterations
Whole number
How many smoothing passes to run on the lower LODs. Coarse LODs usually need a pass or two where LOD0 needs none.
Use Dual Quaternion Skinning
True/False
Dual quaternion skinning instead of linear blend. Keeps volume on a twisted forearm or wrist, where linear blend pinches the mesh into a candy wrapper.
Use Linear Interpolation
True/False
Ramp each morph target's weight in and out with linear keys instead of switching it on and off at full strength. Off, the correction pops the frame it starts on.
Transition Frames
Whole number
How many frames that ramp takes at each end. 1 fades in over a single frame; raise it for a softer hand-off on a slow take. Only read when Use Linear Interpolation is on.
Fade In Frames
Whole number
Frames at the start of the selected range over which the correction ramps up from nothing. 0 makes it pop on fully at the first frame.
Fade Out Frames
Whole number
Frames at the end of the selected range over which the correction ramps back down to nothing. 0 makes it cut off at the last frame.
Sculpts a fix onto one frame of an Alembic or USD cache and bakes it back into the cache, spread across a frame range you choose.
The Sculpt Geometry Cache (Experimental) node
When to use it
Sculpts a fix onto one frame of an Alembic or USD cache and bakes it back into the cache, spread across a frame range you choose.
A cache has no rig to correct through: it is baked geometry, and whatever went wrong in it went wrong for good. This is the way to fix it anyway - scrub to the bad frame, push the surface back where it belongs, and let the correction ride along on the frames either side.
Frames stream off disk as you scrub, so a long cache never has to fit in memory. Still experimental.
How to use it
1
Wire a cache into Streaming Cache and select the node
2
Scrub to the bad frame, pick a frame range, sculpt, press Accept
3
Set the fades so the correction ramps in and out instead of popping
Pins
Pin
Type
Description
StreamingCache
Streaming Geometry Cache
The Alembic or USD cache to sculpt on. Frames load off disk as you scrub, so the whole animation never has to fit in memory.
Pin
Type
Description
StreamingCache
Streaming Geometry Cache
The same cache with your sculpt baked in. Get Frame and the export nodes pick it up on their own.
Settings
Setting
Type
Description
Fade In Frames
Whole number
Frames at the start of the selected range over which the sculpt ramps up from nothing. 0 makes it pop on fully at the first frame.
Fade Out Frames
Whole number
Frames at the end of the selected range over which the sculpt ramps back down to nothing. 0 makes it cut off at the last frame.
Rotate Deltas
True/False
Turn each sculpted offset with the surface as it moves through the range. Off, a bump you sculpted on a straight arm keeps pointing the same way in space and slides off the arm the moment it bends.
Smoothing Iterations
Whole number
How much the surface is smoothed before it works out which way each vertex has turned. More passes give a steadier answer where the mesh folds hard, which is exactly where a sculpt otherwise starts to swim. 10 to 40 is the usual range, and 0 turns it off.
Num Rings
Whole number
How far out from each vertex that turn is measured, in rings of neighbours. 1 uses only the vertices touching it, 2 also uses their neighbours, and so on. A wider ring gives a steadier answer on a dense mesh.
Smoothing Strength
Number
How far each smoothing pass moves a vertex toward its neighbours. Higher settles faster and keeps less fine detail. It stops at 0.5, and that ceiling is not arbitrary: past roughly 0.72 the smoothing starts amplifying exactly the wobble it is meant to remove, and the iteration count turns that into a mesh full of invalid positions. A saved file carrying a bigger number is pulled back into range when it loads.