Studio and Graph › Weight Map
Apply Weight Map
Blends two versions of the same mesh vertex by vertex, with a weight map deciding how far each vertex travels between them. Where the weight is 0 the vertex stays exactly where Mesh put it; where i...
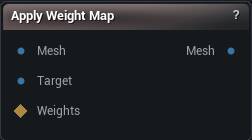
The Apply Weight Map node
When to use it
Blends two versions of the same mesh vertex by vertex, with a weight map deciding how far each vertex travels between them. Where the weight is 0 the vertex stays exactly where Mesh put it; where it is 1 it lands exactly where Target has it; in between it slides along the straight line joining the two.
That makes it the universal way to make any deformation partial. Run whatever operation you like at full strength, feed the before into Mesh and the after into Target, and the weight map decides which parts of the model actually receive it. No operation needs its own masking option, because this one node masks all of them.
Both meshes have to have the same vertex count, in the same order. They will, as long as Target came from Mesh through operations that deform rather than retopologise. Anything that adds, removes or reorders vertices in between breaks the correspondence, and the pairing is by index, so the result is scrambled rather than refused.
How to use it
- 1
Wire the original mesh into Mesh
- 2
Wire the deformed version into Target
- 3
Wire a weight map in, or paint one with Paint Weight Map
- 4
The output updates as soon as any of the three changes
Pins
| Pin | Type | Description |
|---|---|---|
Mesh |
Mesh | What you get where the weight is 0. Usually the mesh before the change. |
Target |
Mesh | What you get where the weight is 1. Needs the same vertex count and order as Mesh. |
WeightMap |
Weight Map | How far each vertex travels from Mesh toward Target. Leave it unwired and you get Mesh straight back. |
| Pin | Type | Description |
|---|---|---|
Mesh |
Mesh | Mesh pulled toward Target by the weights. |
Settings
| Setting | Type | Description |
|---|---|---|
Strength |
Number | Multiplies the whole weight map before blending. Push it above 1 to drive soft areas up to full effect; the result still stops at Target and never overshoots it. |
Invert Weight Map |
True/False | Flips the map before Strength is applied, so the area a mask was protecting becomes the only part that moves. |
Available in Mesh Morpher Graph and Mesh Morpher Studio.