Studio and Graph › Texture
Bake Maps
Projects a dense sculpt (High Poly) onto a game-resolution mesh through that mesh's UVs and produces tangent-space normal, ambient occlusion, curvature, height, position and material-ID textures, e...
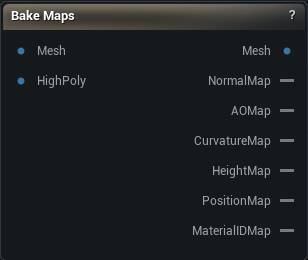
The Bake Maps node
When to use it
Projects a dense sculpt (High Poly) onto a game-resolution mesh through that mesh's UVs and produces tangent-space normal, ambient occlusion, curvature, height, position and material-ID textures, each on its own output.
How to use it
- 1
Connect the low-poly (with UVs) to Mesh and the sculpt to High Poly
- 2
Tick the maps you want, set the resolution and the projection distance
- 3
Press Bake Maps - each map appears on its own texture output pin
Pins
| Pin | Type | Description |
|---|---|---|
Mesh |
Mesh | The game-res mesh the maps are baked into. It needs UVs. |
HighPoly |
Mesh | The sculpt or scan carrying the detail. Leave it empty to bake the low-poly against itself. |
| Pin | Type | Description |
|---|---|---|
Mesh |
Mesh | The same low-poly, untouched. Baking never changes geometry. |
NormalMap |
Asset | The high poly's surface detail as a tangent-space normal map. |
AOMap |
Asset | Ambient occlusion, traced against the high poly. |
CurvatureMap |
Asset | How sharply the high poly bends. Feed it to a cavity or edge-wear mask. |
HeightMap |
Asset | How far the high poly floats above or sinks below the low-poly surface. |
PositionMap |
Asset | Where each point sits inside the high poly's bounding box, written as colour. |
MaterialIDMap |
Asset | A flat colour for each material ID on the high poly. |
Settings
| Setting | Type | Description |
|---|---|---|
Normal (Tangent Space) |
True/False | The normal map. If your low-poly has no tangents, they get worked out from its normals and UVs just for the bake; the mesh itself is left alone. Green reads above mid-grey where the high poly tilts towards increasing V, and red above mid-grey where it tilts towards increasing U. That is the same basis the engine's own bakers use and the same one the MikkTSpace tangents on import produce, so a map baked here shades correctly in the viewport as-is. Anything downstream that expects the opposite green direction needs that channel inverted on the way out. |
Ambient Occlusion |
True/False | Ambient occlusion, traced against the high poly. Much the slowest map here: it fires Occlusion Rays rays for every sample in every texel. |
Bake Curvature |
True/False | How sharply the high poly bends. This is what you feed a cavity or edge-wear mask. |
Height / Displacement |
True/False | How far the high poly floats above or sinks below the low-poly surface, remapped into the Inner and Outer range below. Also called displacement. |
Position (Object Space) |
True/False | Where each point sits inside the high poly's bounding box, written out as colour. |
Material ID |
True/False | A flat colour per material ID on the high poly. Handy as an ID mask when you assign materials later. |
Resolution |
Choice | Size of every map this run produces. |
Samples Per Pixel |
Choice | How many samples land inside each texel. More samples means smoother edges and a longer bake. |
Filter |
Choice | How the samples inside a texel get blended into the final pixel. |
Gutter Size |
Whole number | How many texels of bleed get painted outside each UV island. Set it to 0 and every seam shows a dark hairline as soon as the texture is filtered or mipped. |
Target UV Channel |
Whole number | Which UV channel on the low-poly the maps are laid out in. |
Projection Distance (Cage Offset) |
Number | How far above the low-poly surface each ray starts, in centimetres. It has to clear the widest gap between the two meshes. Too small and raised detail goes missing. Too large and rays shoot right through the model and pick up whatever is behind it, so the inside of an arm bakes the ribcage. There is no separate cage mesh to edit. Every ray starts this same distance out along the surface normal, so one number covers the whole model: where the gap varies a lot, set it by the widest part and expect skewed detail where the two meshes lean apart the most. |
Fall Back To Nearest Point |
True/False | When a ray hits nothing, take the closest point on the high poly instead of leaving the texel blank. On, a texel that missed takes the nearest high-poly point within the projection distance, in whatever direction that happens to be. It closes the small gaps a slightly tight distance leaves behind, and it can also quietly pull colour and detail in from the side. Off, only detail found along the ray counts. Anything the rays did not reach stays at the flat neutral value, so you can see exactly where your projection distance is too tight instead of getting a plausible answer from somewhere else. |
Occlusion Rays |
Whole number | Rays fired per sample. Cutting the grain in half costs four times as many rays, so this is where the bake time goes. |
Occlusion Max Distance |
Number | Anything further away than this stops casting shadow, in centimetres. 0 means no limit. Set a small value and you get contact shadows in the creases instead of the whole model darkening itself. |
Occlusion Spread Angle |
Number | How wide the rays fan out from the surface, in degrees. 180 is the full hemisphere. |
Occlusion Bias Angle |
Number | Rays that leave within this angle of the surface get thrown away. Drop it to 0 and a dense sculpt starts shadowing itself, so the map comes back speckled and dirty. |
Curvature Type |
Choice | Which measure of bending gets written into the map. |
Color Mapping |
Choice | How cavities and raised edges are turned into colours. |
Clamping |
Choice | Keep only the raised edges, only the cavities, or both. |
Color Range Multiplier |
Number | Scales the contrast range the node works out for itself. Above 1 flattens the map, below 1 pushes it harder. |
Min Range Multiplier |
Number | Anything weaker than this fraction of the range is flattened to neutral. Raise it to kill the fine speckle a scan leaves behind. |
Height Range Mode |
Choice | Whether the two distances below are read as centimetres or as a fraction of the mesh's size. |
Inner Distance |
Number | How far below the low-poly surface counts as black. Keep it negative. |
Outer Distance |
Number | How far above the low-poly surface counts as white. Keep it positive. |
Learn more
| Texture transfer with Mesh Morpher Graph | Read the walkthrough on meshmorpher.com | https://meshmorpher.com/blog/texture-transfer-with-mesh-morpher-graph |
Available in Mesh Morpher Graph and Mesh Morpher Studio.