Studio and Graph › Selection
Auto Face Landmarks
Places all 478 MediaPipe facial landmarks on a head scan without you clicking them on by hand.
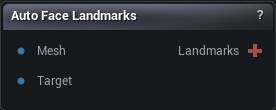
The Auto Face Landmarks node
When to use it
Places all 478 MediaPipe facial landmarks on a head scan without you clicking them on by hand.
It needs the Face Landmarks model pack to run at all, and without it the node reports the missing pack and does nothing. It also needs the mesh to carry colour or texture detail: MediaPipe reads a rendered image of the head, and a bare grey scan is refused outright rather than guessed at.
With nothing wired into Target, it places all 478 points on Mesh alone, each one paired with itself: save that set with Save Landmarks, or load it into Select Landmarks to refine by hand. Wire a second head into Target and it detects independently on both meshes, then pairs every point that landed on both sides into a source-to-target correspondence, ready to drive Non-Rigid Fit or Elastic Conformer with nothing hand-placed on either side.
For a correspondence that lives in a mole or a printed seam rather than a standard face point, Texture Flow Landmarks is still the better start.
How to use it
- 1
Wire the scan into Mesh
Check that Up Axis and Front Axis match how the scan is actually sitting. The defaults are the app's own, front +Y, up +Z.
- 2
Press Detect Landmarks
Read LastRun and Detector Used.
- 3
For a full correspondence, also wire a second head into Target, then press again
- 4
Send the Landmarks output into Non-Rigid Fit or Elastic Conformer, or into Select Landmarks to nudge any of them by hand. Needs the Face Landmarks model pack (Help > AI Model Packs). There is no geometry-only fallback: without the pack this node cannot run at all
Pins
| Pin | Type | Description |
|---|---|---|
Mesh |
Mesh | The head scan to place landmarks on. |
Target |
Mesh | Optional. A second head to pair every landmark against. Wire this to get a proper source-to-target correspondence instead of a self-paired set. |
| Pin | Type | Description |
|---|---|---|
Landmarks |
Landmarks | The landmarks that were placed. With no Target wired in, each pair's two sides are the same point, since there is only one mesh. With a Target, the Mesh side is the source and the Target side is where it lands, which is what Non-Rigid Fit and Elastic Conformer want. |
Settings
| Setting | Type | Description |
|---|---|---|
Up Axis |
Choice | Which world axis points from the chin to the crown. |
Front Axis |
Choice | Which world axis the face looks along. The app's own convention is +Y, which with Up +Z puts the subject's left at -X. |
ML Albedo Source |
Choice | Which colour MediaPipe reads the mesh through. Same source Texture Flow Landmarks resolves from. |
ML Render Resolution |
Whole number | How big the internal render MediaPipe reads is. A landmark can only land as precisely as one pixel is wide on the model. |
ML Min Detection Score |
Number | MediaPipe's own detector confidence floor. Below this the rendered view is treated as having found no face at all. |
Available in Mesh Morpher Graph and Mesh Morpher Studio.