Classic
Editor
106 pages in this section.
Mesh Morpher documentation
Classic
106 pages in this section.
Classic › Editor
Classic › Editor › UI
Classic › Editor › UI
Classic › Editor › UI
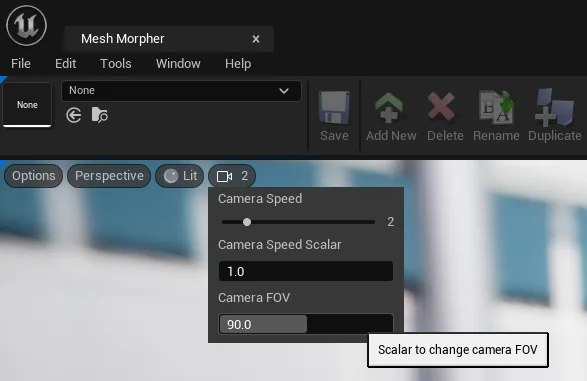
Mesh Morpher allows users to change the camera FOV in the preview viewport.
Navigate to the camera menu in the viewport and set the slider to the desired value.
Classic › Editor › UI
Mesh Morpher allows users to focus the camera while pointing at the Skeletal Mesh to focus the camera on that specific point.
Navigate to Edit top dropdown menu and click Focus Camera.
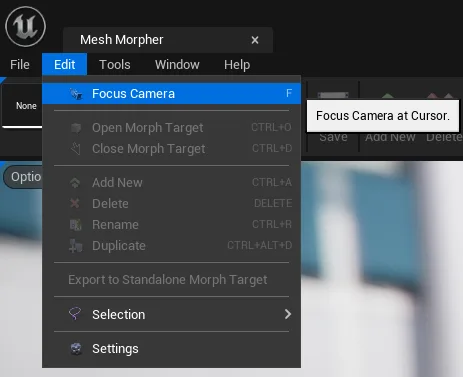
Keyboard shortcut: F
Use Mouse Wheel to adjust the Focusing distance.
Classic › Editor › UI
Ruler allows us to measure and Track MetaHuman Deformations with Ruler. We can track how Morph Targets, Animations, Animations Curves affect our selected Points of Interest so we can better underst...
Ruler allows us to measure and Track MetaHuman Deformations with Ruler. We can track how Morph Targets, Animations, Animations Curves affect our selected Points of Interest so we can better understand what we can do to fine-tune our skeletal meshes.
Left Click to add points. Right Click on points to remove them.
Classic › Editor
Classic › Editor › Basic Operations

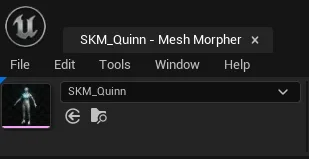
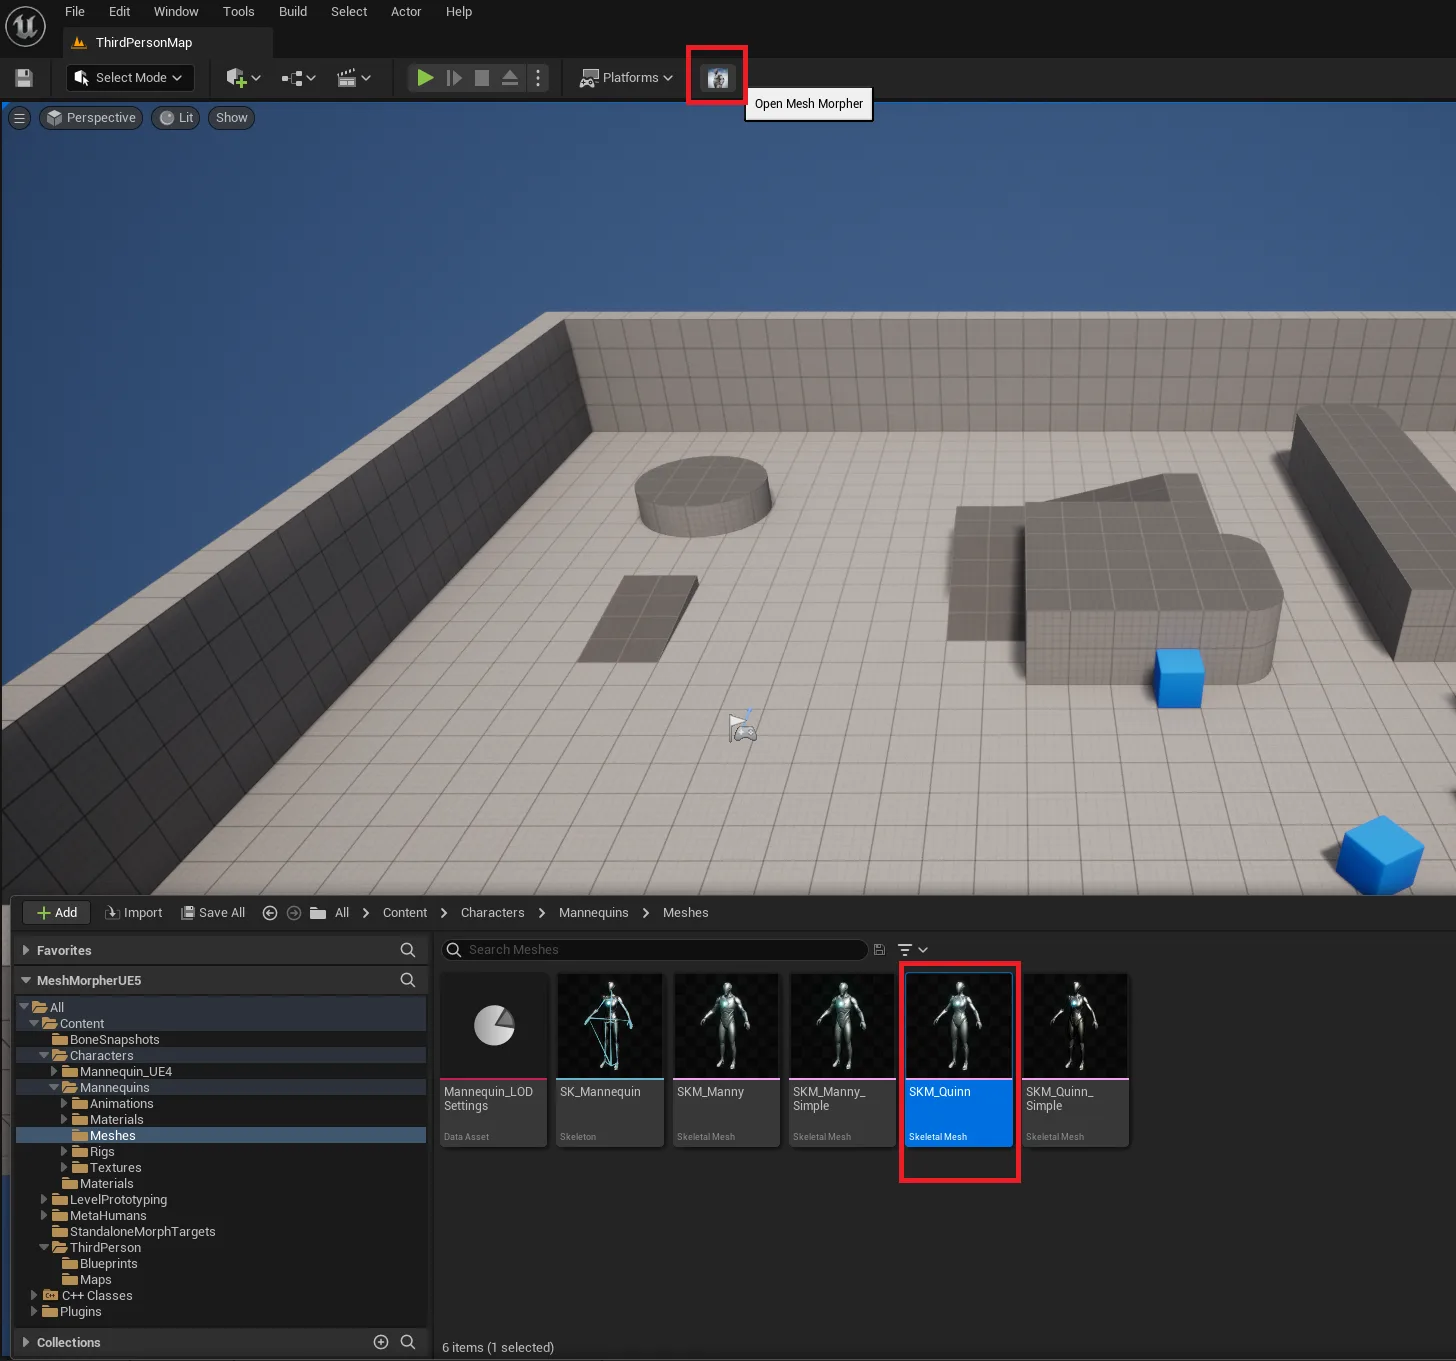
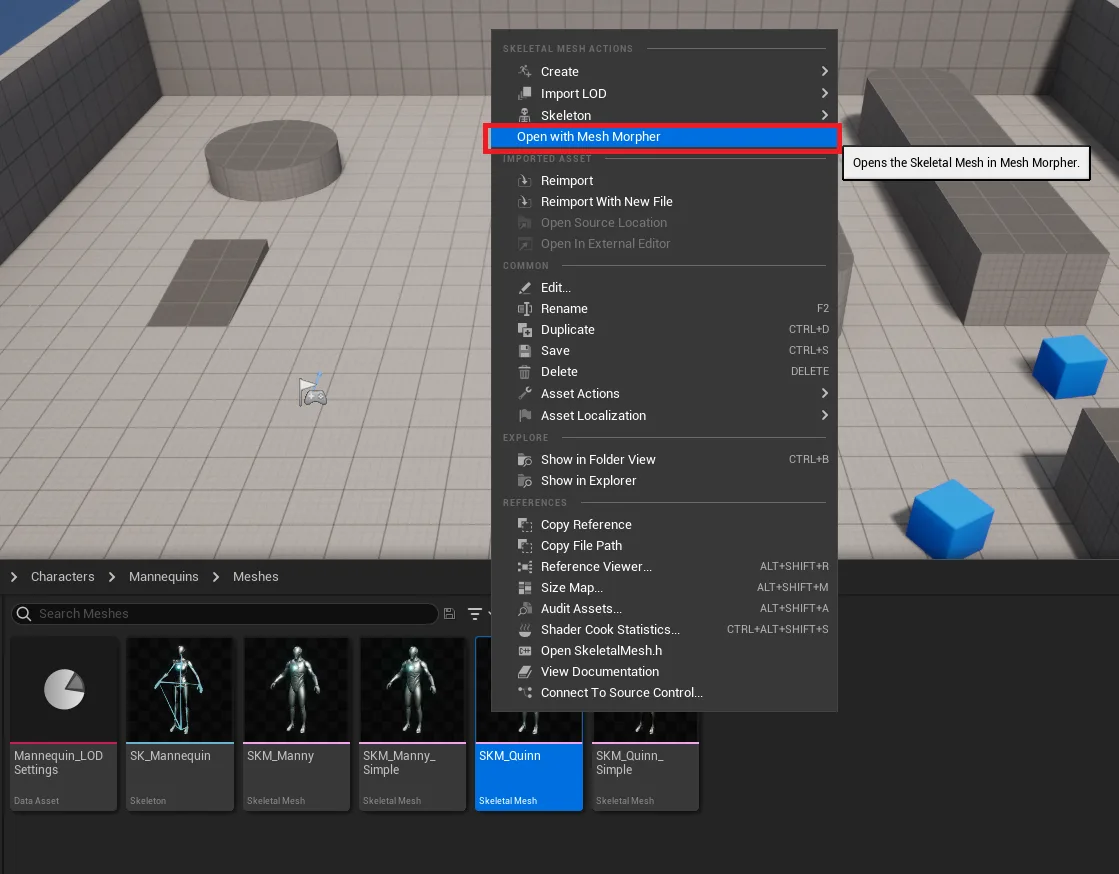
There are several ways you can open a Skeletal Mesh in Mesh Morpher.
Classic › Editor › Basic Operations
Saves the changes to the Skeletal Mesh making them persistent.
Save button is accessible through:

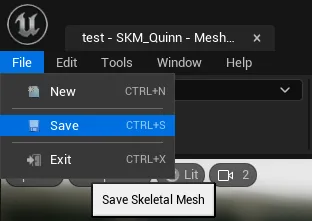
Keyboard shortcut: Ctrl + S
The button is greyed out when there's nothing recorded to save.
Saving is irreversible.
Classic › Editor › Basic Operations
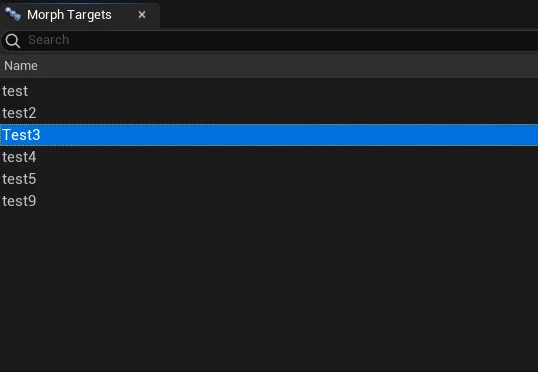
Mesh Morpher allows users to load and sculpt existing Morph Targets in-engine.
There are three ways to load a Morph Target:
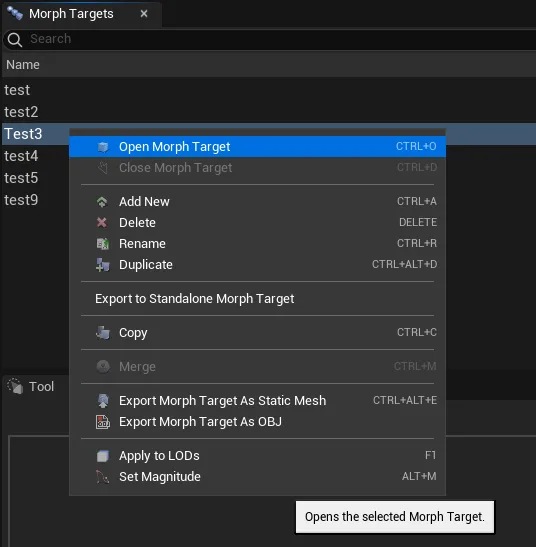
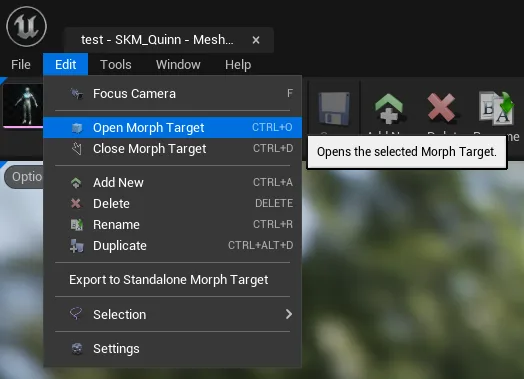
Keyboard shortcut: Ctrl + O
Classic › Editor › Basic Operations
Mesh Morpher allows users to unload Morph Targets that have been previously loaded.
There are two ways to unload a loaded Morph Target:
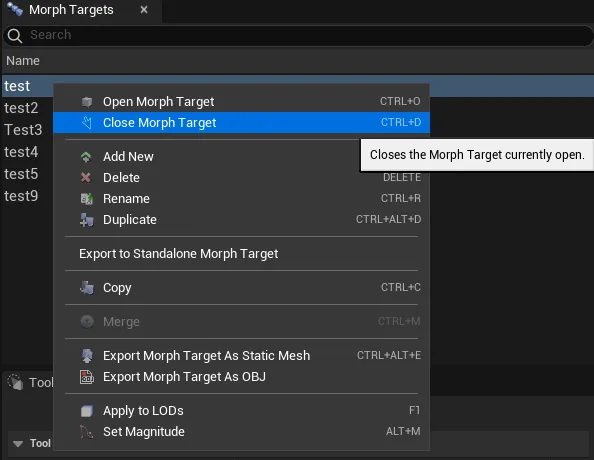
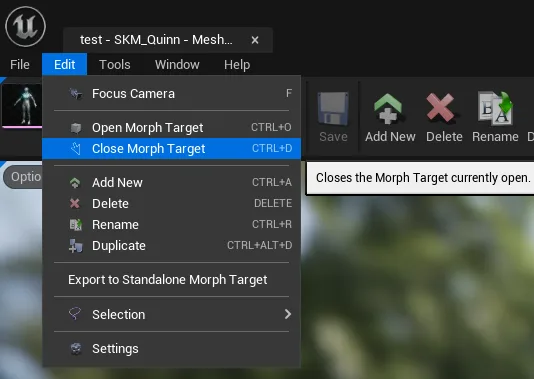
If there are any changes to the Morph Target, Mesh Morpher will attempt to save them.
Keyboard shortcut: Ctrl + D
The button is greyed if no Morph Target is loaded.
Classic › Editor › Basic Operations
Mesh Morpher allows users to create and sculpt new Morph Targets in-engine without the need of any other DCC software.
There are three ways to create new Morph Targets:

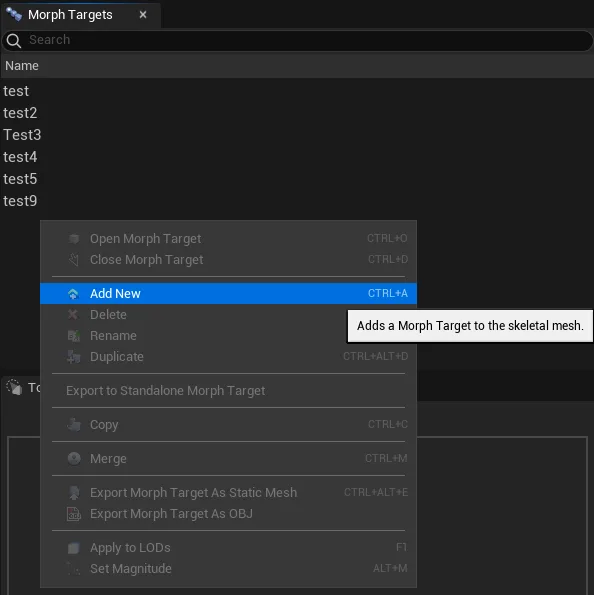
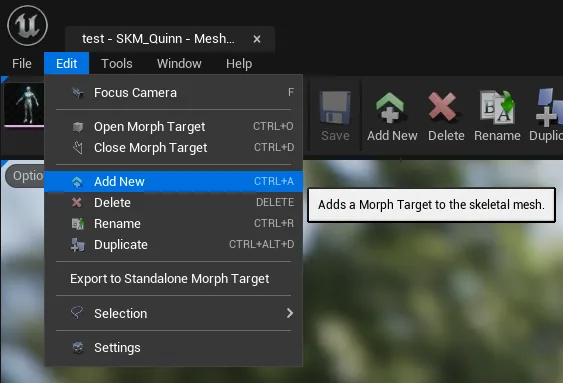
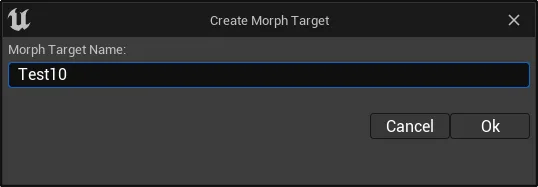
Once the Add New button is pressed, a dialog box will open, asking for a name for the new Morph Target.
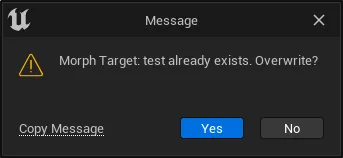
If the selected Morph Target name is already in use, a new dialog box will pop asking whether to overwrite or change the name. Pressing Yes will clear and overwrite the existing Morph Target.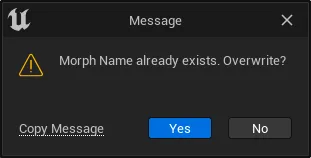
Keyboard shortcut: Ctrl + A
Classic › Editor › Basic Operations
Mesh Morpher allows users to delete Morph Targets in-engine without the need of any other DCC software.
You can delete a single Morph Target or multiple Morph Targets by using Ctrl+Click or Shift+Click to select additional Morph Targets in the Morph Targets list.
There are three ways to delete Morph Targets:

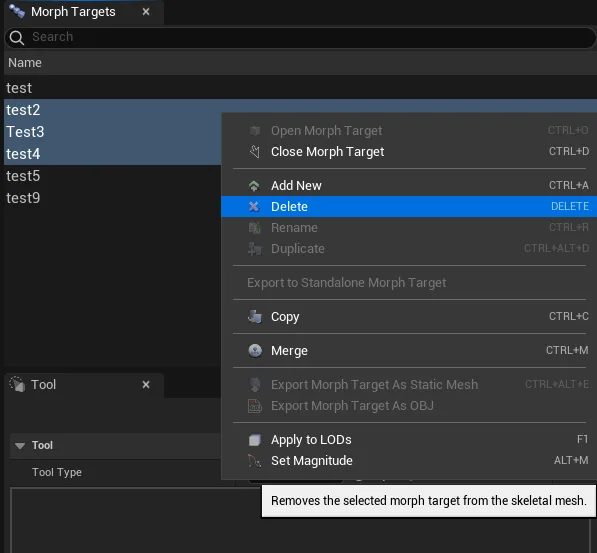
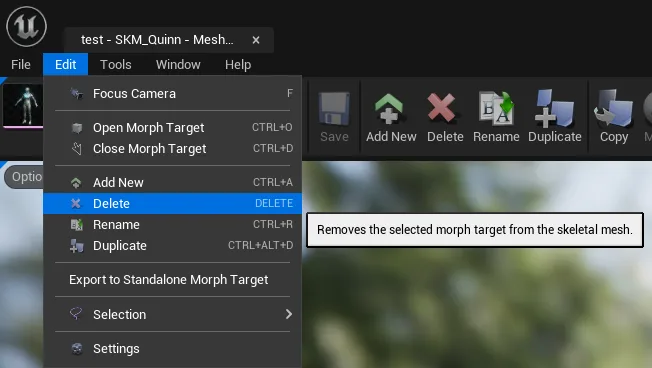
A new dialog will pop asking for confirmation. Clicking Yes will proceed with Morph Target removal.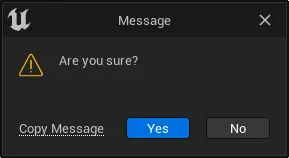
Keyboard shortcut: DELETE
The button is greyed out when there's no selection.
Morph Target removal is irreversible.
Delete allows multi-selection.
Classic › Editor › Basic Operations
Mesh Morpher allows users to rename Morph Targets in-engine without the need of any other DCC software.
There are three ways to rename Morph Targets:

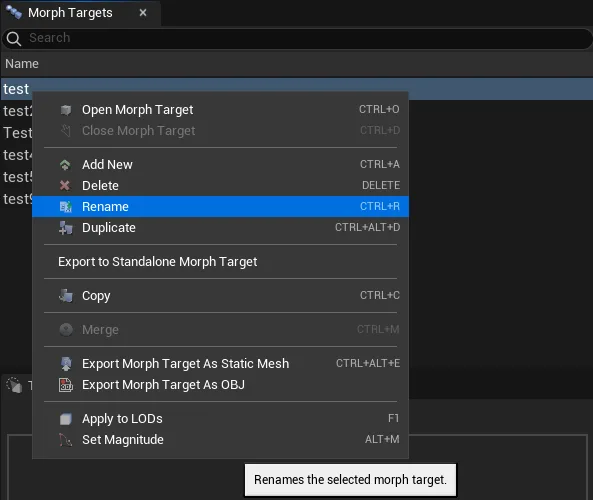
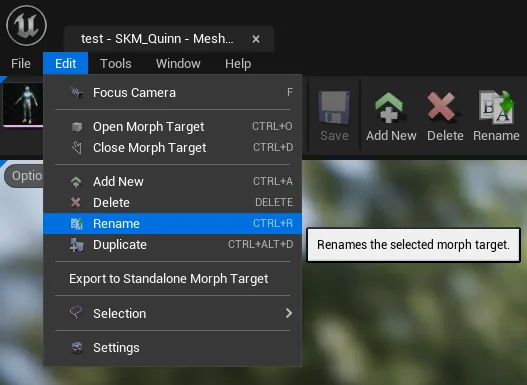
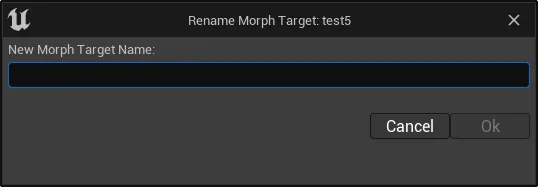
Once the Rename button is pressed, a dialog box will open, asking for a New Morph Target Name.
If the selected Morph Target name is already in use, a new dialog box will pop with the information.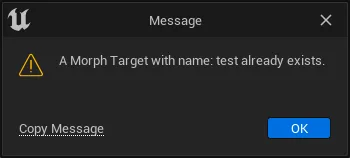
Keyboard shortcut: Ctrl + R
The button is greyed out when there's no selection.
Morph Target renaming is irreversible.
Rename doesn't allow multi-selection.
Classic › Editor › Basic Operations
Mesh Morpher allows users to duplicate Morph Targets in-engine without the need of any other DCC software.
There are three ways to duplicate Morph Targets:

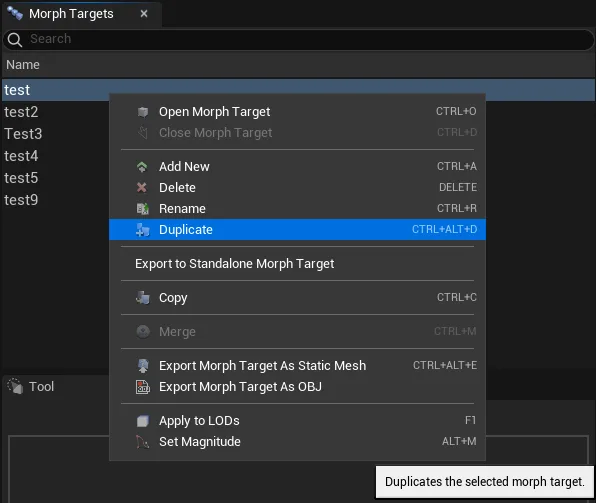
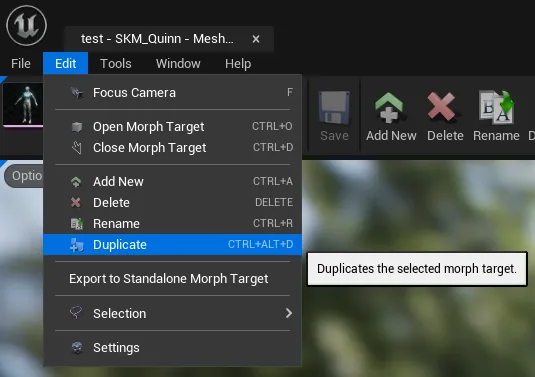
Once the Duplicate button is pressed, a dialog box will open, asking for a name for the new Morph Target.
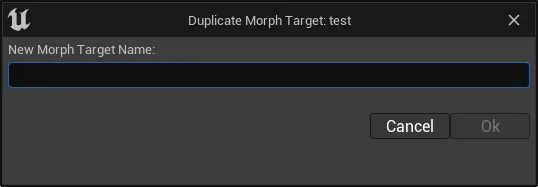
If the selected Morph Target name is already in use, a new dialog box will pop asking whether to overwrite or change the name. Pressing Yes will clear and overwrite the existing Morph Target.
Keyboard shortcut: Ctrl + Alt + D
Duplicate doesn't allow multi-selection.
Classic › Editor › Basic Operations
Set Magnitude works as a Multiplier in Mesh Morpher.
Set Magnitude works as a Multiplier in Mesh Morpher.
It allows users to change the impact of the deltas in a Morph Target by a given value. Values can go both ways, negative to decrease the impact and positive the increase the impact.
You can Set Magnitude for a single Morph Target or multiple Morph Targets by using Ctrl+Click or Shift+Click to select additional Morph Targets in the Morph Targets list.
There are two ways to Set Magnitude of a Morph Target:
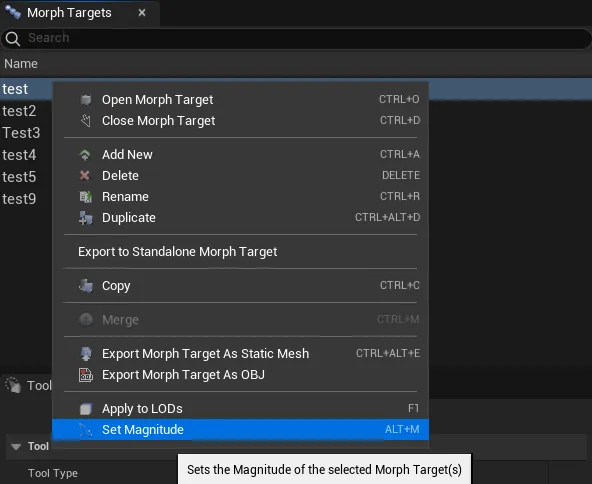
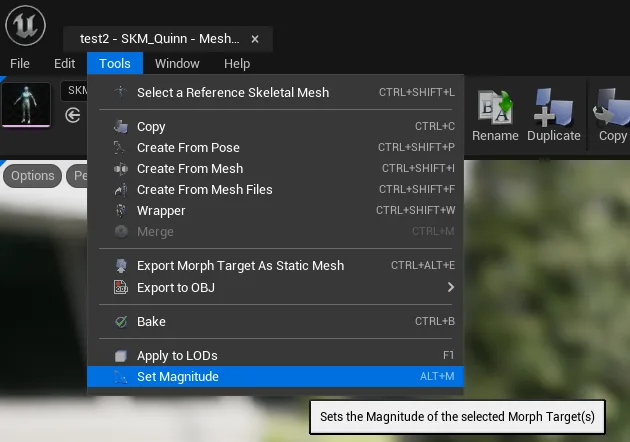
Once the Set Magnitude button is pressed, a dialog box will open, asking for a Magnitude value.
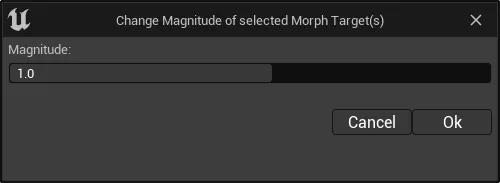
Keyboard shortcut: Alt + M
Set Magnitude allows multi-selection.
Here is an example of how Magnitude Works with both negative and positive magnitude values.
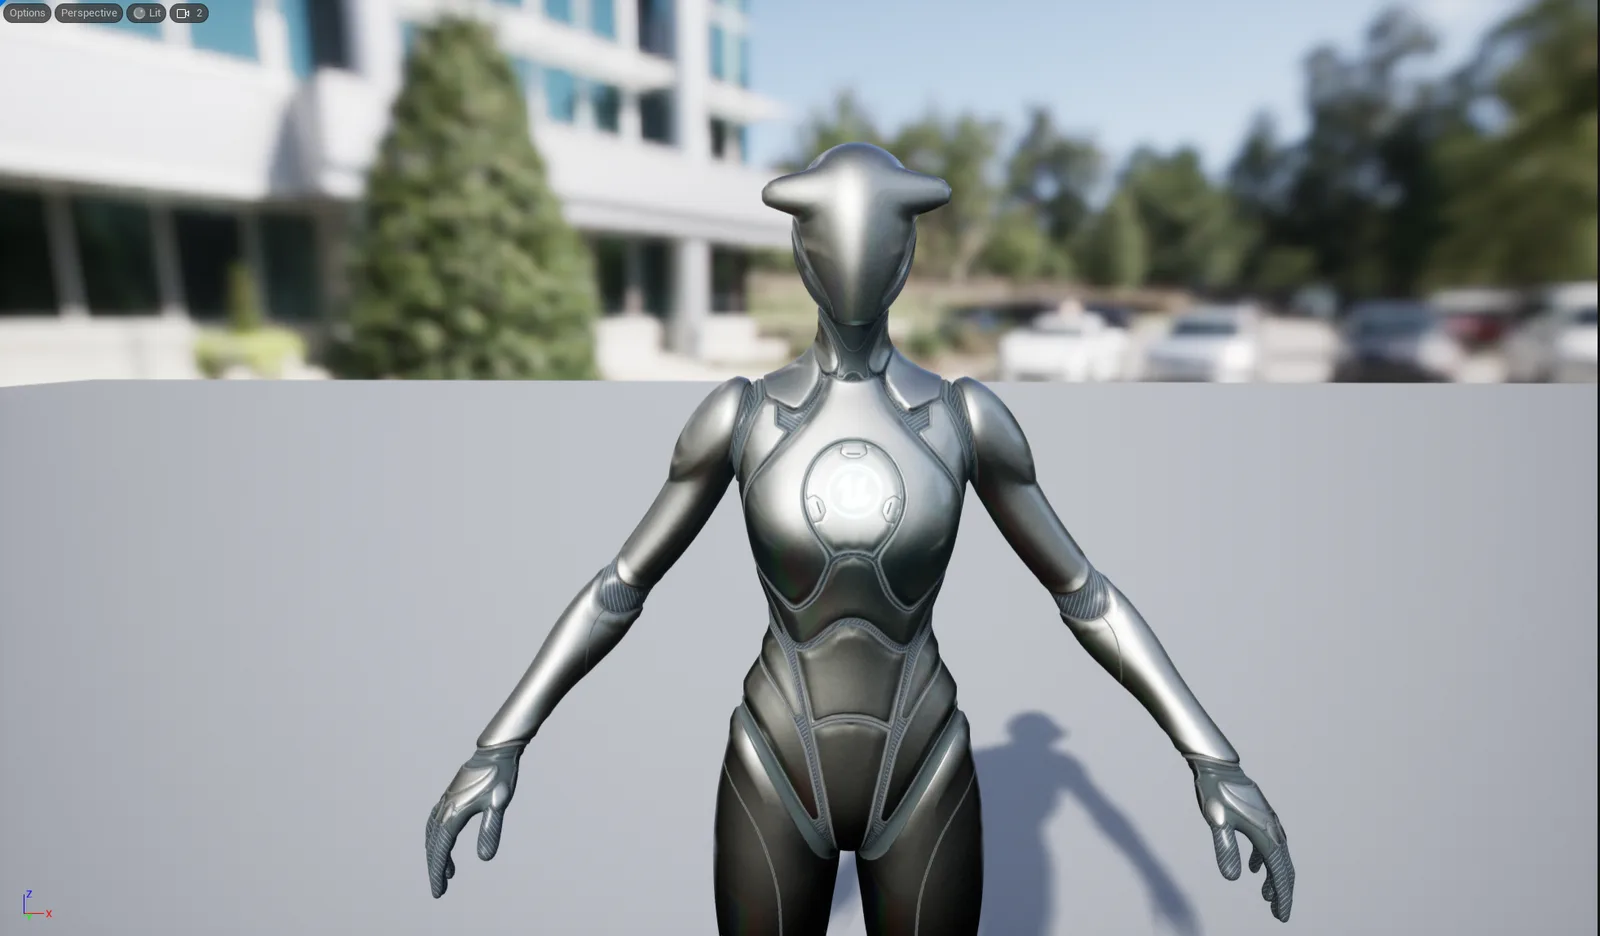
Original Morph Target
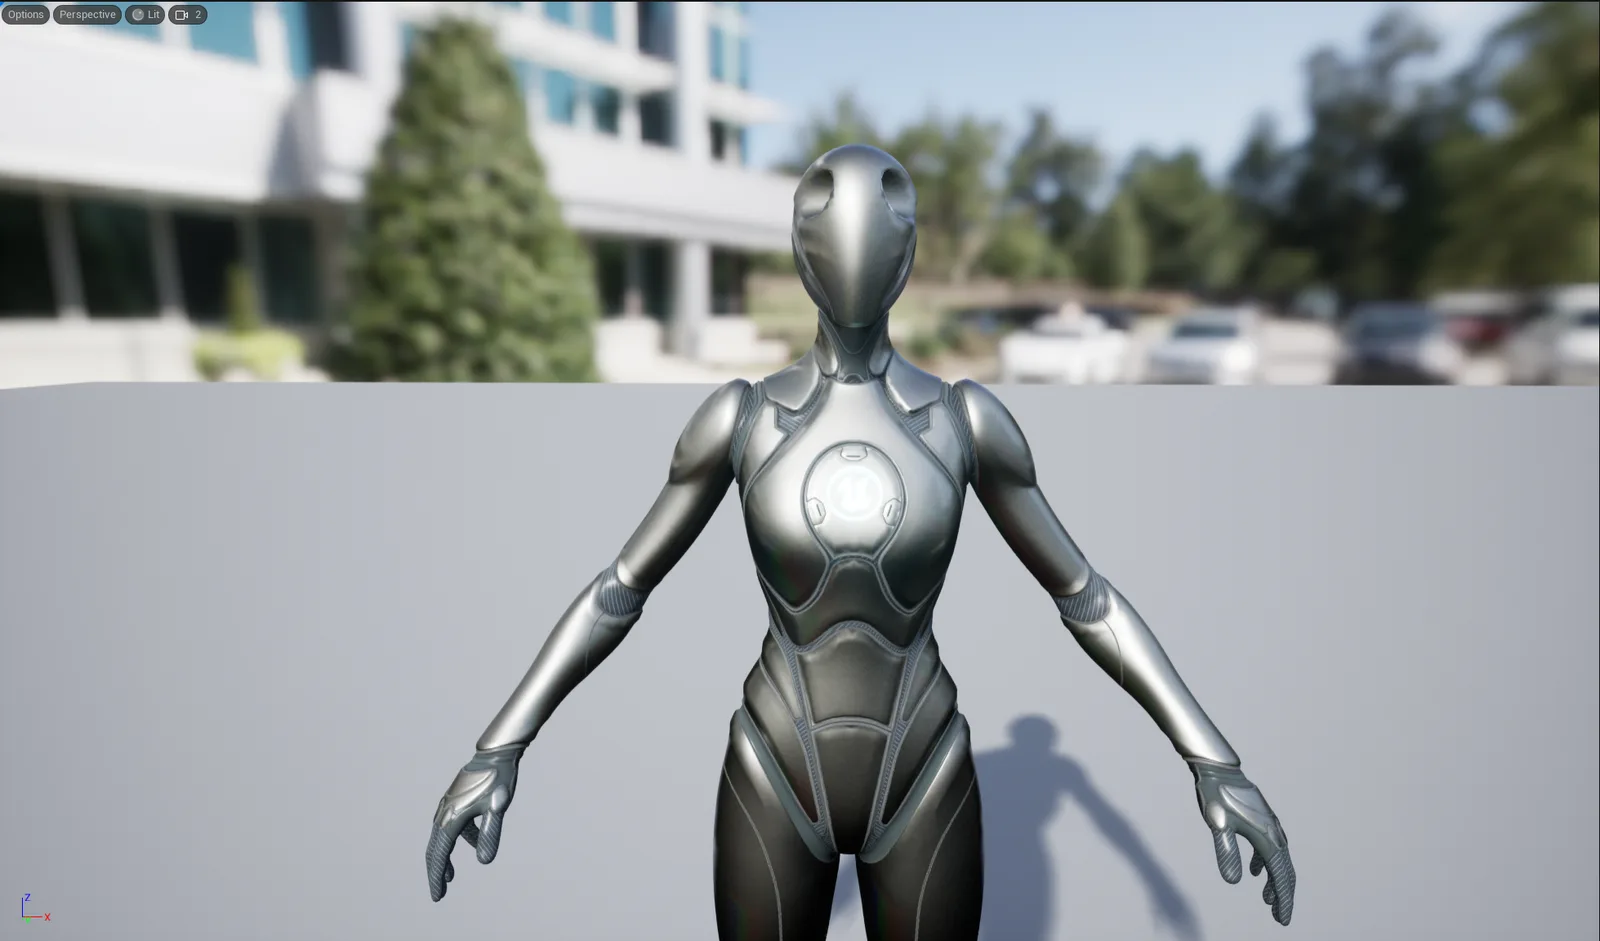
Magnitude: -1.0
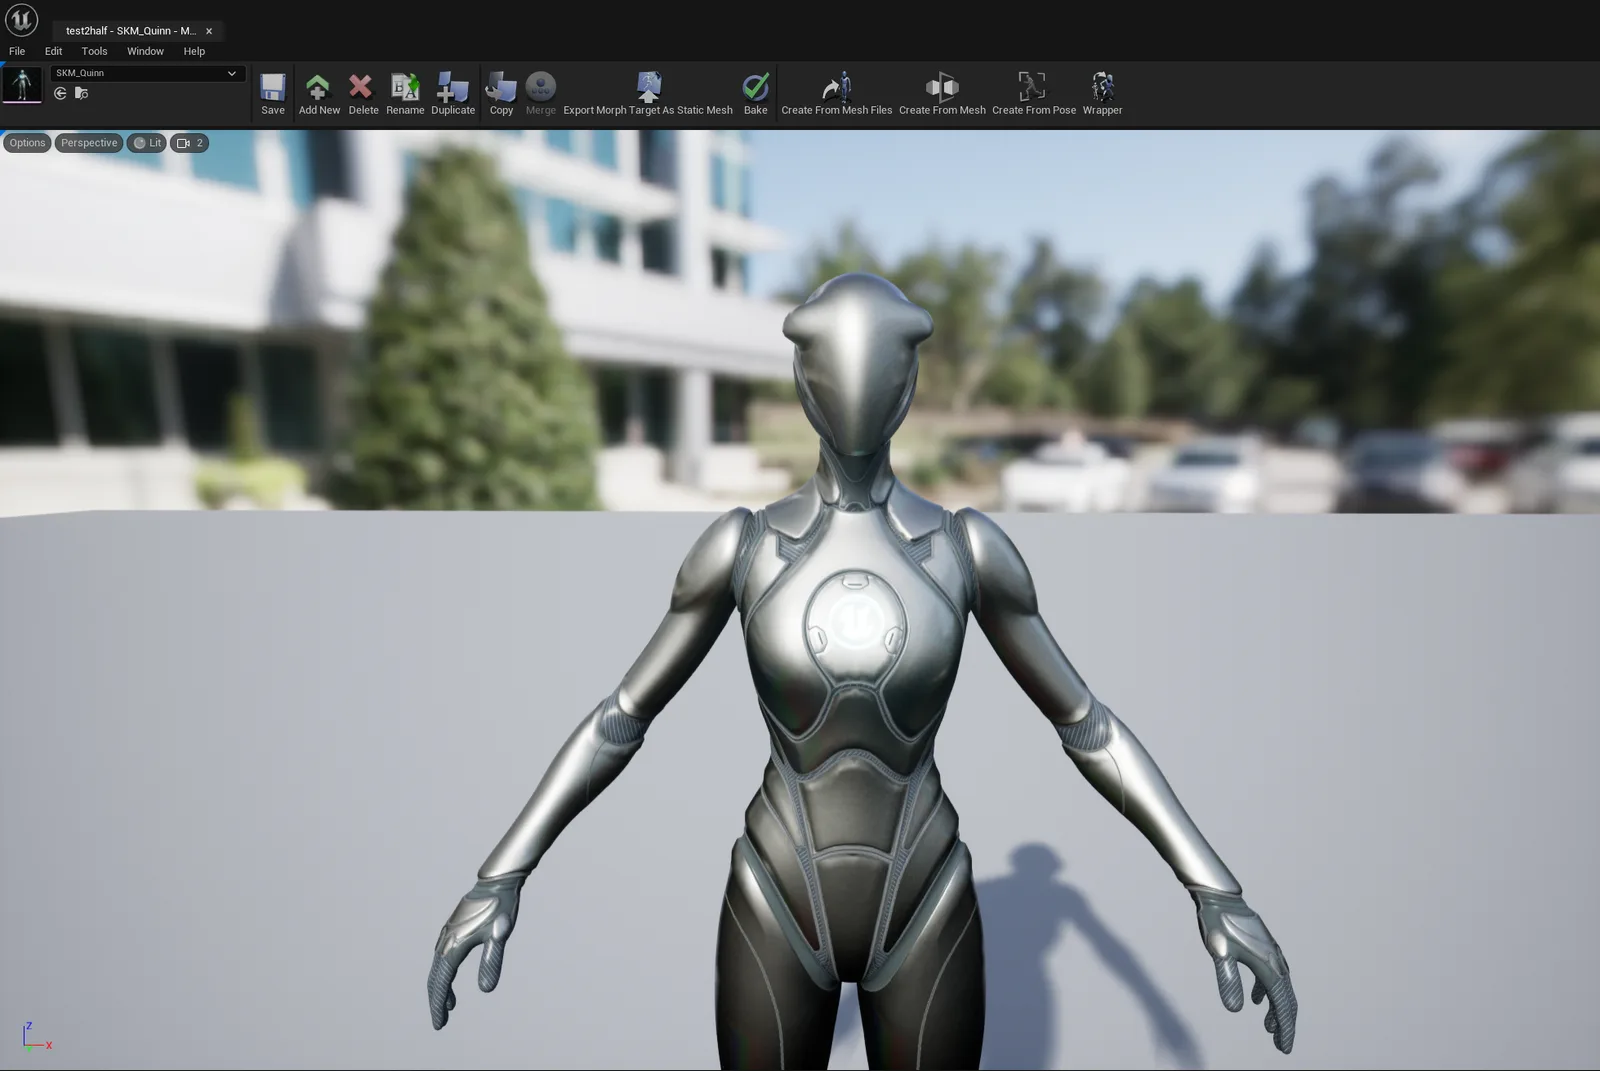
Magnitude: 0.5
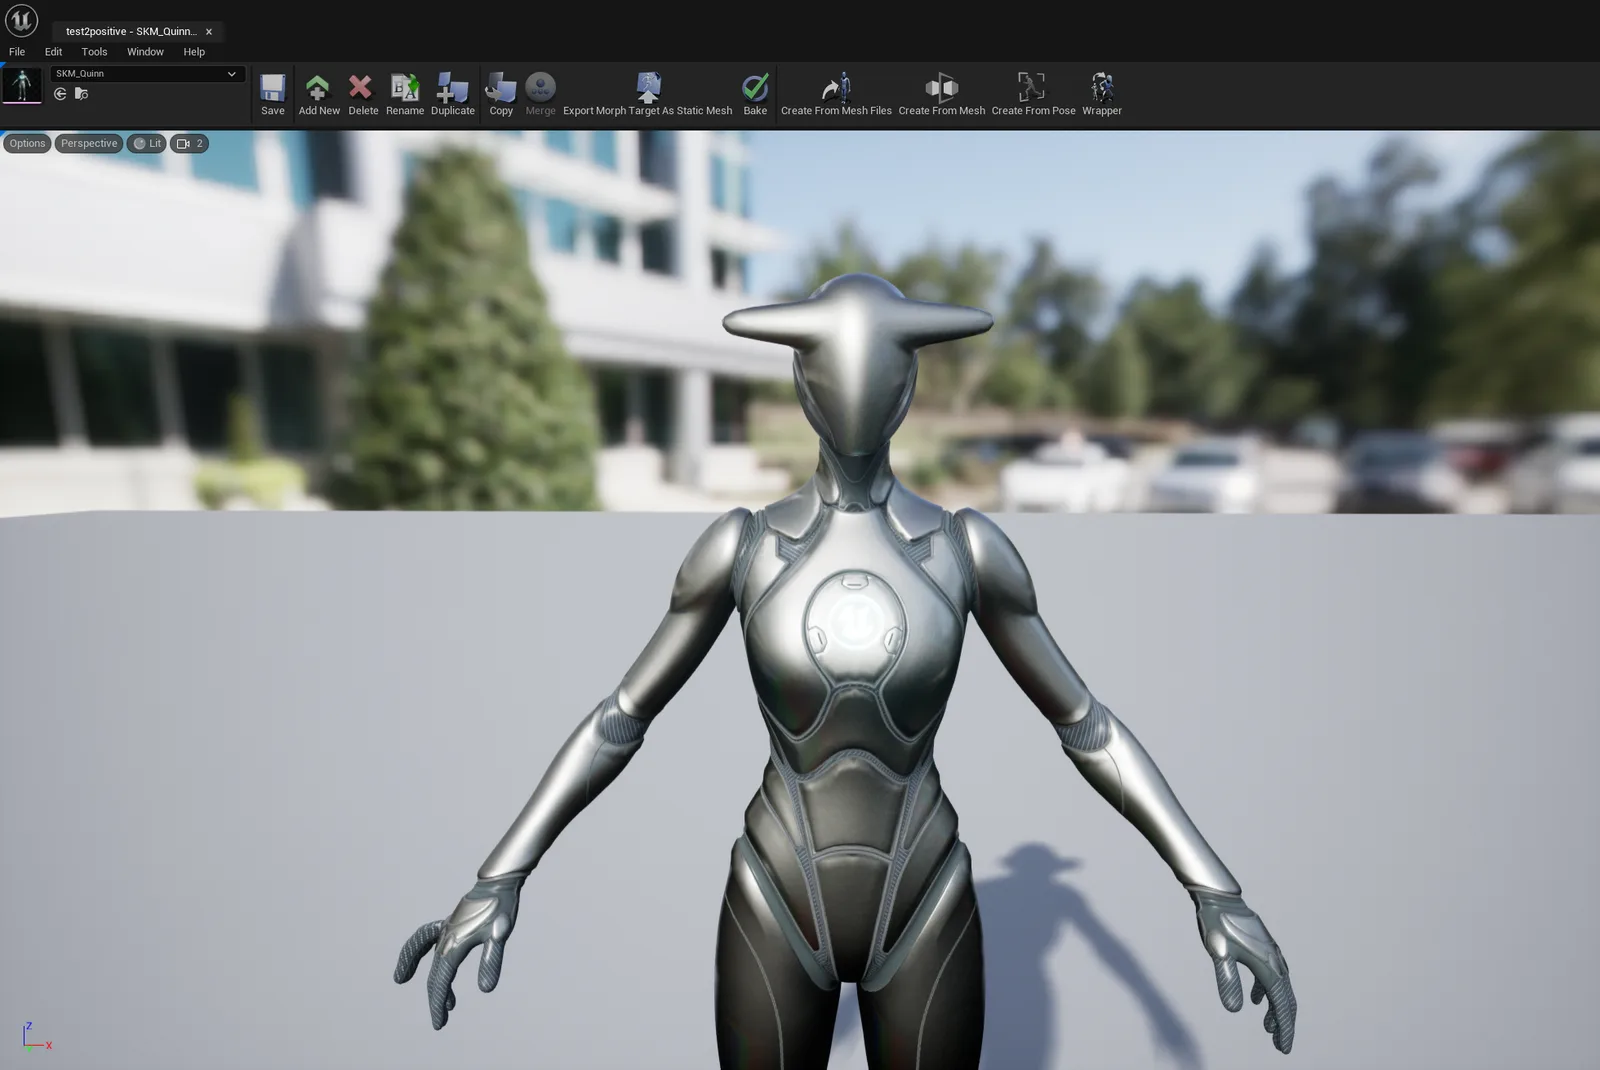
Magnitude: 2.0
Setting Magnitude is irreversible.
Classic › Editor › Basic Operations
Mesh Morpher allows users to merge two or more Morph Targets into a single Morph Target.
You can merge two or more Morph Targets by using Ctrl+Click or Shift+Click to select additional Morph Targets in the Morph Targets list.
There are three ways to Merge Morph Targets:

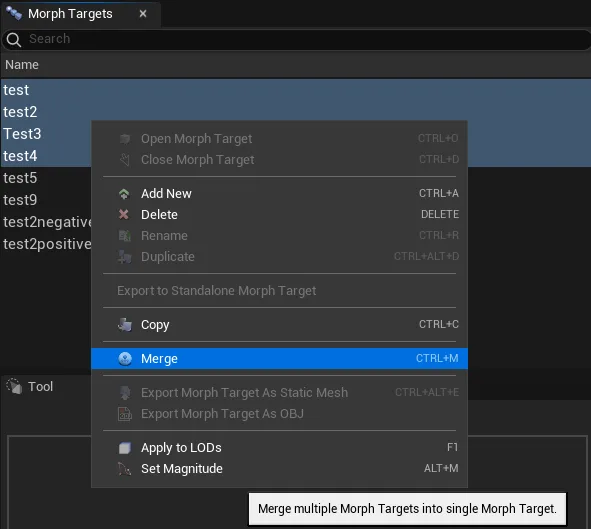
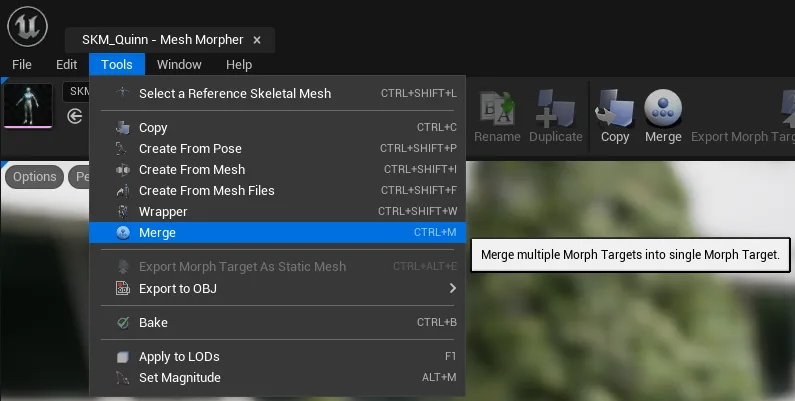
Once the Merge button is pressed, a dialog box will open where users can select several options.
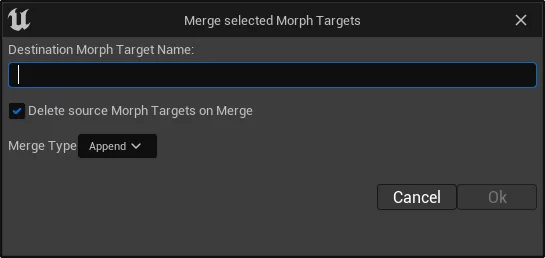
Destination Morph Target Name
Users have to select a new Morph Target name, this Morph Target will hold the merge result.
Delete source Morph Target on Merge
Enabling this option will remove the selected Morph Targets used for merging.
Merge Type
There are currently three types of merging availble in Mesh Morpher which can output different results:
| Type | Description |
|---|---|
| Append | Will append the deltas in each selected Morph Target for each Vertex. |
| Magnitude | Will select the deltas with the highest Magnitude from each Morph Targets for each Vertex. |
| Mean Average | Will get the sum of deltas in each selected Morph Target for each Vertex and will get the average by dividing the sum by the number of deltas for that vertex. |
If the Destination Morph Target name is already in use, a new dialog box will pop asking whether to overwrite or change the name. Pressing Yes will clear and overwrite the existing Morph Target.
If the Destination Morph Target name is part of the selection, a new dialog box will pop asking to pick another name.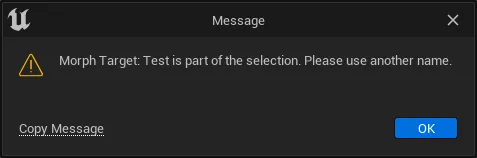
Keyboard shortcut: Ctrl + M
The button is greyed out when there's no selection or the selection doesn't have two or more Morph Targets.
Merge only allows multi-selection.
Morph Target merging is irreversible.
Classic › Editor › Basic Operations
Mesh Morpher can handle Morph Targets with LODs based on UV projection or ICP algorithm.
Classic › Editor
Classic › Editor › Tools
Classic › Editor › Tools › General
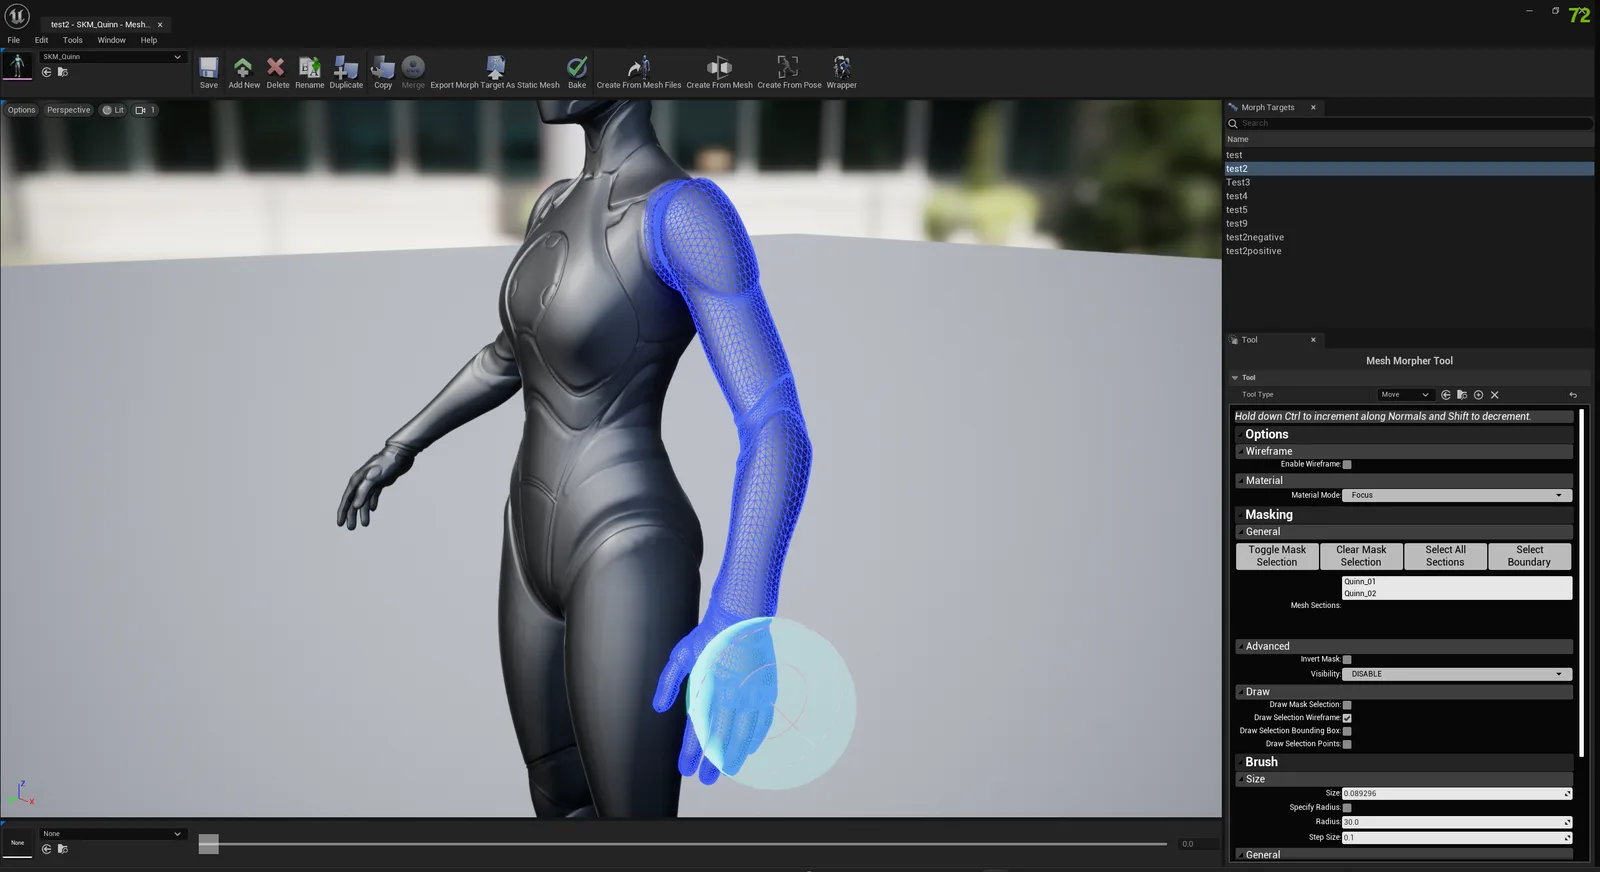
Mesh Morpher allows users to configure the visuals indicators to help them with the Tools.
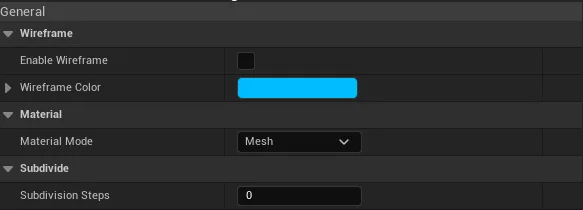
| Options | Description |
|---|---|
| Enable Wireframe | Users can enable/disable Wireframe in Tools. |
| Wireframe Color | Pick a Wireframe color |
| Material Mode | Sometimes the mesh materials can confuse users or hide certain details. Mesh Morpher allows users to use the meshes material or the Focus Material. |
| Subdivision Steps | Allows users to subdivide the mesh in sculpt tool. The subdivided mesh gets projected on the skeletal mesh when the editing is finished. |
Classic › Editor › Tools › General
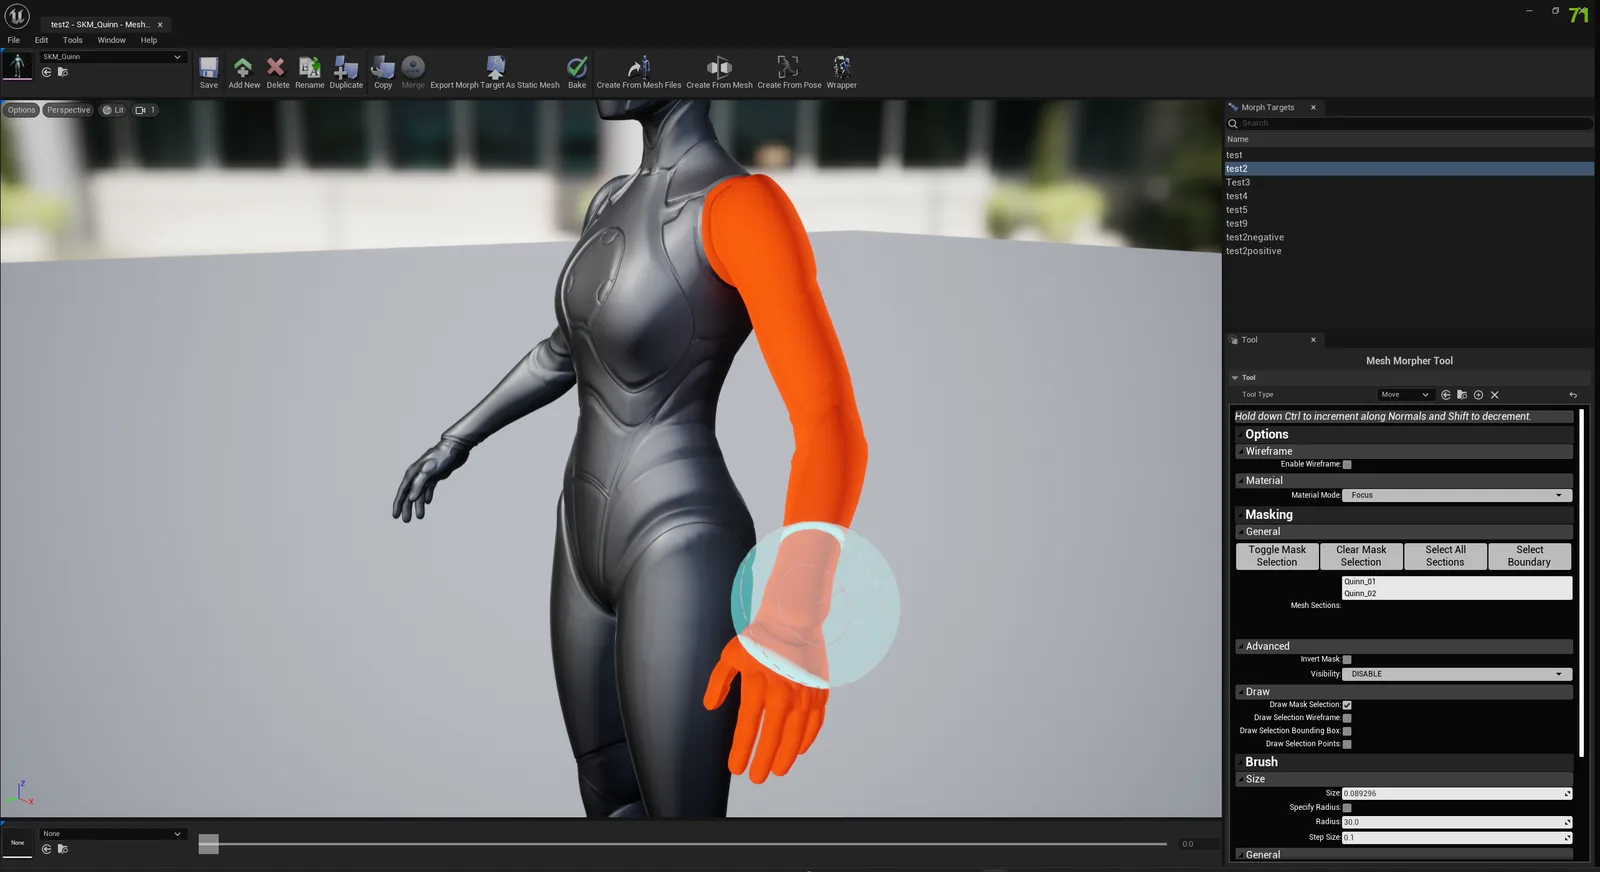
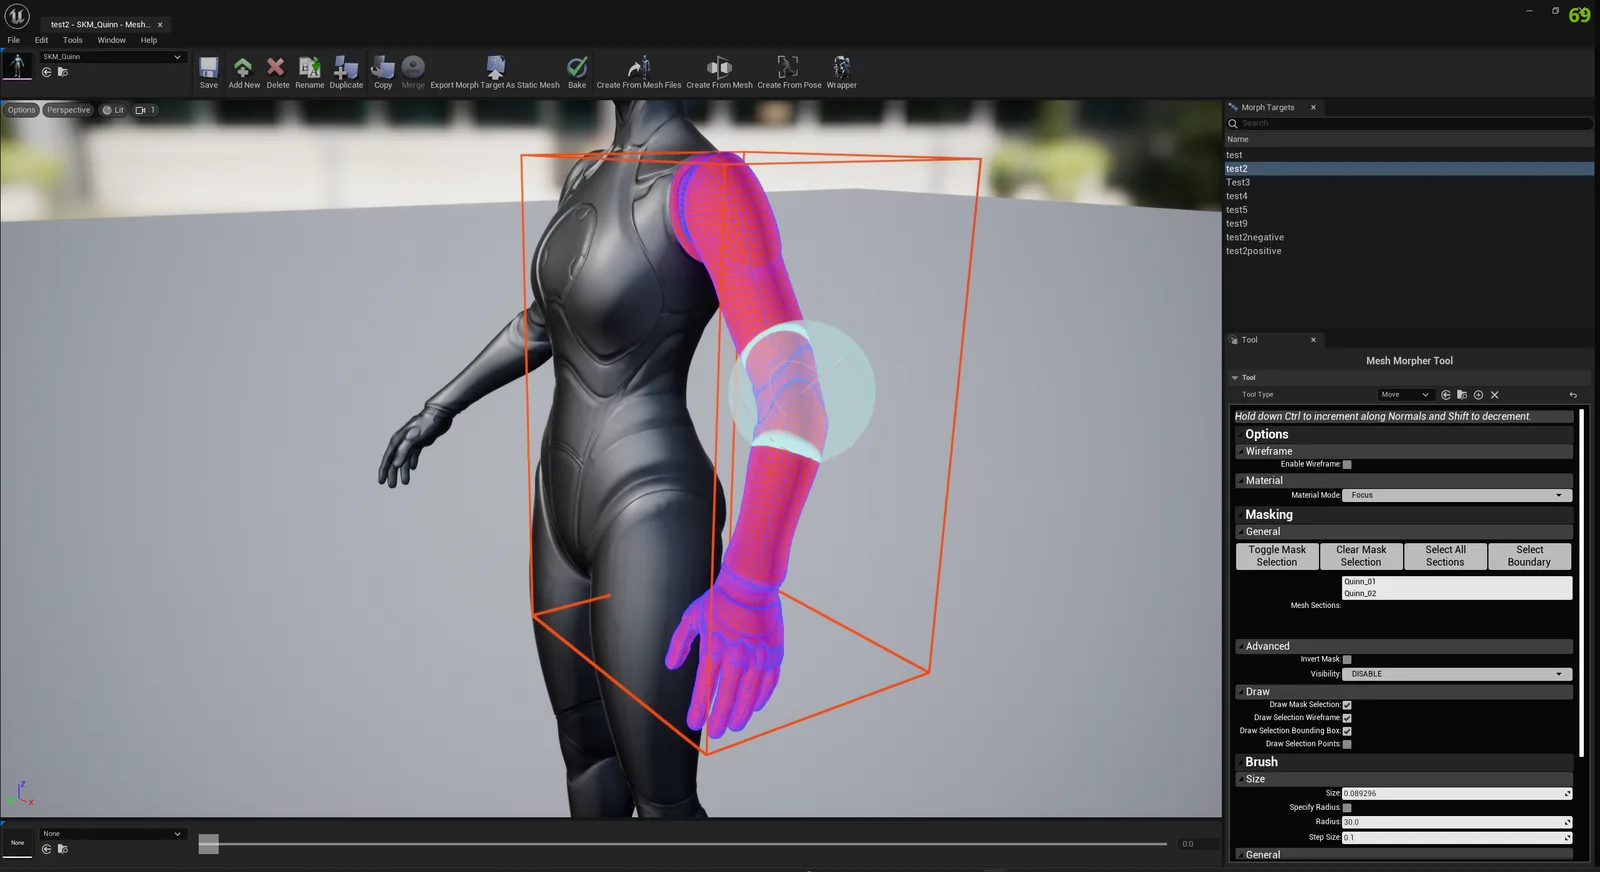
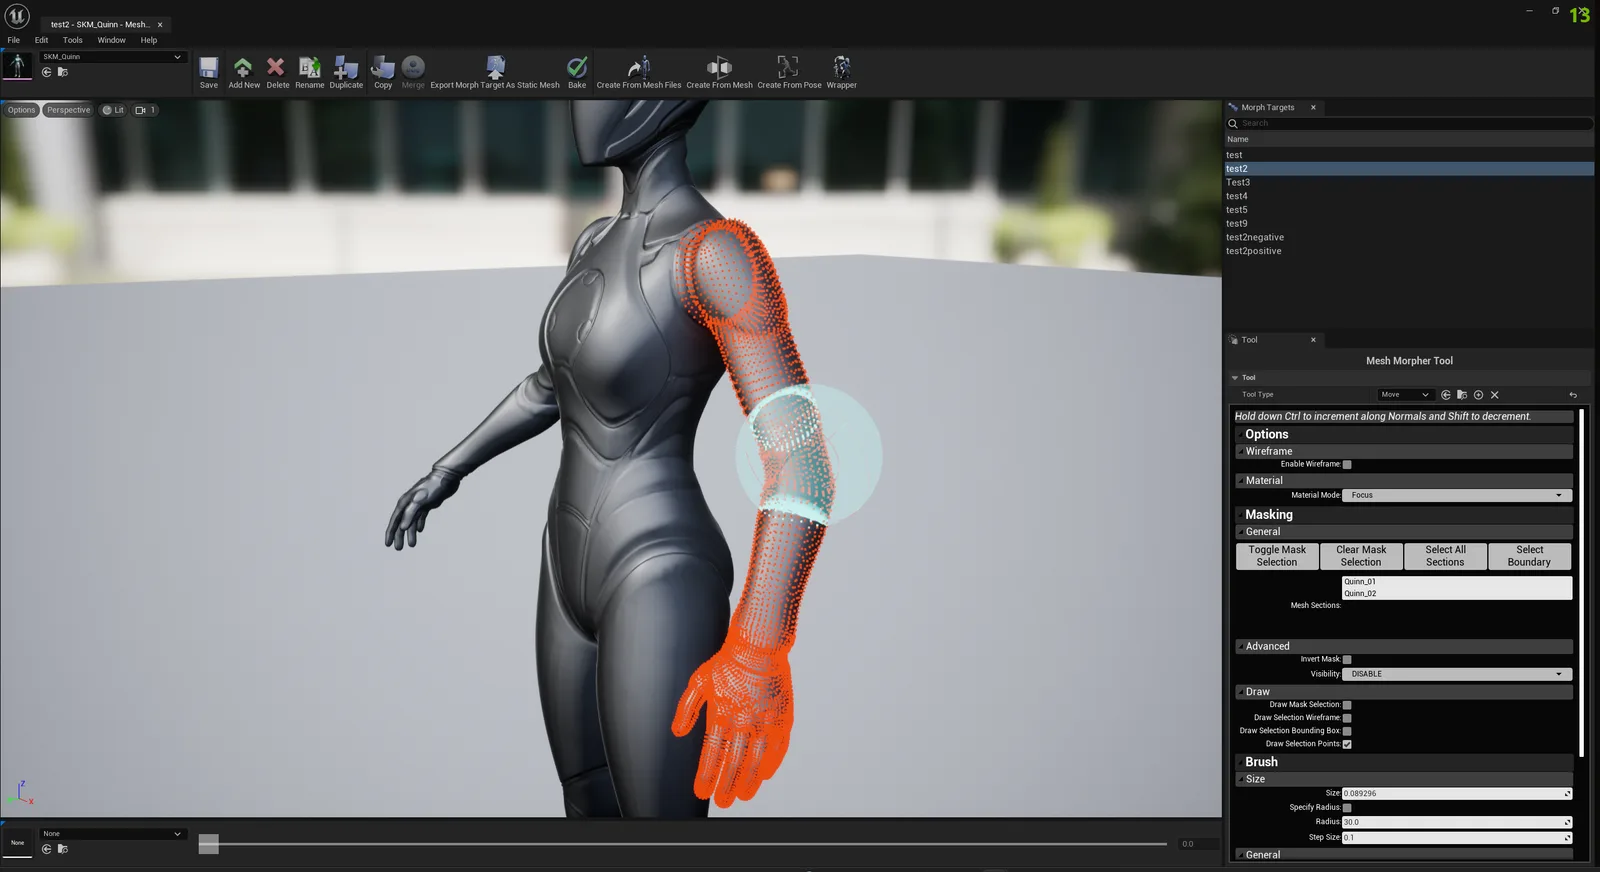
Mesh Morpher allows users to select and mask certain portions of the meshes in order to provide them with precision when applying Tools.
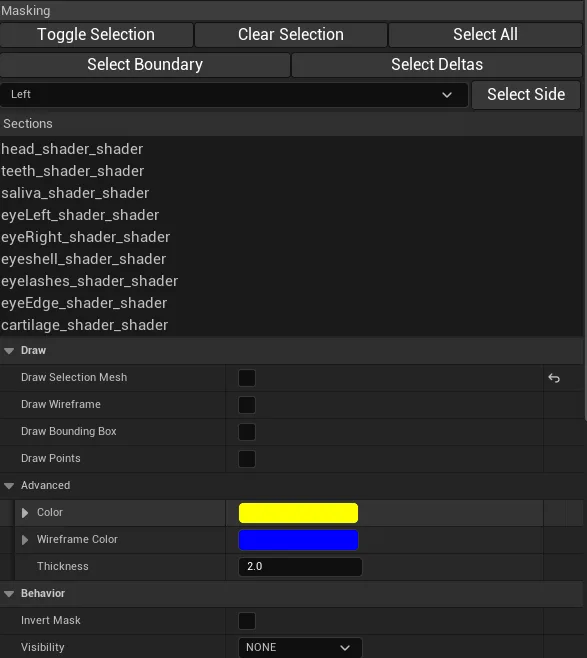
| Options | Description |
|---|---|
| Toggle Selection | Allows users to toggle drawing selection on/off. When the Mask Selection Drawing is enabled, the notification area will display the following message |
| Clear Selection | Clears the current mask selection |
| Select All | Selects all sections in Mesh Sections |
| Select Boundary | Selects the boundary vertices of the mesh |
| Select Deltas | Selects affected vertices |
| Select Side | Allows users to select vertices located in the picked side. |
| Sections | Displays the current Sections available in the mesh data and allows users to select them. When selecting a section, previous masked vertices are cleared. Once a section is selected, toggling masking allows users to add additional masked vertices to the selection |
| Options | Description |
|---|---|
| Draw Selection Mesh | If enabled, the selection will be drawn as a mesh on top of the existing Mesh |
| Draw Wireframe | If enabled, draws the wireframe of the selection |
| Draw Bounding Box | If enabled, draws a bounding box around the selection |
| Draw Points | If enabled, draws the vertices points of the mask selection |
| Color | Set the color of the selection mesh |
| Wireframe Color | Set the color of the selection wireframe |
| Thickness | Set the thickness of the selection drawing elements |
| Options | Description |
|---|---|
| Invert Mask | Inverts the behavior of the selection. If enabled, only the vertices that are not part of the selection can be modified. If disabled, users can only modify the vertices that are part of the selection. |
| Render Unselected | Whether to render unselected vertices |
Users can save a mask selection to a UStandaloneMaskSelection asset to use it later whenever they want.
To save a selection, users need to go to Edit->Selection
and select Save Selection(enabled only if a selection is already open) or Save Selection As...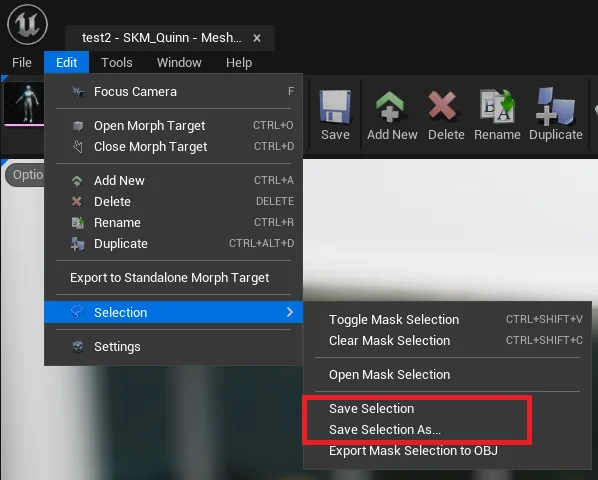
Users can also open a previously saved UStandaloneMaskSelection asset by going to Edit->Selection and clicking on Open Mask Selection which will open a asset browser.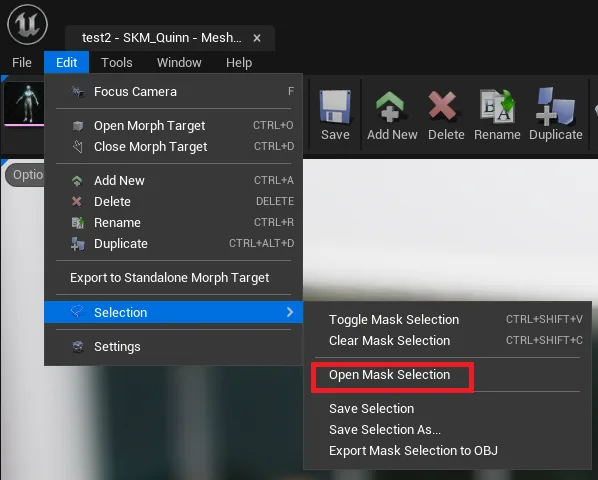
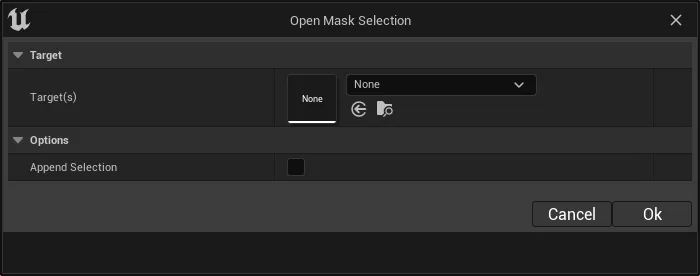
Enabling Append Selection, will add the Mask Selection to the existing selection in Tools.
Users can also export a selection to an OBJ file by going to Edit->Selection and clicking on Export Mask Selection to OBJ...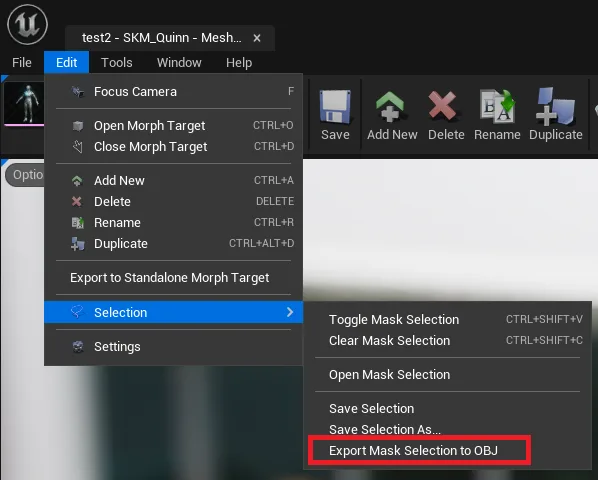
When Masking is toggled on, the Tool is disabled, users can only draw mask selection.
Classic › Editor › Tools › General
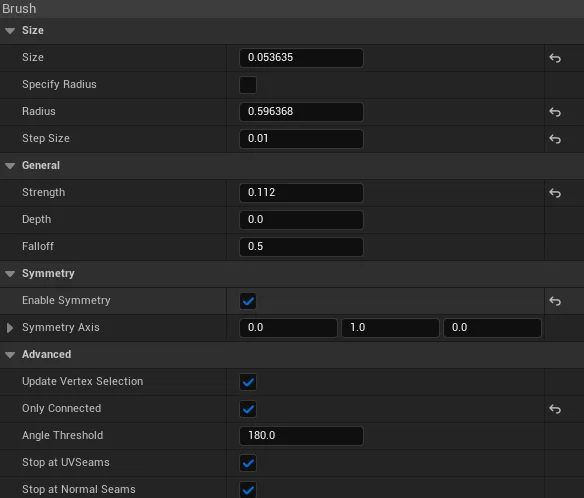
Mesh Morpher allows users to configure the Brush parameters to help them achieve wanted results with the Tools.
| Options | Description |
|---|---|
| Size | Size of the brush indicator relative to the mesh size |
| Specify Radius | Users can also manually specify a brush radius by enabling this option |
| Radius | Radius of the brush |
| Step Size | By pressing [ and ] users can increase/decrease the brush size by the Step Size amount |
| Strength | Strength of the brush. Changes how impactful the brush actions are |
| Depth | Depth allow to change how deep the Brush gets placed on the Drag Plane, the initial brush positioning. |
| Falloff | Allows to change how impactful the brush can be on the outskirts. |
| Falloff Type | Falloff type applied on the outskirts of the brush. |
| Enable Symmetry | If enabled, a second brush indicator will appear that will be placed at 180 rotation to the Symmetry Axis. 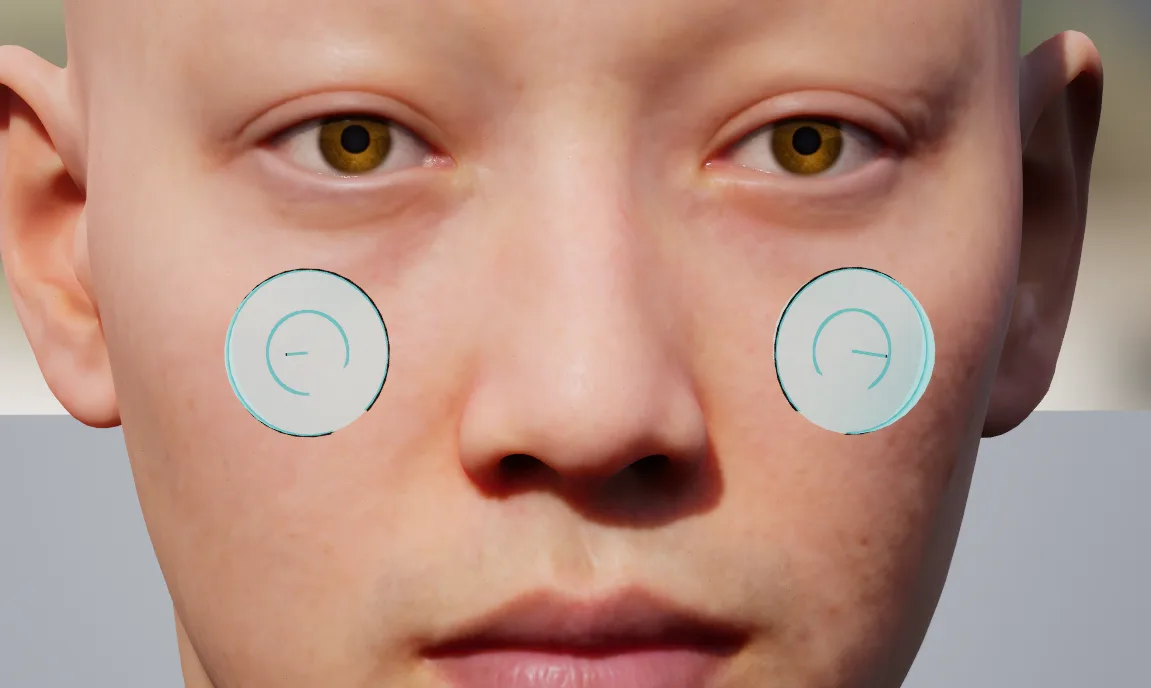 |
| Symmetry Axis | Mesh Morpher uses Y forward so the symmetric brush will be placed accordingly |
| Update Vertex Selection | Whether to update the vertex selection on brush move |
| Only Facing Camera | Whether to only hit and select vertices only facing camera. |
| Only Connected | Enabling this options disables Only Facing Camera option. This options allows users to select and use the brushes only on connected triangles. |
| Angle Threshold | The angle threshold at which the triangles are still marked as connected |
| Stop at UV Seams | Stops the iteration of connected triangles at UV seams |
| Stop at Normal Seams | Stops the iteration of connected triangles at Normal seams |
Classic › Editor › Tools › General
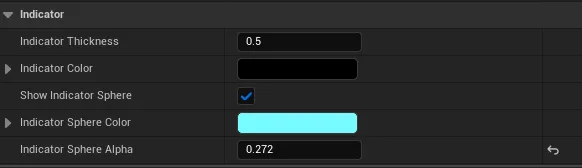
Mesh Morpher allows users to configure how Brush indicators are rendered. Changing thsese settings can increase visibility in certain cases and improve overall user experience.
| Options | Description |
|---|---|
| Indicator Thickness | Set the Indicator thickness |
| Indicator Color | Set the Indicator color |
| Show Indicator Sphere | Whether to display Sphere Indicators |
| Indicator Sphere Color | Set the color of Sphere Indicators |
| Indicator Sphere Alpha | Set the opacity of Sphere Indicators |
Classic › Editor › Tools › General
Hold key (B) to dynamically change brush size moving mouse left and right 
Hold key (N) to dynamically change brush falloff moving mouse left and right
Hold key (T) to dynamically change brush strength moving mouse left and right
The values are increased by the Step Size value in Brush Settings.
Classic › Editor › Tools
Move Tool allows users to move around vertices using the brush.

Users can press Ctrl + Z to Undo and Ctrl + Y to Redo the operation.

Move tool has two additional modes that allow further functionality:
Holding Ctrl while moving the brush left and right will Move the vertices along the normal
Classic › Editor › Tools
Grab Tool allows users to grab vertices using the brush.
Grab is an elastic deformation tool.

There are several options that affect how Grab Tool works.
| Option | Description |
|---|---|
| Type | Grab Type |
| Stiffness | How much the mesh resists shear |
| Incompressiblity | How compressible the spatial region is: 1 - 2 x Poisson ratio |
| IntegrationTime | Integration Time for elasticity |
| BrushSteps | Integration steps |
Users can press Ctrl + Z to Undo and Ctrl + Y to Redo the operation.
Classic › Editor › Tools
Sculpt Tool allows users to Sculpt vertices using the sculpt brush.

Holding Ctrl will invert the Sculpt effect to the vertices.

Users can press Ctrl + Z to Undo and Ctrl + Y to Redo the operation.
Classic › Editor › Tools
Smooth Tool allows users to Smooth vertices using the sculpt brush.

There are two types of Smoothing. by Preserving UV flow or if disabled then the smoothing is uniform.
Smooth can also be applied to the entire mesh or a mask selection by click on Apply Smoothing.
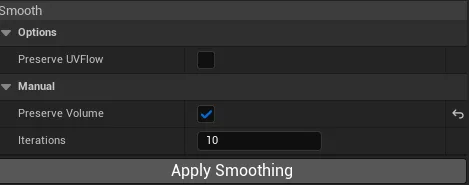
| Options | Description |
|---|---|
| Preserve Volume | Reprojects the smoothed vertices maintaining volume. |
| Iterations | Iterations count performed by Apply Smoothing(not by brush sculpting) |
Users can press Ctrl + Z to Undo and Ctrl + Y to Redo the operation.
Classic › Editor › Tools
Inflate Tool allows users to inflate vertices using the sculpt brush.

Holding Ctrl will deflate(inverted effect) the vertices.

Users can press Ctrl + Z to Undo and Ctrl + Y to Redo the operation.
Classic › Editor › Tools
Pinch Tool allows users to Pinch vertices using the sculpt brush.

Holding Ctrl will invert the pinch effect to the vertices.

Users can press Ctrl + Z to Undo and Ctrl + Y to Redo the operation.
Classic › Editor › Tools
Plane Tool allows users to flatten vertices on the brush plane.

Users can press Ctrl + Z to Undo and Ctrl + Y to Redo the operation.
Classic › Editor › Tools
Flatten Tool allows users to flatten vertices using the sculpt brush.

Users can press Ctrl + Z to Undo and Ctrl + Y to Redo the operation.
Classic › Editor › Tools
Restore Tool allows users to Restore vertices using the brush to their initial(original) position.

Restore is a very powerful tool in Mesh Morpher and it goes beyond using the brush to restore to original positions.
Users can also select a Mask and Apply Restore to the mask selection or the entire mesh.
Preserve Location option restore the vertices while also keeping the bounding box centered at the same location. Preserve Location works with mask selections.
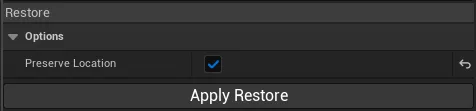
Users can also restore selected sides of the mesh.

Relative Restore allows users to make a section selection and a relative section selection and restore relatively.
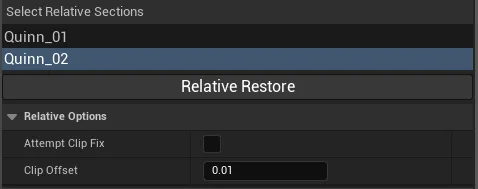
The options here are straight forward.
| Option | Description |
|---|---|
| Attempt Clip Fix | Whether to attempt fixing vertex penetrations |
| Clip Offset | The maximum threshold value we move the vertices to prevent clipping. |
Users can press Ctrl + Z to Undo and Ctrl + Y to Redo the operation.
Classic › Editor › Tools
| Option | Description |
|---|---|
| Preserve Pivot Point | Wether to preserve Pivot point on transform |
| Enable Gizmo Offseting | Move the Gizmo without affecting Geometry. Holding shift while moving the Gizmo has same effect |
| Transform | Manual Transformation Input |
Classic › Editor › Tools
Classic › Editor › Tools
Classic › Editor › Tools
Classic › Editor › Tools
Classic › Editor › Tools
Classic › Editor › Tools
Scale Tool allows users to scale vertices using the brush.
Scale is an elastic deformation tool.

Holding Ctrl will invert the Scale effect to the vertices.

There are several options that affect how Scale Tool works.
| Option | Description |
|---|---|
| Stiffness | How much the mesh resists shear |
| Incompressiblity | How compressible the spatial region is: 1 - 2 x Poisson ratio |
| IntegrationTime | Integration Time for elasticity |
| BrushSteps | Integration steps |
Users can press Ctrl + Z to Undo and Ctrl + Y to Redo the operation.
Classic › Editor › Tools
Twist Tool allows users to twist vertices using the brush.
Twist is an elastic deformation tool.

There are several options that affect how Twist Tool works.
| Option | Description |
|---|---|
| Type | Twist Type |
| Stiffness | How much the mesh resists shear |
| Incompressiblity | How compressible the spatial region is: 1 - 2 x Poisson ratio |
| IntegrationTime | Integration Time for elasticity |
| BrushSteps | Integration steps |
Users can press Ctrl + Z to Undo and Ctrl + Y to Redo the operation.
Classic › Editor › Tools
Classic › Editor › Tools
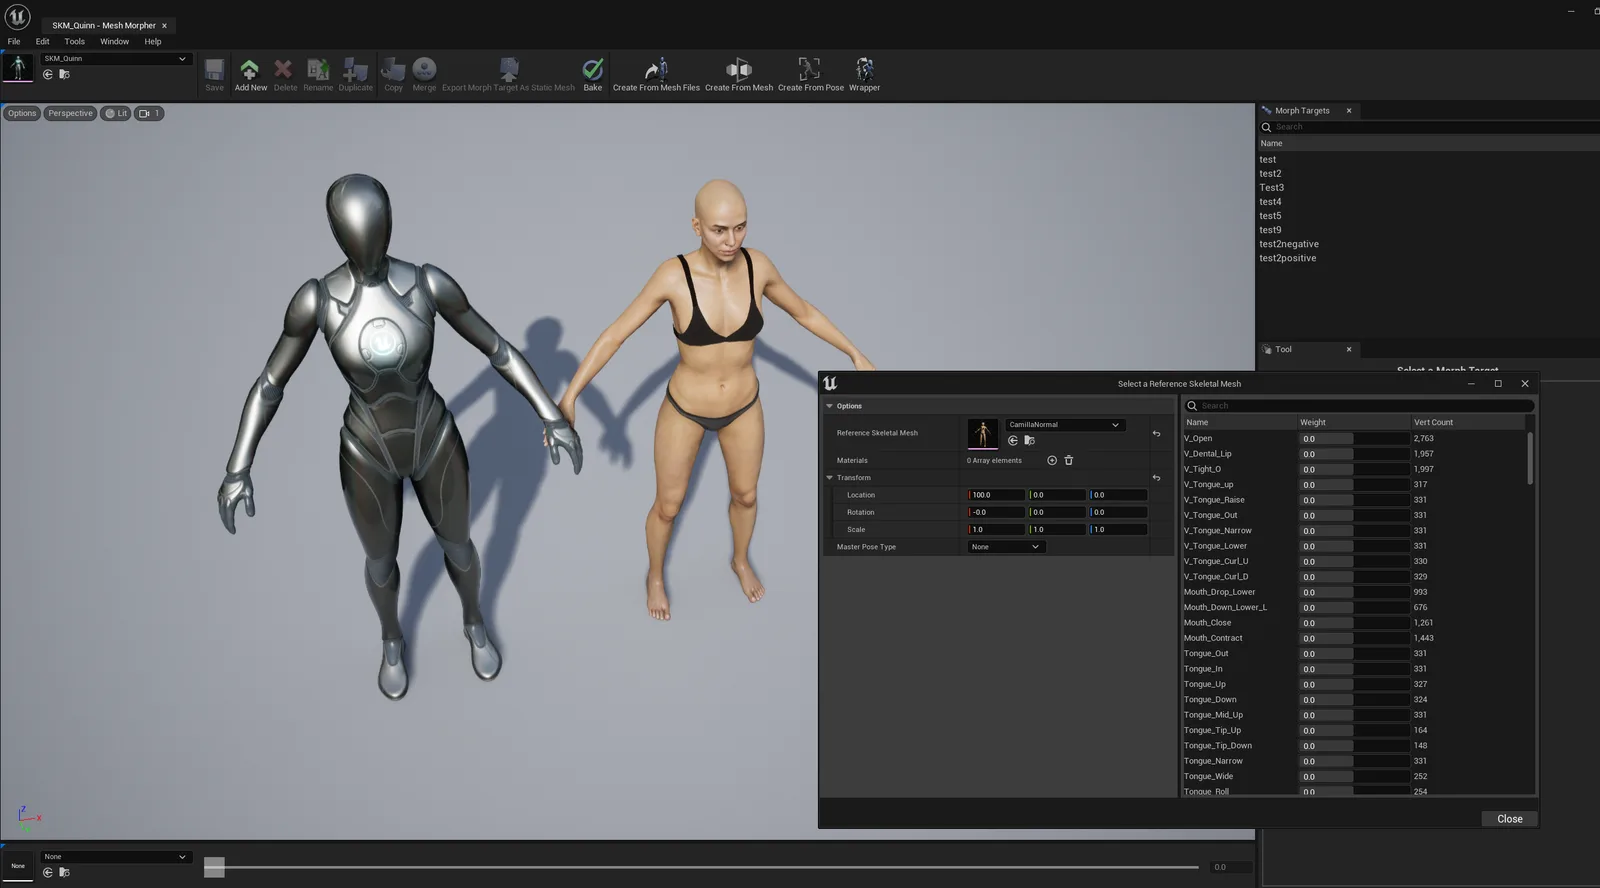
Mesh Morpher allows users to select a Reference Mesh in order to help them with Sculpting Tools.
Reference Skeletal Mesh Window can be open by navigating to Tools drop down menu and clicking on Select a Reference Skeletal Mesh.
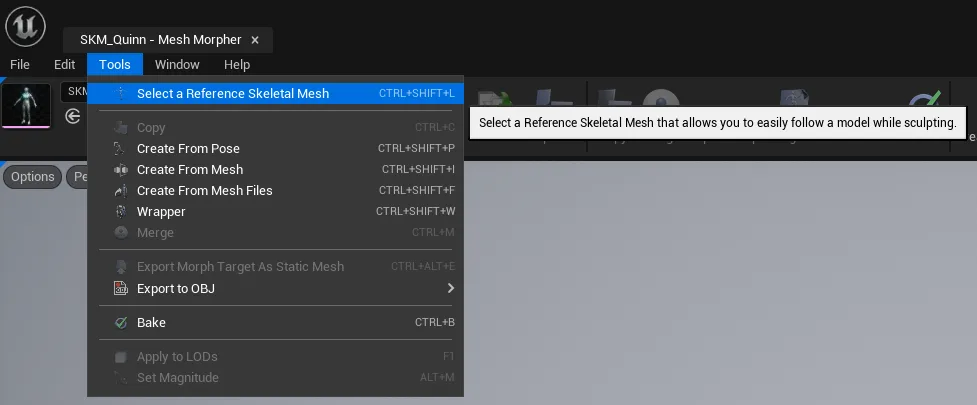
Once the Select a Reference Skeletal Mesh button is pressed, a dialog box will open where users can select several options.
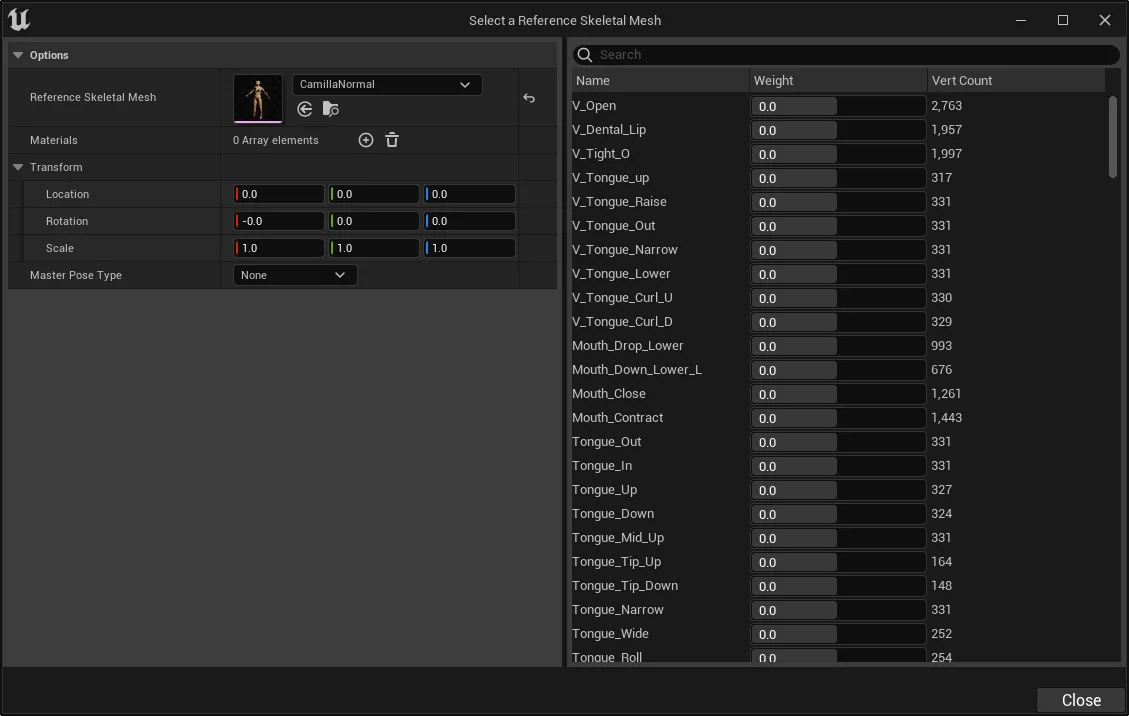
| Options | Description |
|---|---|
| Reference Skeletal Mesh | The selected Reference Skeletal Mesh |
| Materials | Materials can be manually assigned to the Reference Skeletal Mesh. If none, then the mesh's materials will be used. |
| Transform | Transformation that can be applied to the Reference Skeletal Mesh. |
| Master Pose Type | There are 3 types of Master Pose. |
Users can also enable Morph Targets on the Reference Skeletal Mesh from the right Morph Target List.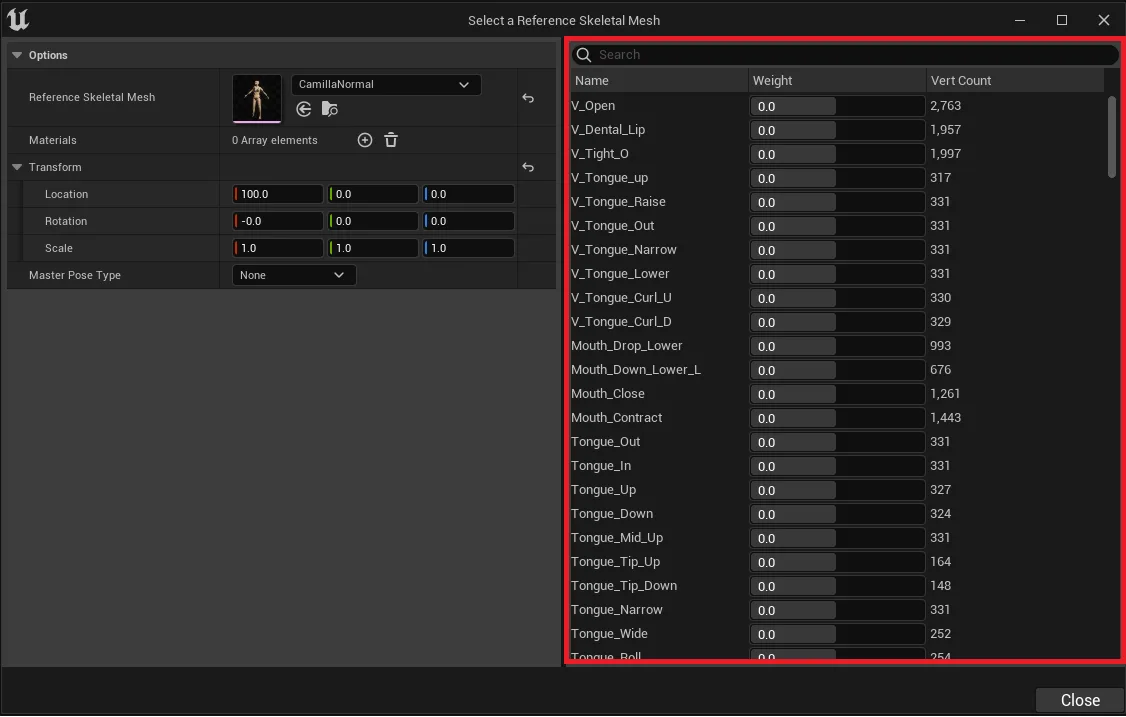
Setting the Master Pose component to "Reference" allows to create Corrective Morph Targets which can be used to achieve various things like fitting clothing to other body types.
Keyboard shortcut: Ctrl + Shift + L
Classic › Editor › Tools
Mesh Morpher excel at creating Corrective Morph Targets.
A corrective Morph Target can be used to alter a pose.
Classic › Editor › Tools
Classic › Editor › Tools
Classic › Editor › Tools
Classic › Editor
Classic › Editor › Advanced Operations
Mesh Morpher allows users to create a Morph Target from another Mesh, thus providing the ability to morph objects/face/bodies into other Skeletal Meshes.
In order for this functionality to work correctly, meshes need to share same vertex count and order.
Mesh Morpher goes even further by checking for the same vertex count and order on any of the available LODs, and if found, will grab the deltas and project them on LOD0(and then the LOD0 projected result will be re-projected on all other LODs).
There are two ways to create Morph Targets from Mesh:

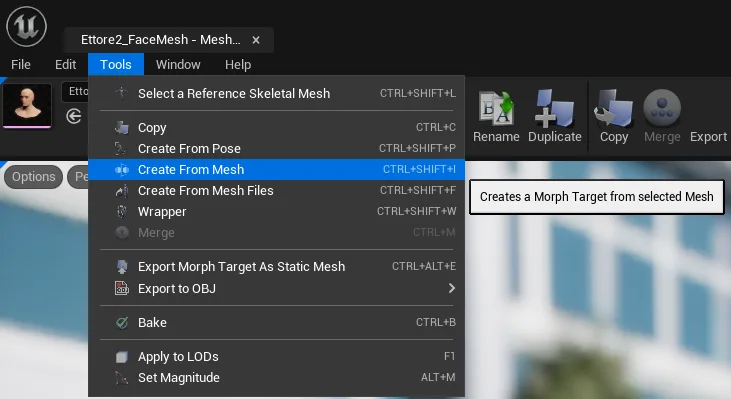
Once the Create from Mesh button is pressed, a dialog box will open where users can select several options.
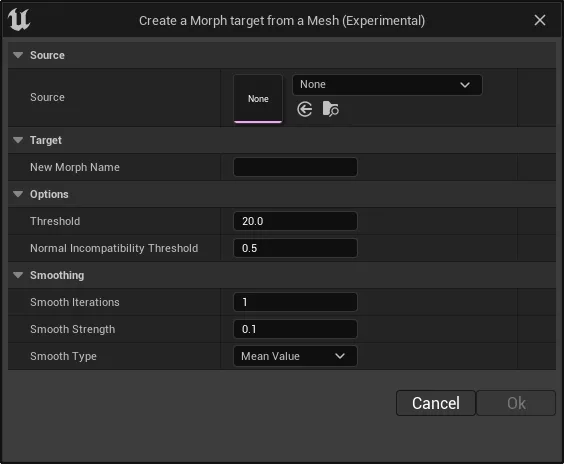
| Options | Description |
|---|---|
| Source | The Skeletal Mesh to create the Morph Target from. |
| New Morph Name | Users can also pick the Morph Target name that will be created. |
| Threshold | Maximum Distance threshold between a vertex in the target mesh and a vertex in source mesh, at which they are considered to be correspondent. Used only by Projection. |
| Normal Incompatibility Threshold | Normal threshold at which a triangle is deemed as incompatible. This helps to avoid triangle flipping during Projection. |
| Smooth Iterations | Smooth Iterations steps used to Smooth the resulted Projected Deltas. |
| Smooth Strength | Smooth Strength used to Smooth the resulted Projected Deltas. |
| Smooth Type | Smooth Type used to Smooth the resulted Projected Deltas. |
For Meta Human faces, in order to have the best result, in MHC, select same body, eyelashes, eyebrows and hair in order to maximize the possibility to have same vertex count and order on LOD0.
Result
If successful, a dialog box will pop, notifying users whether the operation was successful. 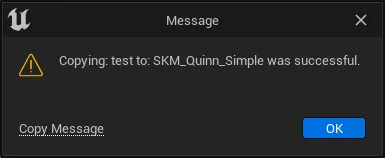
If the Morph Target name is already in use, a new dialog box will pop asking whether to overwrite or change the name. Pressing Yes will clear and overwrite the existing Morph Target.
Keyboard shortcut: Ctrl + Shift + I
The button is greyed out when there's no skeletal mesh loaded
Classic › Editor › Advanced Operations
Mesh Morpher allows users to create a Morph Target from another Mesh Files and it supports both FBX/OBJ formats.
In order to create Morph Targets from Mesh Files, Mesh Morpher requires two file inputs (Base and Morphed), from which it grabs the deltas. Those deltas are then projected on the Skeletal Mesh.
In order for this functionality to work correctly, both Mesh Files (Base and Morphed) need to share same vertex count and order.
Enabling UV Matching allows users to overcome this limitation.
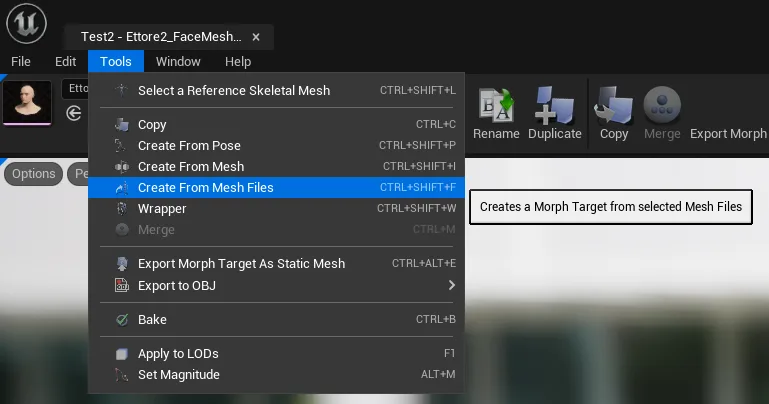
There are two ways to create Morph Targets from Mesh Files:

Create from Mesh Files supports both triangulated and quads meshes with the condition that both files have same vertex count and order.
It is recommended that if users want to work with quads, to convert the base file to quads(Blender or any other DCC) and then they duplicate the quad base file(name it Morphed) and they do the work on the duplicate file.
In Blender this is how to convert triangle meshes to quads.
Mesh Morpher exports and imports Mesh Files with X as Forward Axis and Y as Up Axis, therefor imports and exports in third-party DCC files should use the same settings.
In order for the Morph Target to be successfully created, all 3 meshes (Base, Morphed and Skeletal Mesh) should face same direction. This can be always achieved by changing the axes or transforms of the input files.
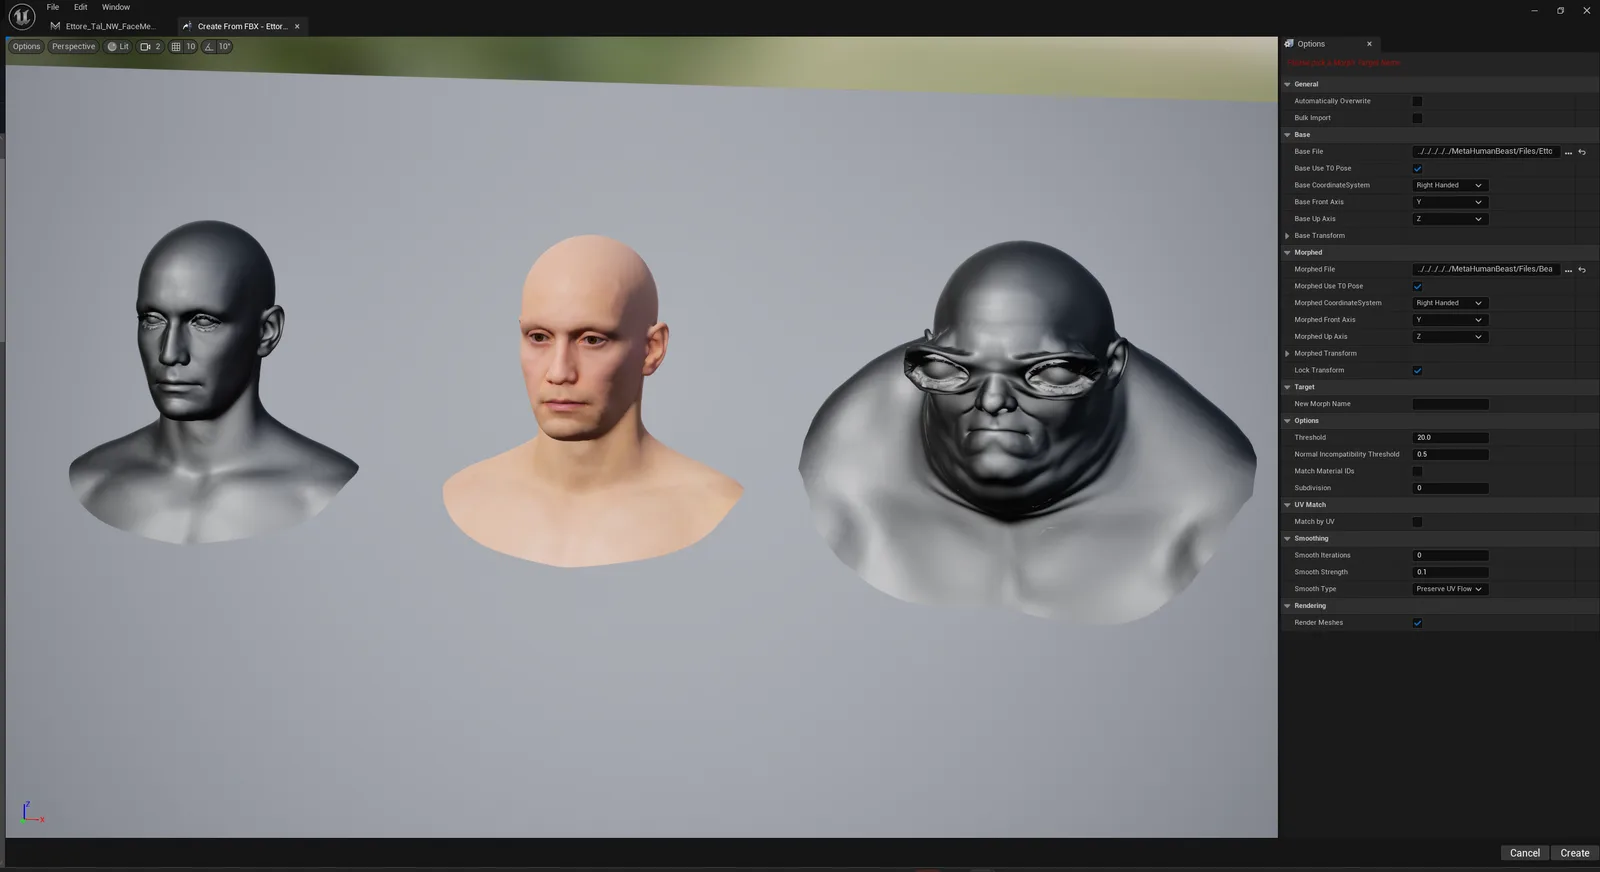
Mesh OBJ Files have been imported using X as Front and Y UP in blender and exported using the same.
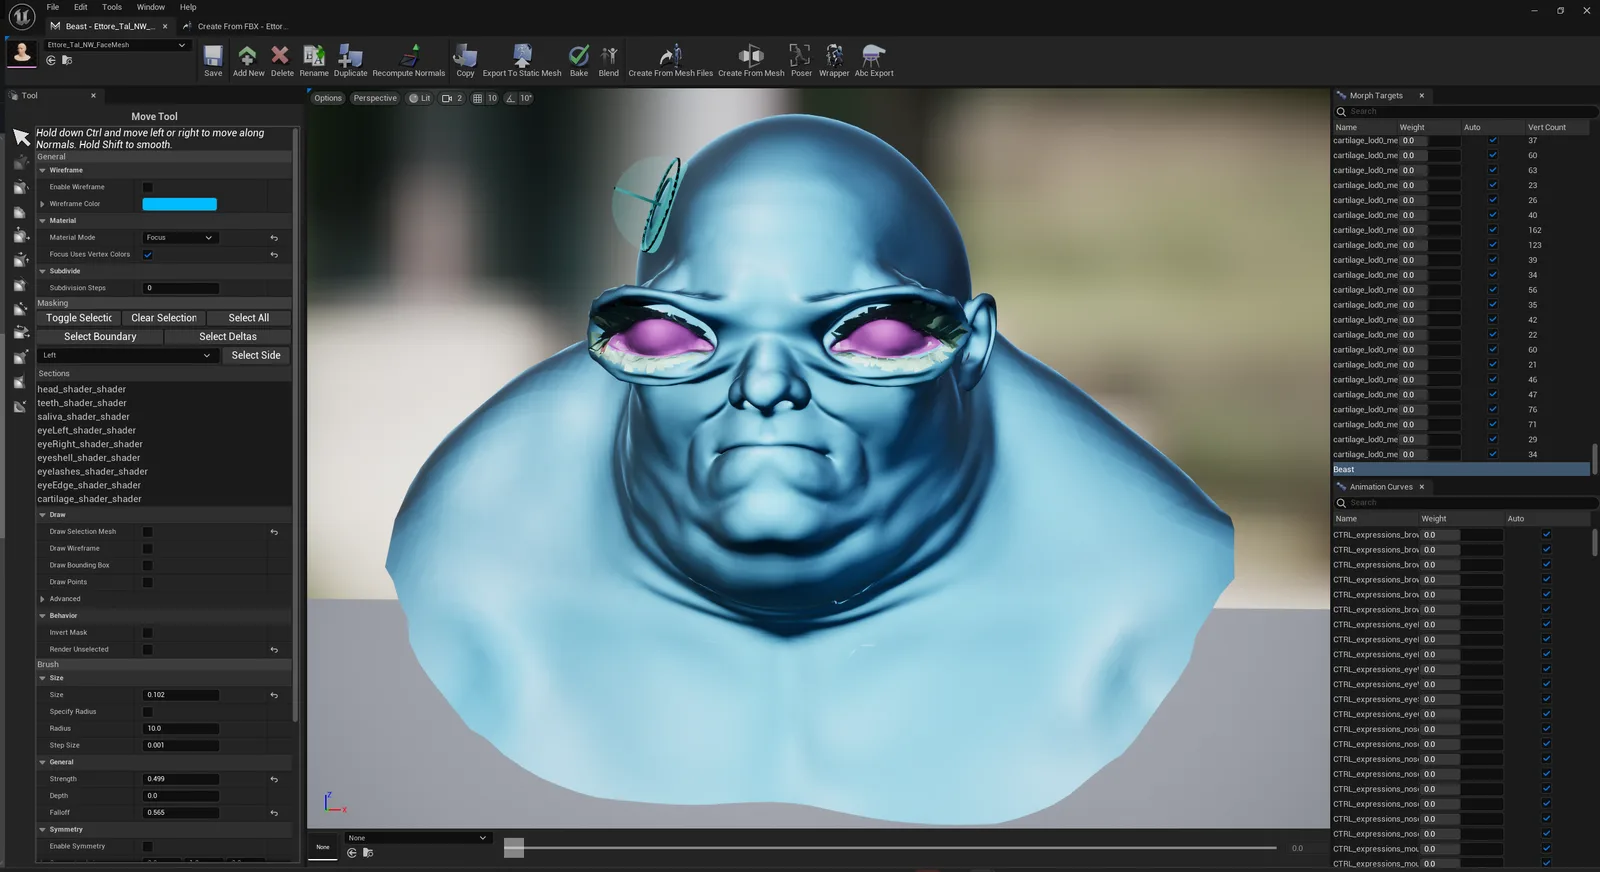
Result
Mesh Morpher doesn't require for Base file to be identical with the Skeletal Mesh, but the more they resemble the better the output result.
Threshold is what controls how permissive Mesh Morpher is when the projection is happening. Higher Threshold means that Mesh Morpher is more permissive with the differences between Base and Skeletal Mesh. With a very low Threshold(for example 0.001) users are hinting that only very similar vertices would be part of the final result.
Mesh Morpher will throw errors when something goes wrong:
Morph Target: %s has no valid data. Base Mesh and Morphed Mesh are the same or did not generate any deltas. This error is self explanatory, when the Base and Morphed files are the same, there are no deltas to project.Morph Target: %s has no valid data. Base Mesh and Skeletal Mesh have no similarities? This error could happen for various reasons, either the base mesh is too different from the skeletal mesh, or it doesn't face the same direction as the skeletal mesh.Default settings are what works in most tests and experiments. Users are supposed to tweak and customize the settings based on their inputs.
Create from Mesh Files and CC4 in Mesh Morpher
If successful, a dialog box will pop, notifying users whether the operation was successful.
If the Morph Target name is already in use, a new dialog box will pop asking whether to overwrite or change the name. Pressing Yes will clear and overwrite the existing Morph Target.
Keyboard shortcut: Ctrl + Shift + F
The button is greyed out when there's no skeletal mesh loaded
Classic › Editor › Advanced Operations › Create from Mesh Files
| Option | Description |
|---|---|
| Automatically Overwrite | If selected, Morph Targets on target Skeletal Mesh will automatically be overwritten without asking. |
| Bulk Import | Whether to enable or disable bulk import. Enabling this option will switch Morphed File to Morphed Directory and vice-versa |
| Prefix | String to prefix morph targets names on bulk import (appears when Bulk Import enabled) |
| Suffix | String to append to morph targets names on bulk import (appears when Bulk Import enabled) |
Other settings:
| Option | Description |
|---|---|
| New Morph Name | Target Morph Name. If it exists you can overwrite. (appears only with Bulk Import disabled) |
| Render Meshes | Whether files are rendered in the scene |
Classic › Editor › Advanced Operations › Create from Mesh Files
| Options | Description |
|---|---|
| Base File | Original/Unchanged Mesh File |
| Base Use T0 Pose | Enable this option to use frame 0 as reference pose. This works only for FBX files. Useful for imports from CC3/CC4 |
| Base Coordinate System | Coordinate System used to import the file. Supports both left and right. |
| Base Front Axis | The default Front axis in Unreal Engine(Y) |
| Base Up Axis | The default UP axis in Unreal Engine(Z) |
| Base Transform | Offset the mesh file. Allows location, rotation and scale. |
Classic › Editor › Advanced Operations › Create from Mesh Files
| Options | Description |
|---|---|
| Morphed File | Modified version of Base File (appears with Bulk Import disabled) |
| Morphed Directory | Directory containing multiple modified versions of Base File (appears with Bulk Import enabled) |
| Morphed Use T0 Pose | Enable this option to use frame 0 as reference pose. This works only for FBX files. Useful for imports from CC3/CC4 |
| Morphed Coordinate System | Coordinate System used to import the file. Supports both left and right. |
| Morphed Front Axis | The default Front axis in Unreal Engine(Y) |
| Morphed Up Axis | The default UP axis in Unreal Engine(Z) |
| Morphed Transform | Offset the mesh file. Allows location, rotation and scale. |
| Lock Transform | If enabled, Morphed inputs use same transform as Base mesh. |
Classic › Editor › Advanced Operations › Create from Mesh Files
| Option | Description |
|---|---|
| Threshold | Maximum Distance threshold between a vertex in the target mesh and a vertex in source mesh, at which they are considered to be correspondent. |
| Normal Incompatibility Threshold | Normal threshold at which a triangle is deemed as incompatible. This helps to avoid triangle flipping during Projection. |
| Match Material IDs | Apply deltas only to vertices that have same material ID. The material ID is checked between skeletal mesh and base file. This requires both to have same material count and order. |
| Subdivision | Subdivide the input files. This usually increase quality and the precision of the final resulted Morph Target if topology is drastically changed in base file |
Classic › Editor › Advanced Operations › Create from Mesh Files
| Option | Description |
|---|---|
| Match By UV | !!Experimental!! Match Base and Morphed files by UVs, ignoring vertex count and order. This shouldn't be used with welded meshes because they don't have their UVs intact. |
| Match UV Iterations | Match UV iterations. Vertices without a matching UV correspondent are reiterated for the amount of iterations and assigned neighbor found matches. |
Classic › Editor › Advanced Operations › Create from Mesh Files
| Option | Description |
|---|---|
| Smooth Iterations | Smooth Iterations steps used to Smooth the resulted Projected Deltas. |
| Smooth Strength | Smooth Strength used to Smooth the resulted Projected Deltas. |
| Smooth Type | Smooth Type used to Smooth the resulted Projected Deltas. |
Classic › Editor › Advanced Operations
Mesh Morpher allows users to create Morph Targets from Poses.
Mesh Morpher allows users to create Morph Targets from Poses.
Poses can be an Animation frame, a Bone Snapshot or a combination of an Animation frame and Bones modification.
There are two ways to create Morph Targets from Pose:

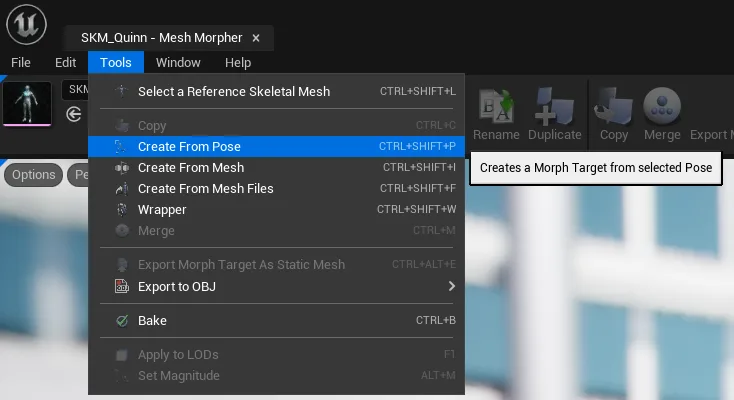
Once the Create from Pose button is pressed, a dialog box will open where users can select several options.
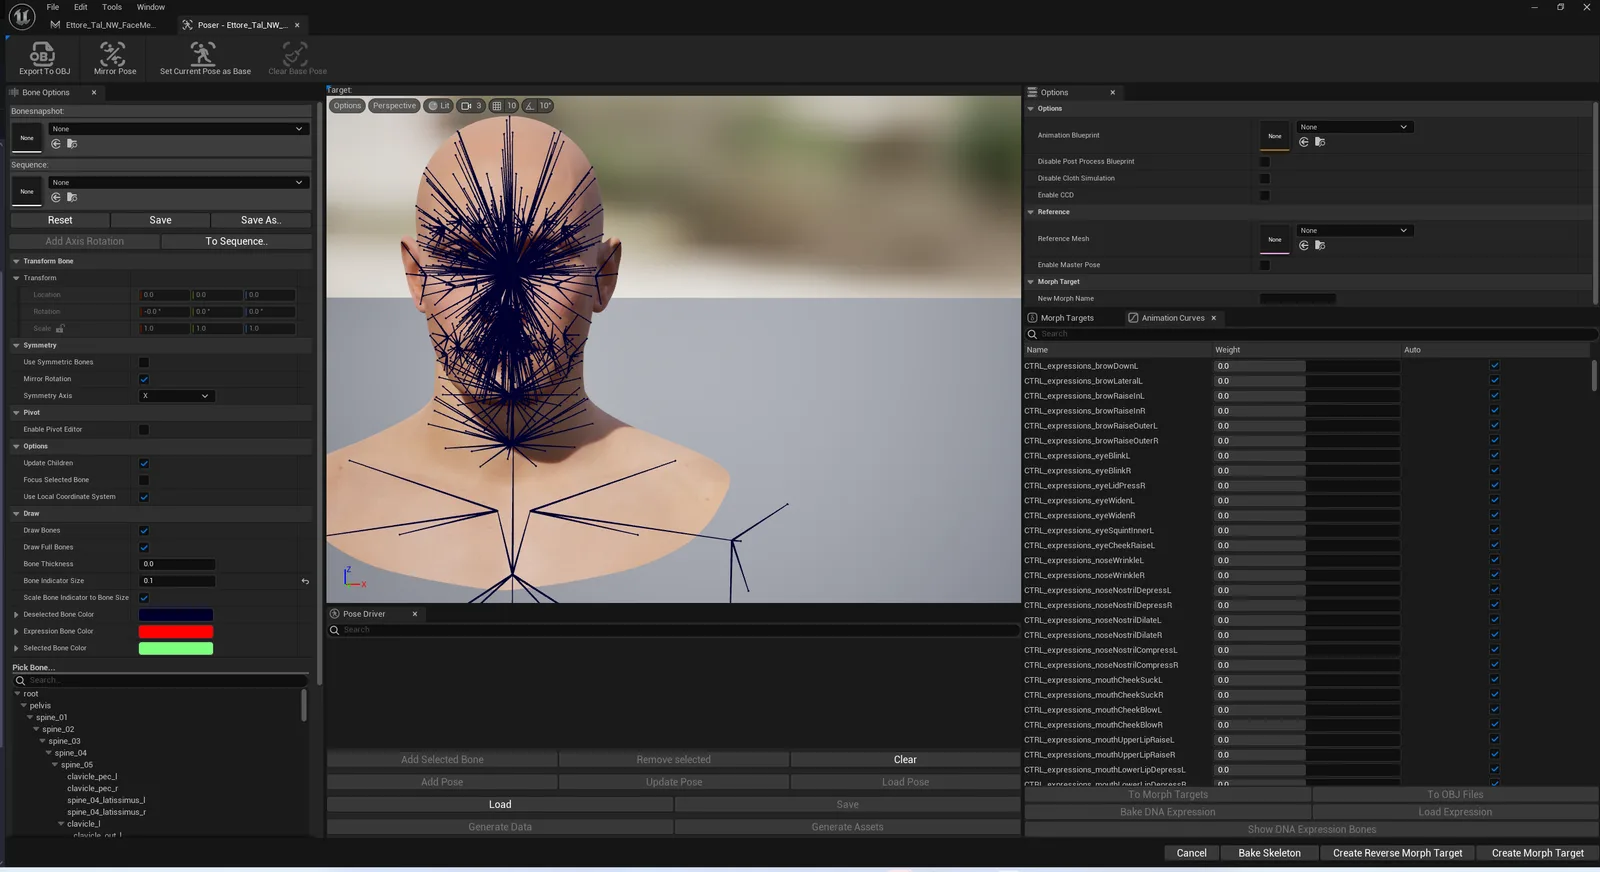
| Options | Description |
|---|---|
| Animation Blueprint | Allows users to select and enable an Animation Blueprint in Poser |
| Disable Post Process Blueprint | Toggles the Post Process blueprint in the selected skeletal mesh in Poser |
| Disable Cloth Simulation | Toggles the cloth simulation for the selected skeletal mesh in Poser |
| Enable CCD | Toggles Continuous Collision Detection in Poser |
| Reference Mesh | Allows users to select a skeletal mesh as a reference |
| Enable Master Pose | Set the Leader/Master Pose Component for the reference mesh to the main skeletal mesh opened in Poser |
| New Morph Name | Users can also pick the Morph Target name that will be created. |
Classic › Editor › Advanced Operations › Poser
Bake Skeleton allows users to permanently bake skeleton and mesh changes in Poser to the Skeletal Mesh and Skeleton.
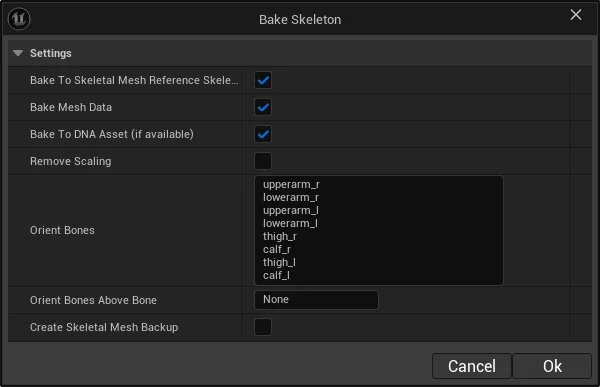
| Option | Description |
|---|---|
| Bake to Skeletal Mesh Reference Skeleton | This option enables the skeleton changes to be baked in the Skeleton Reference which is located inside the Skeletal Mesh. |
| Bake Mesh Data | This option allows to bake Mesh data to skeletal Mesh. Required to reflect skeleton changes in the mesh data. |
| Bake To DNA Asset | Bakes skeleton and Mesh data to the DNA Asset if available. This is intended for Meta Humans only. It doesn't bake any Morph Target data. |
| Remove Scaling | This scales back to 1,1,1 all bones while preserving translations and rotation. Useful for FBX exports. |
| Orient Bones | List of bones to recompute orientations for. To disable, simply remove the bones from the list. This impacts how Pose Drivers and control Rigs functions(for metahumans as well) |
| Orient Bones Above Bone | Recomputes the orientations for all the bones above the selected bone name in the hierarchy. To disable, simply set the bone name to None. This impacts how Pose Drivers and control Rigs functions(for metahumans as well) |
| Create Skeletal Mesh Backup | Whether to create a backup before baking. Users will be prompted to save the asset. The asset will have "_bk" suffix automatically added. |
Classic › Editor › Advanced Operations › Poser
This option allows users to create a reversed Morph Target from the current Pose. 
By default the Morph Targets contain the deltas between the default Skeletal Mesh and the modified Skeletal Mesh.
By creating a Reverse Morph Target, the Morph Target will hold the deltas between the Modified Skeletal Mesh and the default Skeletal Mesh.
If the Toolkit(Main Window) has a Pose asset selected or there is a Base Pose selected in Poser then this Morph Target will be a reversed corrective Morph Target between those two poses.
Classic › Editor › Advanced Operations › Poser
This option allows users to create a Morph Target from the current Pose. 
By creating a Morph Target, the Morph Target will hold the deltas between the default Skeletal Mesh and the modified Skeletal Mesh(Poser pose).
If the Toolkit(Main Window) has a Pose asset selected or there is a Base Pose selected in Poser then this Morph Target will be a reversed corrective Morph Target between those two poses.
Classic › Editor › Advanced Operations › Poser
Poser allows users to interact with Animation Curves.
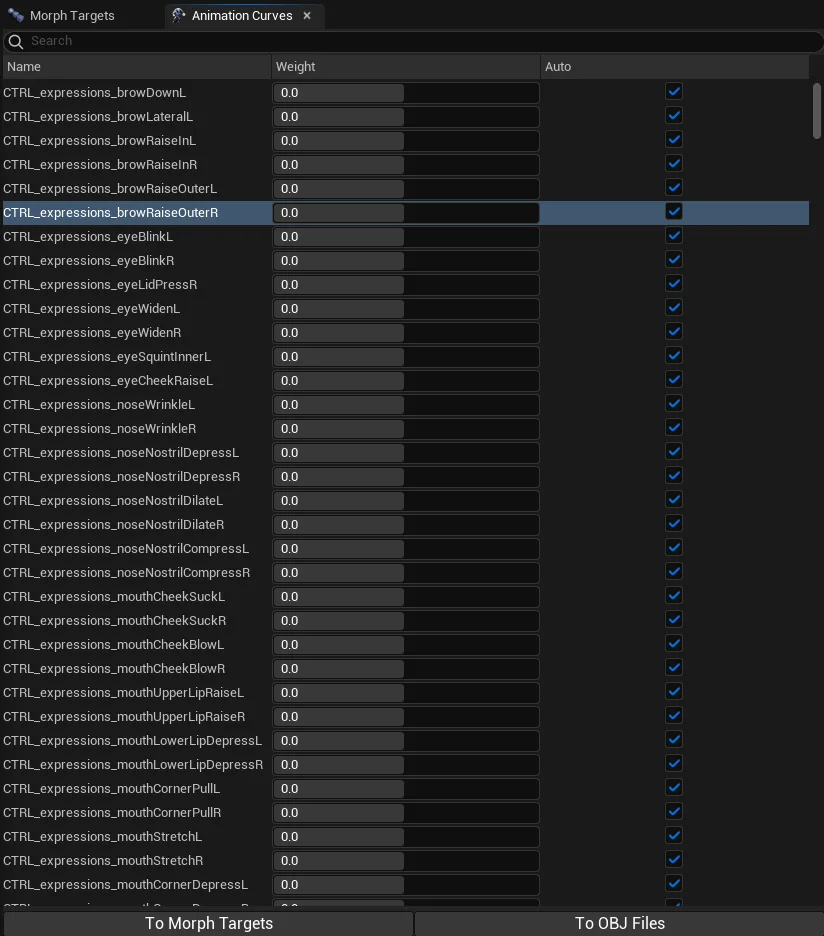
Animation curves can be enabled and disabled and also exported to OBJ files or converted to Morph Targets.
Classic › Editor › Advanced Operations › Poser › Animation Curves
Animation Curves can be converted to Morph Targets.
To do so, select the animation curves and click on To Morph Targets.
A new dialog will open.
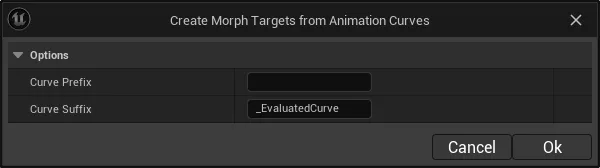
In this new dialog users can select a prefix and suffix for the new Morph Targets names.
Classic › Editor › Advanced Operations › Poser › Animation Curves
Animation Curves can be exported to OBJ files.
To do so, select the animation curves and click on To OBJ Files or right click the list and select the same.
A new dialog will open.
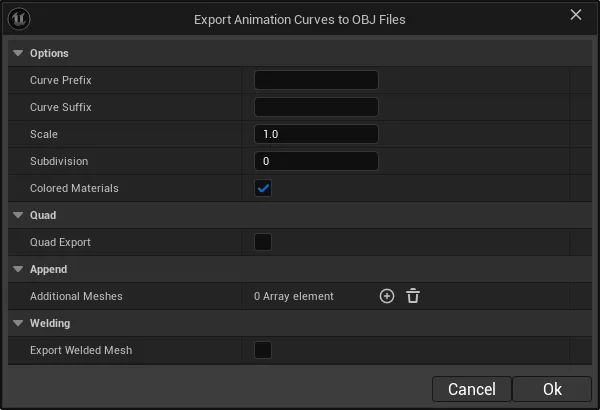
In this dialog window, users will be able to select a prefix and suffix for the OBJ files, append additional meshes and also weld the OBJ file.
Classic › Editor › Advanced Operations › Poser
Poser allows users to interact with Morph Targets.
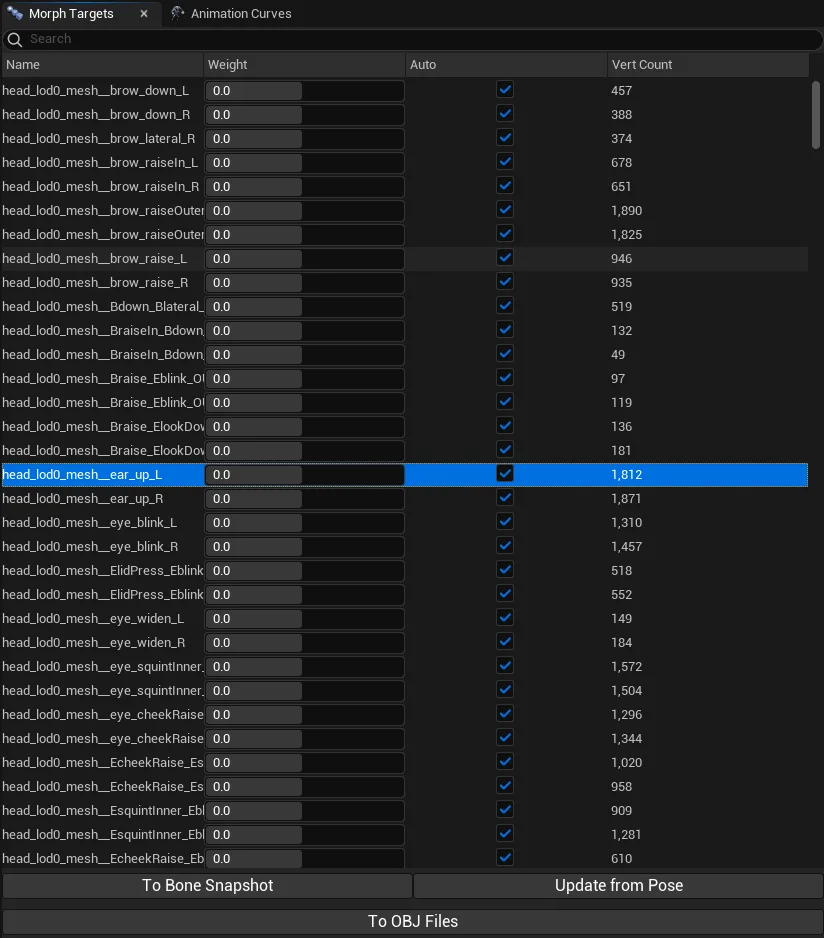
Morph Targets can be enabled and disabled and also exported to OBJ files.
Classic › Editor › Advanced Operations › Poser › Morph Targets
Bone Snapshots can be created from Morph Targets which allows users to fit the skeleton to match the Morph Target shape.
In order to do so, select a Morph Target and click on To Bonesnapshot.
A dialog window will open.
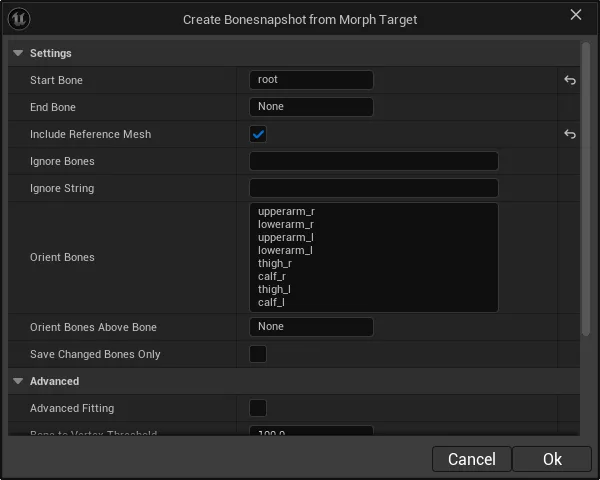
| Option | Description |
|---|---|
| Start Bone | Pick the first bone in the Bonesnapshot. Users can select whether to bonesnapshot will start from root or any other bone in the skeleton hierarchy |
| End Bone | The end Bone in the hierarchy that will be part of the bonesnapshot |
| Include Reference Mesh | Whether to include the selected reference skeletal mesh in the bonesnapshot. This option appears only when a reference skeletal mesh is selected in Poser and a Morph Target with the same name exists on both meshes. |
| Ignore Bones | List of Bones to ignore. One per row. Ignored bones will not be part of the bonesnapshot |
| Ignore String | Ignore all bones containing the string. Ignored bones will not be part of the bonesnapshot |
| Orient Bones | List of bones to recompute orientations for. To disable, simply remove the bones from the list. This impacts how Pose Drivers and control Rigs functions(for metahumans as well) |
| Orient Bones Above Bone | Recomputes the orientations for all the bones above the selected bone name in the hierarchy. To disable, simply set the bone name to None. This impacts how Pose Drivers and control Rigs functions(for metahumans as well) |
| Save Changed Bones Only | Whether the bonesnapshot will hold only the bones that have their transform changed during the fitting. |
| Advanced Fitting | Enable this when fitting bones to morph targets for meta human expressions. |
| Bone to Vertex Threshold | Maximum distance at which a bone is deemed to be compatible with a vertex. |
| Bone to Bone Threshold | Maximum distance at which a bone is deemed to be compatible with another bone. |
| Max Distance To Surface | Maximum distance to surface |
| Use Vertex Weights | Whether to use vertex weights when available |
| Preserve Relative Bone Transforms | Whether to preserve relative bone transformations. |
| Vertex Sample Size | Nearest Vertex Sample Size used to reposition the bones. |
Advanced Bone Fitting is using Dem Bones and its purpose solely intended to create bonesnapshots from facial expressions morph targets.
Copyright (C) 2019 Electronic Arts Inc. All rights reserved.
Redistribution and use in source and binary forms, with or without modification, are permitted provided that the following conditions are met:
THIS SOFTWARE IS PROVIDED BY ELECTRONIC ARTS AND ITS CONTRIBUTORS "AS IS" AND ANY EXPRESS OR IMPLIED WARRANTIES, INCLUDING, BUT NOT LIMITED TO, THE IMPLIED WARRANTIES OF MERCHANTABILITY AND FITNESS FOR A PARTICULAR PURPOSE ARE DISCLAIMED. IN NO EVENT SHALL ELECTRONIC ARTS OR ITS CONTRIBUTORS BE LIABLE FOR ANY DIRECT, INDIRECT, INCIDENTAL, SPECIAL, EXEMPLARY, OR CONSEQUENTIAL DAMAGES (INCLUDING, BUT NOT LIMITED TO, PROCUREMENT OF SUBSTITUTE GOODS OR SERVICES; LOSS OF USE, DATA, OR PROFITS; OR BUSINESS INTERRUPTION) HOWEVER CAUSED AND ON ANY THEORY OF LIABILITY, WHETHER IN CONTRACT, STRICT LIABILITY, OR TORT (INCLUDING NEGLIGENCE OR OTHERWISE) ARISING IN ANY WAY OUT OF THE USE OF THIS SOFTWARE, EVEN IF ADVISED OF THE POSSIBILITY OF SUCH DAMAGE.
Classic › Editor › Advanced Operations › Poser › Morph Targets
Morph Targets can be updated from the current Pose in Poser.
This means that if the bones changed, by Updating from Pose the deltas in Morph Target will only contain the deltas between the Pose in Poser and the final Morph Target shape.
Classic › Editor › Advanced Operations › Poser › Morph Targets
Morph Targets can be exported to OBJ files from Poser
To do so, select the Morph Target and click on To OBJ Files or right click the list and select the same.
A new dialog window will open.
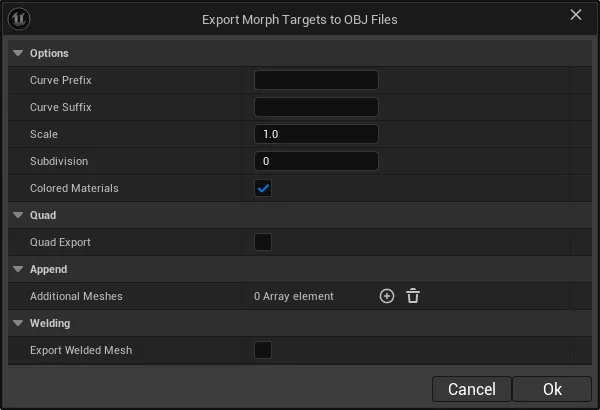
In this dialog window, users will be able to select a prefix and suffix for the OBJ files, append additional meshes and also weld the OBJ file.
Classic › Editor › Advanced Operations › Poser
The Poser allows users to create corrective Morph Targets. 
Corrective Morph Targets hold deltas between Base Pose and Current Pose.
In order to set a Base Pose users have to navigate to Tools menu and select Set Current Pose as Base.
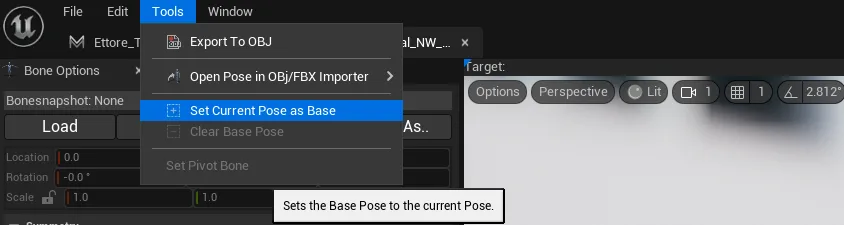
To reset the Base Pose select Clear Base Pose.
Clicking on Create Morph Target or Create Reverse Morph Target will create the corrective Morph Target.
Classic › Editor › Advanced Operations › Poser
Bone Editor in Poser allows users to modify bone transforms and pivots.
Bone Editor allows Symmetry and a lot of additional customization that can improve the experience.
Holding Left Ctrl while clicking a bone will toggle its selection status. Users can select multiple bones at once.
Clicking on no bone will deselect all bones.
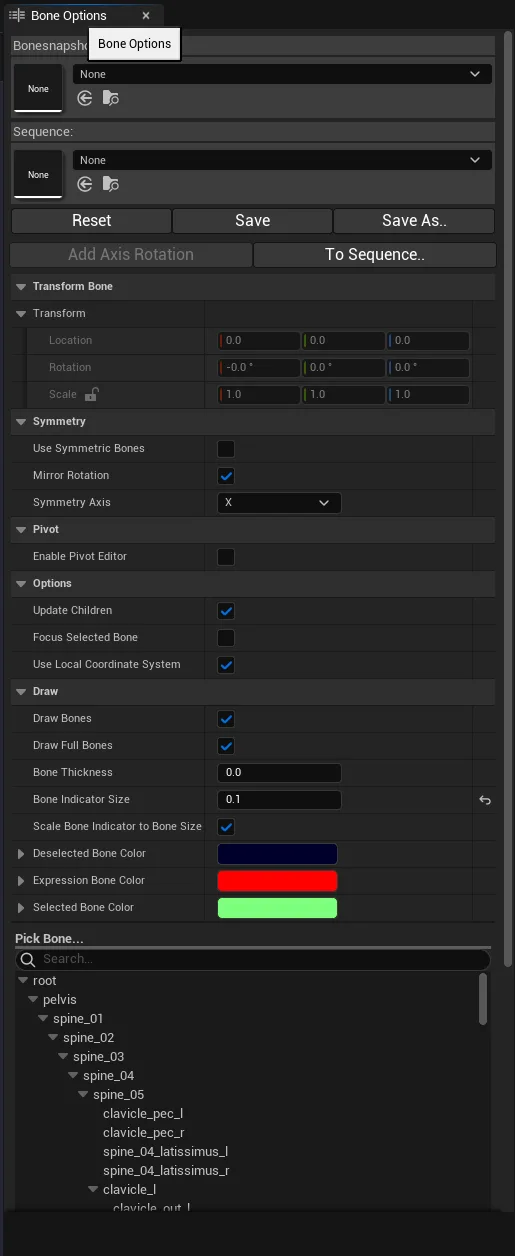
Bone editor supports Bone Symmetry and can be enabled by enabling the Symmetry Checkbox
Bonesnapshots are another important component of Bone Editor and users are allowed to Load and Save Bonesnapshots that will hold the skeleton transformation.
Classic › Editor › Advanced Operations › Poser › Bone Editor
The Poser in Mesh Morpher allows users to have transform symmetric bones.
| Options | Description |
|---|---|
| Use Symmetric Bones | Whether to enable or disable bone Symmetry |
| Mirror Rotation | Whether transforming a symmetric bone uses symmetric rotation |
| Symmetry Axis | Symmetry axis used for symmetric bone transformation |
Classic › Editor › Advanced Operations › Poser › Bone Editor
The Poser in Mesh Morpher allows Pivot editing.
| Options | Description |
|---|---|
| Enable Pivot Editor | Enabling Pivot Editor allows users to transform bones without affecting Mesh Data. Disabling the Pivot Editor will bake the changes to the skeletal mesh. |
| Update Children | Whether changing the transform of a Pivot Bone updates its children bones. |
Classic › Editor › Advanced Operations › Poser › Bone Editor
Mesh Morpher allows users to customize the way bones are drawn in the viewport.
| Options | Descriptions |
|---|---|
| Draw Bones | Whether to draw Bones in viewport |
| Draw Full Bones | Whether to draw Full Bones in viewport |
| Bone Thickness | Bone Indicator Thickness |
| Bone Indicator Size | Bone Indicator Size |
| Scale Bone Indicator to Bone Size | Whether to scale Bone Indicator based on the Bone size |
| Deselected Bone Color | Color used to draw deselected bones |
| Selected Bone Color | Color used to draw selected bones |
Classic › Editor › Advanced Operations › Poser › Bone Editor
When working with Animation or control rigs(modular rigs as well) the engine in general doesn't play well with scaled bones.
To overcome this users should bake with Remove Scaling enabled
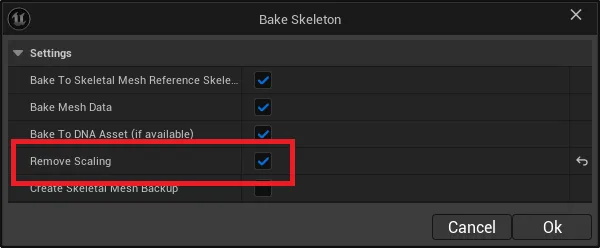
The above options works only for bones above root in the skeleton hierarchy.
For root bone(or any other bone) scaling can be removed manually.
After scaling, disable Update Children option in Bone Options side panel and set back the scale to 1.(don't forget to re-enable Update Children after you've completed this step).
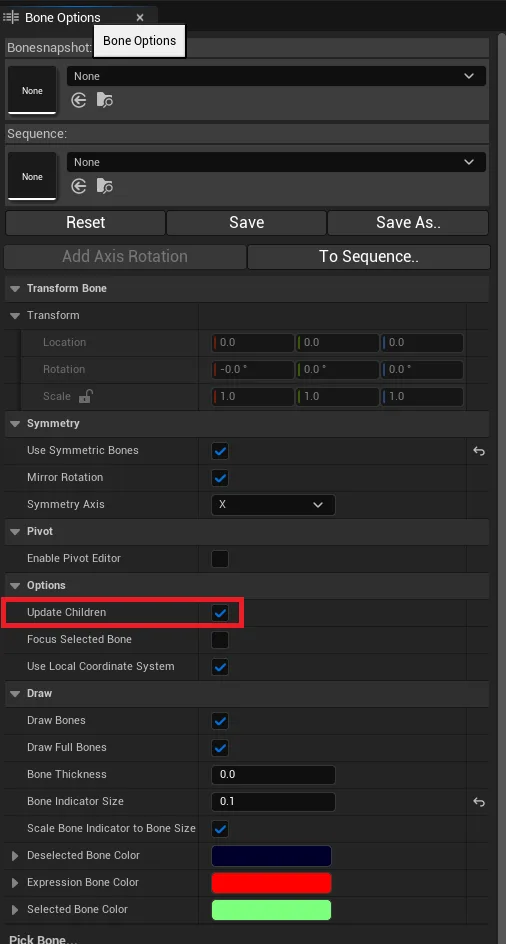
Here's a video going through the process.
Classic › Editor › Advanced Operations › Poser › Bone Editor
Lock the selected bones. Locked Bones always preserve their original transformation when using Transform Gizmo to edit skeleton.
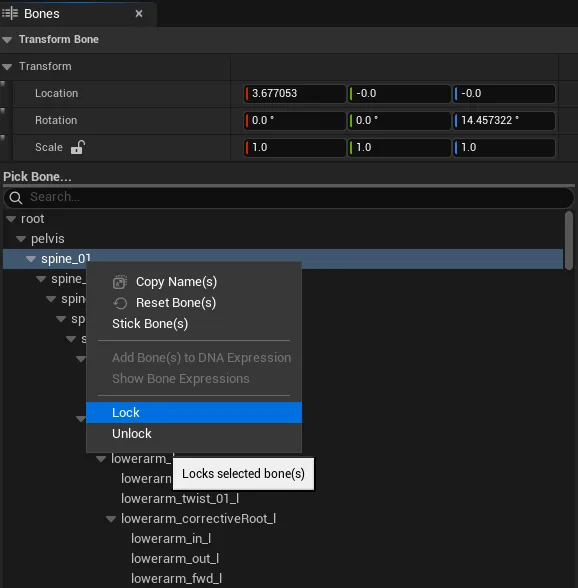
Lock the selected bones. Locked Bones always preserve their original transformation when using Transform Gizmo to edit skeleton.
Classic › Editor › Advanced Operations › Poser › Bone Editor
Unlock the selected bones. Locked Bones now being unlocked can be edited using Transform Gizmo.
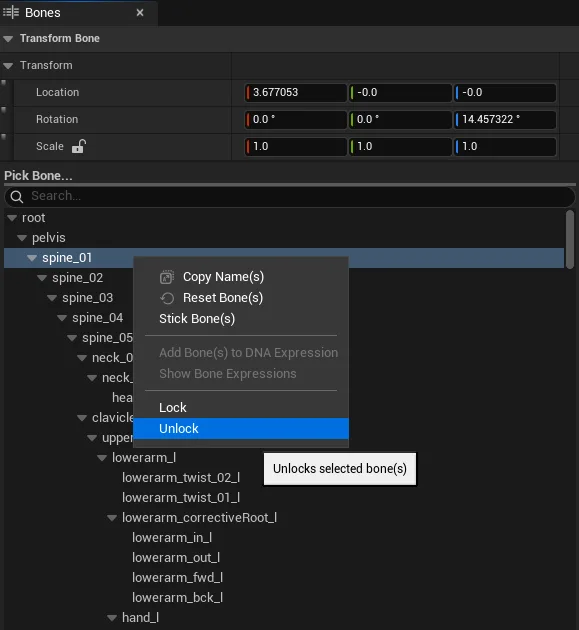
Unlock the selected bones. Locked Bones now being unlocked can be edited using Transform Gizmo.
Classic › Editor › Advanced Operations › Poser
Bone snapshots are a snapshot of all bones in a skeletal mesh that hold the required data to be loaded at runtime or in editor.
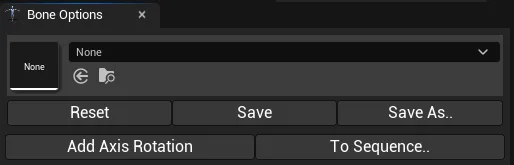
Bonesnapshot menu
| Options | Description |
|---|---|
| Asset Picker | Allows users to load a bonesnapshot or an animation sequence |
| Reset | Resets the current pose to the Default neutral pose |
| Save | Save a pose to the current bonesnapshot. If a bonesnapshot is not loaded it asks for a new bonesnapshot location |
| Save As... | Save the current pose as a new bonesnapshot |
| Add Axis Rotation | Manually add rotation in degrees on the selected axis. Allows users to rotate manually with increased precision |
| To Sequence.. | Save current Pose as an animation sequence |
Classic › Editor › Advanced Operations › Poser › Bone Snapshots
Mesh Morpher's Poser has the ability to create a corrective Bonesnapshot. 
Corrective Bonesnapshots can be used to correct certain poses and expressions using Animation Blueprints.
Classic › Editor › Advanced Operations › Poser
Classic › Editor › Advanced Operations › Poser
Classic › Editor › Advanced Operations › Poser
Classic › Editor › Advanced Operations › Poser
Classic › Editor › Advanced Operations
Mesh Morpher allows users to copy/project Morph Targets from one Skeletal Mesh to other Skeletal Meshes.
Users can bulk-copy Morph Targets to multiple Target Skeletal Meshes at once.
Mesh Morpher checks if the source and target skeletal meshes are identical(vertex count, Positions and Normals).
If the Skeletal Meshes are identical then Mesh Morpher proceeds with simply transferring the Morph Targets from Source to Target.
If the Skeletal Meshes are not identical then Mesh Morpher will attempt to project the Morph Targets on the Target Skeletal Meshes using the given parameters.
The quality of the resulted projection is directly proportional with the resemblance and similarity between the Source and Target. The more the meshes look alike, the better the projected result will be.
You can Copy a single Morph Target or multiple Morph Targets by using Ctrl+Click or Shift+Click to select additional Morph Targets in the Morph Targets list.
There are three ways to Copy Morph Targets:

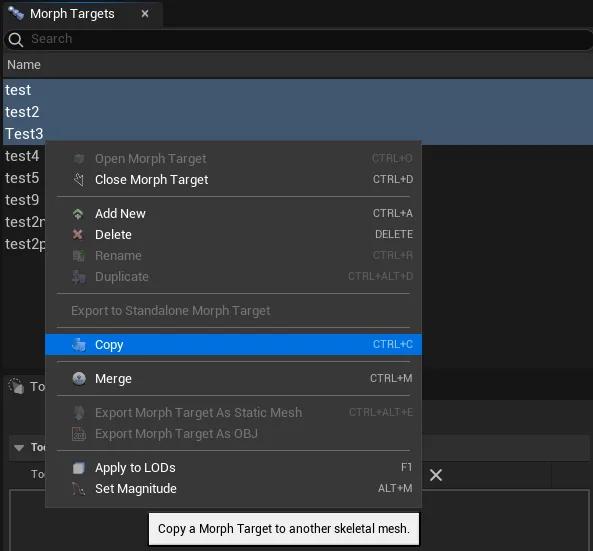
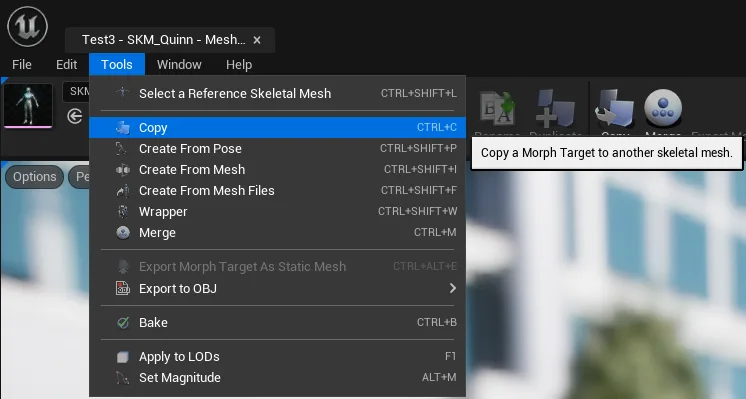
Once the Copy button is pressed, a dialog box will open where users can select several options.
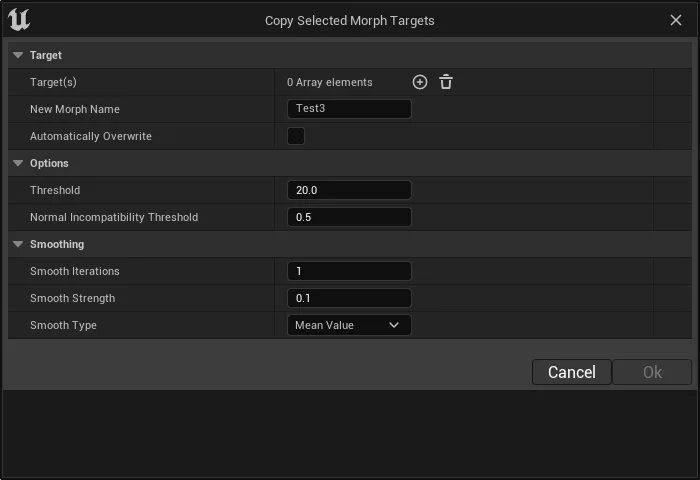
Users can add and remove multiple Targets by clicking the + sign in the Targets field
Users can remove items from the Targets list by the symbol as in the bellow image and select Delete.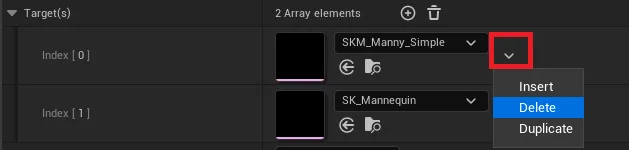
| Options | Description |
|---|---|
| New Morph Name | This parameter will become visible if only one Morph Target is selected for copying. This is the Morph Target Name on the Target Skeletal Mesh where Mesh Morpher will copy. |
| Automatically Overwrite | This option will allow users to automatically overwrite Morph Targets on the Target Skeletal Mesh if they already exist. Otherwise, if this option is disabled and a Morph Target with the same name exists on the Target Skeletal Mesh, users will be asked if they want to overwrite. |
| Threshold | Maximum Distance threshold between a vertex in the target mesh and a vertex in source mesh, at which they are considered to be correspondent. Used only by Projection. |
| Normal Incompatibility Threshold | Normal threshold at which a triangle is deemed as incompatible. This helps to avoid triangle flipping during Projection. |
| Smooth Iterations | Smooth Iterations steps used to Smooth the resulted Projected Deltas. |
| Smooth Strength | Smooth Strength used to Smooth the resulted Projected Deltas. |
| Smooth Type | Smooth Type used to Smooth the resulted Projected Deltas. |
For single Morph Target copy/projection, if there is any generated result, a dialog box will pop, notifying users whether the operation was successful. For multiple selection this dialog will not show.
Keyboard shortcut: Ctrl + C
The button is greyed out when there's no selection.
Copy allows single and multi-selection.
Morph Target copying is irreversible.
Classic › Editor › Advanced Operations
The wrapper is a new feature in Mesh Morpher and still experimental and WIP. Expect bugs.
Classic › Editor › Advanced Operations › Wrapper
here are several options that allow users to interact with the Wrapper and pre-configure it.
| Option | Description |
|---|---|
| SourceMesh | Allows users to select the Source Mesh. Source Mesh is the mesh we want to take the shape from using the wrapper. |
| SourcePose | Allows users to set a pose from an animation sequence asset. |
| SourcePoseFrame | Allows users to select a frame from the pose animation sequence |
| bHideSourcePreviewMesh | Whether to hide the Source preview mesh component |
| bHideSourceReferenceMesh | Whether to hide the Source reference mesh component |
| Option | Description |
|---|---|
| TargetPose | Allows users to set a pose from an animation sequence asset. |
| TargetPoseFrame | Allows users to select a frame from the pose animation sequence |
| bHideTargetPreviewMesh | Whether to hide the Source preview mesh component |
| bHideTargetReferenceMesh | Whether to hide the Source reference mesh component |
| Option | Description |
|---|---|
| NewMorphName | Target Morph Name. If it exists you can overwrite. |
| Option | Description |
|---|---|
| bLockCameras | Whether to lock the cameras to same transform in both viewports. Works only when both viewports have the same view types. |
Classic › Editor › Advanced Operations › Wrapper
The Wrapper has various options that allow users to customize how the wrapping performs and influence its results.
| Option | Description |
|---|---|
| KNN | Number of closest points when looking for correspondents on the opposite surface. |
| AffinityThreshold | Affinity values higher than this make flag values 1 (all others 0). |
| bNormaliseAffinity | Allow vertex affinities to be normalized independently to negate distance bias. |
| VertexRange | Range for discovering correspondences |
| bUseOrientation | Whether or not to use Vertex Normals when evaluating correspondences. |
| Option | Description |
|---|---|
| Iterations | Number of iterations. Higher count often provides better results. |
| StickyIterations | Weight Smoothing Sticky Iterations. Higher value means less impact as the vertices are moving together. |
| ElasticIterations | Weight Smoothing Elastic Iterations. Higher value means less impact as the vertices are moving together. |
| Option | Description |
|---|---|
| SmoothNeighbours | Number of neighbors in local smoothing region for each vertex. |
| SmoothGaussianWidth | Smoothing Gaussian Width. |
| Option | Description |
|---|---|
| SourceResolution | Resolution subdivision for source mesh. |
| TargetResolution | Resolution subdivision for target mesh. |
| bForceFit | Force fitting attempts a final fit of the wrap result to the source mesh. This requires a higher source resolution for better results. |
| Option | Description |
|---|---|
| ControlPointInfluence | Control Point Influence Radius. |
| ControlPointNormalThreshold | Whether or not the Control Points can find in their radius only un-flipped triangles. |
Classic › Editor › Advanced Operations › Wrapper
Control Points are used to hint the geometry to the non-rigid fitting algorithm.
Control Points are used to hint the geometry to the non-rigid fitting algorithm.
Users can add as many Control Points they want and can overlap them without any issue.
Control points need to have same count and order in both target and source meshes as they`re used to hint correspondent landmarks between the two of them to the non-rigid fitting algorithm.
There are several options that allow users to configure how control points work in Mesh Morpher's wrapper.
In order to add/remove Control Points, users have to select Control Points in Advanced Menu.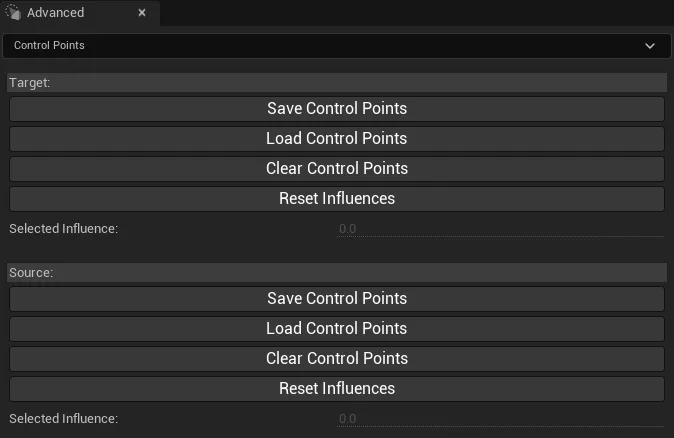
Users can Save, Load, Clear and change the Influence of the Control Points for both Target and Source.
To select a Control Point, users can Left Click on it which also allows them to change the influence for the selected Control Point
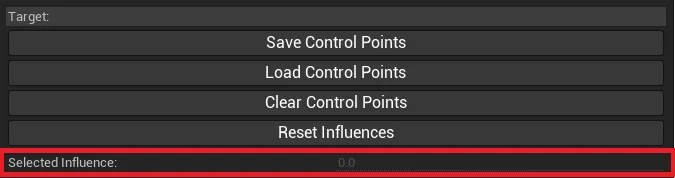
Reset Influence resets the Influences for all Control Points to the value located in Wrapper Settings.
Right Clicking on a Control Point will remove it and doing so will change the Index for the Control Points with a higher index.
Aligning bones, changing Section Selection or masking will clear out the selected Control Points.
| Options | Description |
|---|---|
| Control Point Influence | The Influence of a Control Point determines the radius in which the control points gather mesh vertices and uses them to find correspondent vertices in its Pair. |
| ControlPointNormalThreshold | Whether or not the Control Points can find in their radius only un-flipped triangles. |
Holding Left Shift while adding a Control Point will create a Symmetric Control Point as well.
There are several visual settings for Control Points that can be access by navigating to Edit->Settings.
| Options | Description |
|---|---|
| ElementThickness | The thickness used to display the debug sphere for Control Points |
| ControlPointSize | The size of the displayed Control Point dot marker on the mesh |
| ControlPointFontColor | Font Color of the Control Point Index Indicator |
| ControlPointFontShadowColor | Font Shadow Color of the Control Point Index Indicator |
| bShowDebugControlPoints | Whether to display the influence radius debug sphere for Control Points. |
Classic › Editor › Advanced Operations › Wrapper
The Bone Editor in the Wrapper allows users to match poses or set specific poses for both Target and Source.
In order to open Bone Editor, users have to select Bone Editor in Advanced Menu.
Selecting a bone in the Bone list or clicking on a bone in the viewport for both target and source will select the bone and display a Gizmo that allows to change rotation, translation and scale.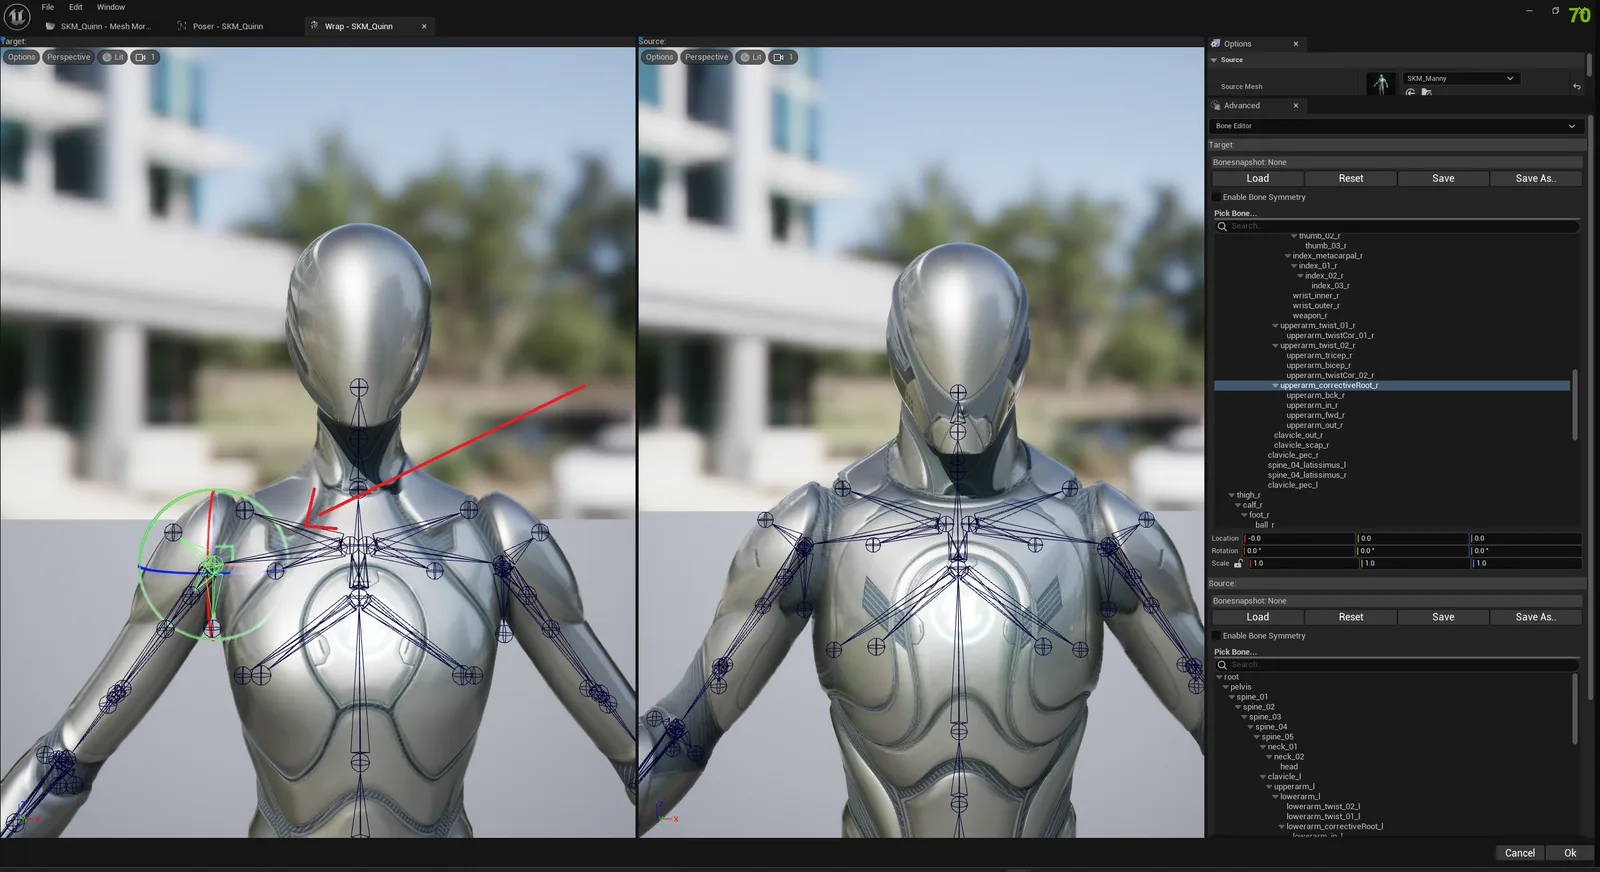
Users can also manually enter transformation values in the widgets below the bone list.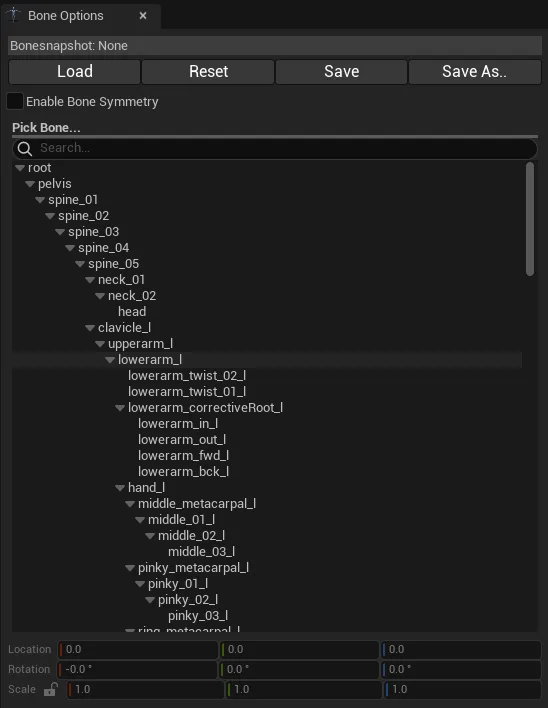
Bone Editor allows Undo/Redo actions by using Ctrl+Z and Ctrl+Y
Bone editor supports Bone Symmetry and can be enabled by enabling the Symmetry Checkbox
Bonesnapshots are another important component of Bone Editor and users are allowed to Load and Save Bonesnapshots that will hold the skeleton transformation.
There are several visual settings for Bone Editor that can be accessed by navigating to Edit->Settings.
| bDrawBones | Whether to draw bone indicators in the Target and Source Viewports |
| bDrawFullBones | Whether to draw bone indicators from start to end in the Target and Source Viewports |
| BoneIndicatorSize | The bone drawing indicator size |
| bScaleBoneIndicatorToBoneSize | Whether to scale the bone indicator relative to the bone size |
| DeselectedBoneColor | The color of the bone indicators when they're unselected |
| SelectedBoneColor | The color of the bone indocators when they're selected |
Classic › Editor › Advanced Operations › Wrapper
Section Selection in the Wrapper allows users to select certain mesh sections in both Target and Source. The wrapping will proceed only for the selected mesh data.
In order to open Section Selection, users have to select it in Advanced Menu.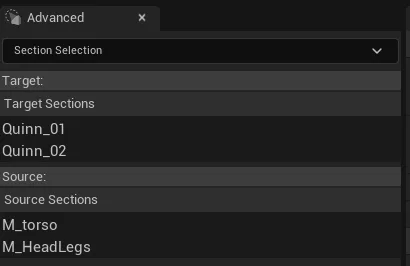
Users can select multiple sections or deselect.
Classic › Editor › Advanced Operations › Wrapper
Classic › Editor › Advanced Operations
Mesh Morpher allows users to bake Morph Targets on the Skeletal Mesh.
Mesh Morpher allows users to bake Morph Targets on the Skeletal Mesh.
Baking writes the Morph Target deltas to the Skeletal Mesh Import data(if available) or LOD Model data.
Baking is persistent and permanent.
There are two ways to Bake Morph Targets:

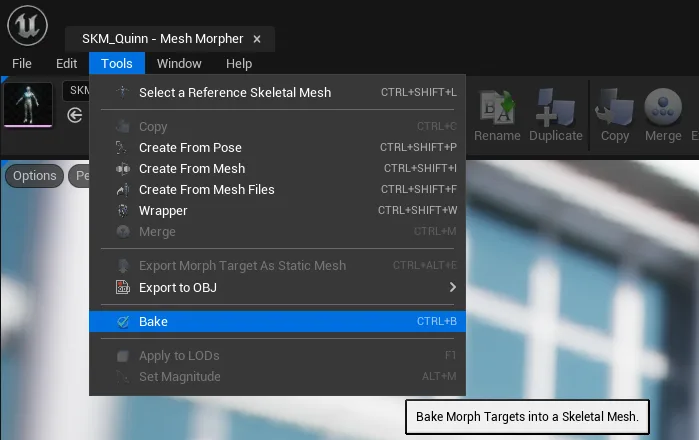
Once the Bake button is pressed, a dialog box will open where users can select which Morph Targets to Bake.
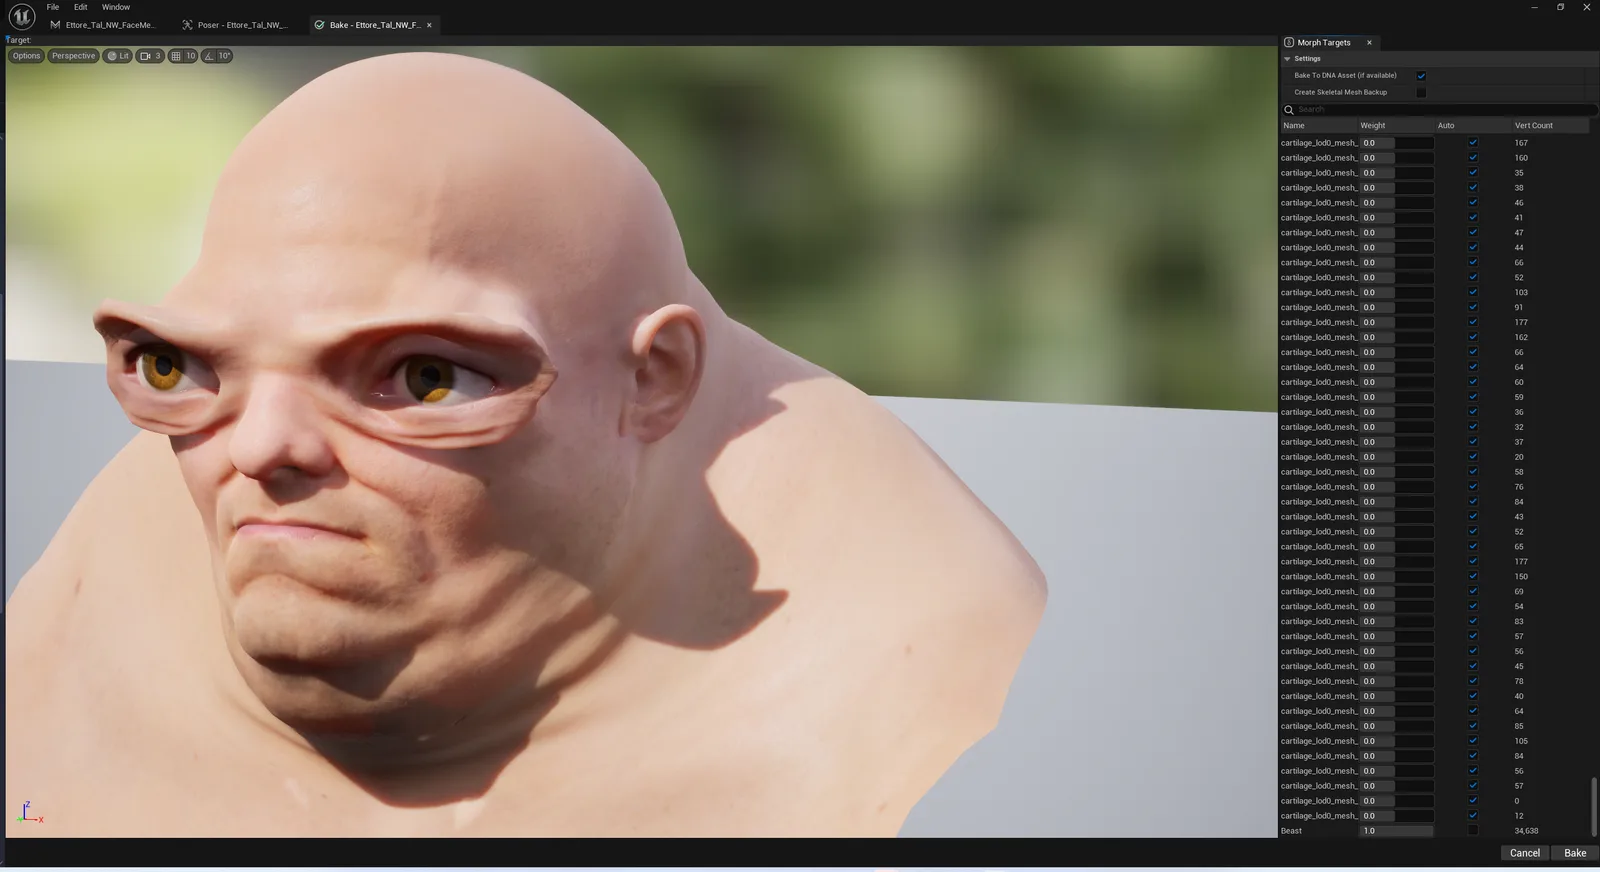
Mesh Morpher will attempt to bake the Morph Targets that have a weight different than 0.
After baking is completed the baked Morph Targets are removed from the Skeletal Mesh.
Users can select multiple Morph Targets with different weight from the list and in the preview viewport they can visualize how the final result will look like.
After the Morph Targets are baked. Mesh Morpher will also attempt to offset the existing Morph Targets in Import Data so they'll reflect the actual mesh.
Keyboard shortcut: Ctrl + B
The button is greyed out when there's no skeletal mesh loaded
Morph Target Baking is irreversible.
Classic › Editor › Advanced Operations
Recompute Normals allows users to recompute the Normals for a selection of skeletal meshes.
The Normals are computed in such way that there is no seam if multiple skeletal meshes are selected as the meshes are getting welded in the underlying algorithm and the normals are then projected back to the Skeletal Meshes.
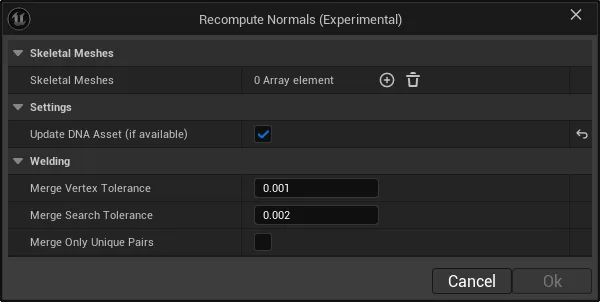
| Option | Description |
|---|---|
| Skeletal Meshes | Array of skeletal Meshes |
| Update DNA Asset | Bakes Normals to DNA Asset Mesh Data if available. This is intended for Meta Humans only. |
| Merge Vertex Tolerance | Edges are coincident if both pairs of endpoint vertices are closer than this distance |
| Merge Search Tolerance | Edges are considered as potentially the same if their midpoints are within this distance. Due to floating-point roundoff this should be larger than MergeVertexTolerance. |
| Merge Only Unique Pairs | Only merge unambiguous pairs that have unique duplicate-edge matches |
Classic › Editor › Advanced Operations
Mesh Morpher has the ability to stitch two morph targets between two meshes.
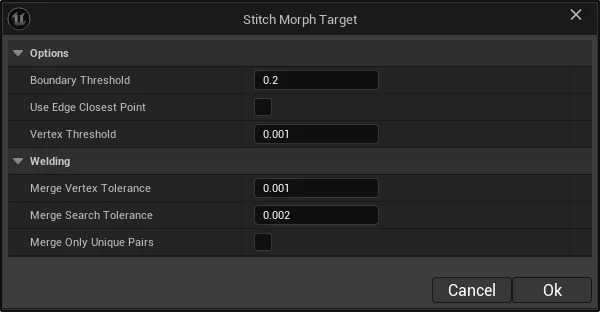
| Option | Description |
|---|---|
| Boundary Threshold | Distance Threshold at which the boundary vertices are coincident |
| Use Edge Closest Point | Whether the correspondent vertices are glued to the closest point on edges. |
| Vertex Threshold | The Maximum Threshold between the original position and the welded position |
| Merge Vertex Tolerance | Edges are coincident if both pairs of endpoint vertices are closer than this distance |
| Merge Search Tolerance | Edges are considered as potentially the same if their midpoints are within this distance. Due to floating-point roundoff this should be larger than MergeVertexTolerance. |
| Merge Only Unique Pairs | Only merge unambiguous pairs that have unique duplicate-edge matches |
Classic › Editor › Advanced Operations › Stitch
Classic › Editor › Advanced Operations
Classic › Editor › Advanced Operations
Classic › Editor › Advanced Operations
Classic › Editor › Advanced Operations
Classic › Editor
Classic › Editor › Exporter
With UE 5.1 the import pipeline has changed for meshes.
With UE 5.1 the import pipeline has changed for meshes.
In order to import the full body meta humans OBJs as FBX to use it for Wrapper follow these steps
Classic › Editor › Exporter
Classic › Editor › Exporter
Morph Targets can be exported to OBJ files from anywhere in Mesh Morpher where there is a Morph Target List
To do so select your Morph Targets and right click the list and select Export to OBJ File(s).
A new dialog window will open.
In this dialog window, users will be able to select a prefix and suffix for the OBJ files, append additional meshes and also weld the OBJ file.
Classic › Editor › Exporter
Classic › Editor › Exporter
Mesh Morpher supports Alembic export of Skeletal Meshes and Sequences.
Classic › Editor › Exporter
Classic › Editor › Exporter